Ever wanted to create an addon for Kodi – your very own piece of work to enjoy yourself or upload to help out other users looking for the same thing? Read on as we take you through a journey, starting with meeting the “Jen Template”, a nice tool for new addon developers.
Did you ever want to create an addon for Kodi containing the perfect set of playlists, streams, and data? We hope that our guide starts you off on the right foot towards completing this, even if you have no programming experience at all! This is possible through the use of the Jen Template for Kodi, which we will get to in a sec.
All Kodi addons are made in an open-source language called Python. You can download any Kodi addon and see the python code instantly. Kodi addons aren’t anything magical. Despite what some media companies want you to believe, addons don’t store any streams or host any files. Their job is to search the public internet and play whatever files are returned inside of the Kodi media player interface. Kodi addons simply type the queries in to Google rather than you doing it for yourself.
The Jen Template is a shell of a Kodi program with all of the complicated pieces of Python code worked out for you already. With a few basic configuration steps and the input of whatever streaming files you want to view in Kodi, you can turn the template into your very own Kodi addon. Best of all, the setup time is not all that long!
Grab a coffee, sit down, and read the guide below to create an addon for Kodi using the Jen Template:
How to Create an Addon For Kodi Part 1: The Jen Template
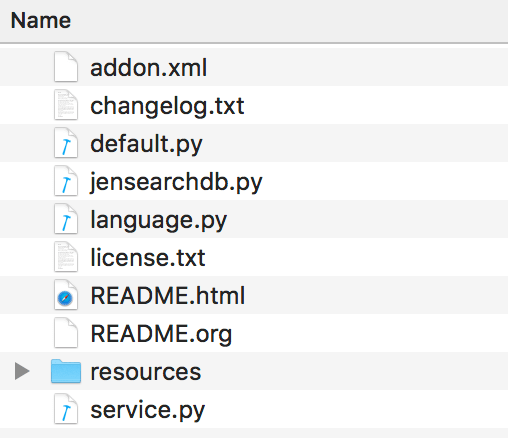
- Download the Jen Template by clicking here to go to its GitHub page. Click on the green Clone or Download button on the right side of the page and select Download ZIP and save the template files to your computer. You’ll want to unzip the files so that you have free access to the plugin.video.jen-master folder shown below.
- First off, head in to the folder and open addon.xml in your text editor of choice (Notepad++, Bracket, or TextEdit are three good programs). addon.xml contains all of the summary information and dependency details about your addon. The summary information is what you enter to make your addon unique. Dependencies are side components loaded with the addon so that you don’t have to do a bunch of coding yourself. A popular dependency is “URLResolver”, which can automatically resolve links from file hosting websites for you. Change all of the blue highlighted areas below to match your new addon’s information
addon id = replace ‘jen’ with the name of your addon WITH NO SPACES
name = Type out the full name of your addon WITH SPAXES
version = Version number of your addon (1.0 to start)
provider-name = Enter in your username
summary = A quick one line summary of your adddon.
description = A longer 2-3 line description of your addon. This is where you can put your social media information to follow you and any disclaimers as you see necessary.
website = your website address. This can be left blank as well.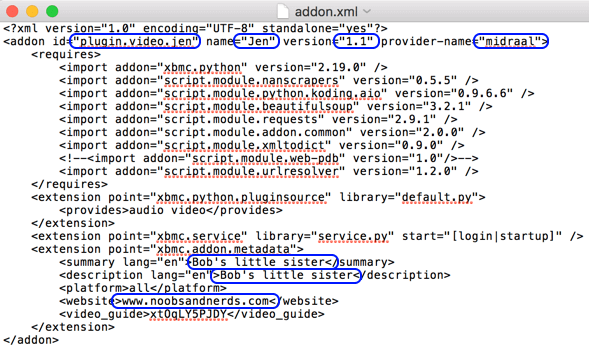
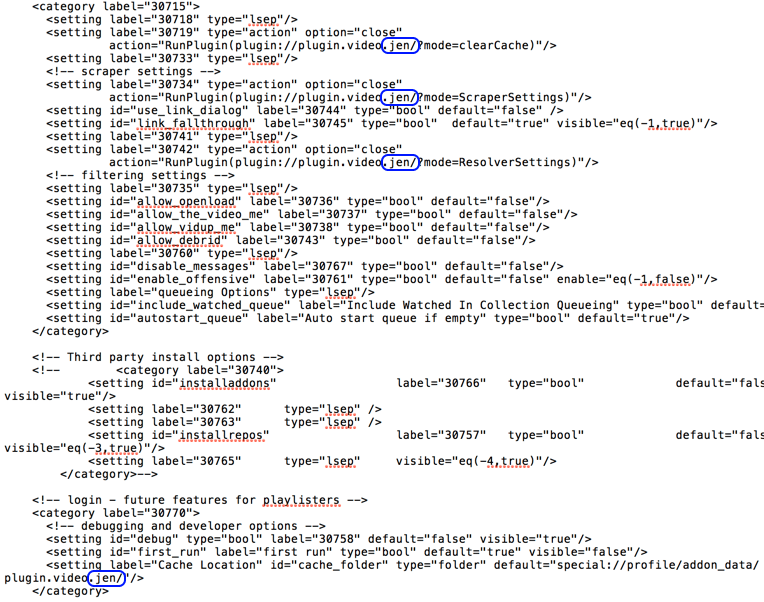
- Next, open up the settings.xml file, which can be found in the resources folder. Settings is the configuration file for your addon. After you create an addon and install it in Kodi, the settings page lets you configure the addon is special ways. Jen includes some configuration by default – clearing cache, changing scraper and resolver settings, and other settings you may find useful. Open up settings.xml and change the four cases of “jen” to the addonid you define above in step 2.
- Next, change the overall Jen Template folder name to match your addon id. This will ensure that you don’t overwrite any other jen template when you install the addon in Kodi. Rename the folder, replacing “jen-master” with your addon id used in steps 2 and 3 above.

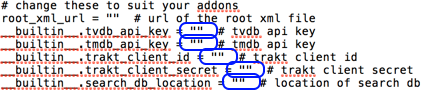
- Believe it or not, we are almost done! Next, we have to configure and enter in API Key Information for TVDB, TMDB and Trakt. TVDB, TMDB and Trakt are metadata providers. You ever notice how Kodi addons bring back all movie posters, trailers, plot, actor, year, genre, and other information for anything you watch? Those are grabbed automatically from these websites and all you have to do is create an API Key for both and enter it into your addon code.
Click here to create a TVDB API Key
Click here to create a TMDB API Key
Click here to create a Trakt API Key
After you have your API keys, open up the default.py file and enter them in between the brackets of the first four lines of code below.
Believe it or not, you could now install and run your Jen template Kodi addon. In the next part of our create an addon for Kodi guide, we’ll walk you through how to setup an XML file with links to video files that you’ll be able to stream in Kodi.
TIP: If you go to zip your addon folder and try to install it, make sure your zip file is in the format plugin.video.addonname-x.x.x.zip where addonname is the name you gave in your addon id in step 2 and x-x-x is the version of the addon you also gave in step 2.
While we polish that addon up, we encourage you to take a look at creating icon.png and fanart.jpg files for your Kodi addon.
Icon.PNG
This is an icon used to represent your add-on. It shows up when you hover over the addon in your video addons area and must meet the following criteria:
- The icon size must be 256×256 pixels or 512×512 pixels.
- File format is PNG.
- Background must be 100% solid. That doesn’t mean one color, it also can be a gradient or a low contrast texture. Just make sure there is no transparency.
- Keep text to a minimum. However, a text logo along with the graphical logo is recommended in order to easily recognize the addon.
- Don’t mix logos with Kodi’s logo; it’s obvious that we’re talking about Kodi here.
- Don’t add borders or any overlays.
- It is suggested that a logo on a plain background (non-transparent) is best in many situations (e.g. for addons that retrieve media from an online service, use that service’s logo as long as you are free to do so).
Fanart.jpg
This is a splash banner that appears in the background when you hover on or go to launch your addon. It should meet the following guidelines:
- It should be 16:9 aspect ratio
- It is intended for the background, so should be simple and without text where reasonable.
- We recommend a 1280×720 JPEG image and no larger than 1920×1080.
- We recommend keeping it as small as is reasonable with respect to file-size. Remember that hundreds of thousands of users are going to be downloading this.
Once you are completed, move your icon and fanart images into the addon folder.
After you get to this step, we recommend zipping your plugin.video.name folder back up and attempting to Install From Zip File in Kodi. If your Kodi addon install that’s great, you are ready to start providing it content. If you get an error during installation, you’ve made a mistake somewhere in the procedure above that must be fixed.
In the next part of how to create an addon for Kodi, we’ll walk you through how to create an XML file which will create the menu structure for your addon and links to streams you want to present. We’ll also be showing you how to put the addon in to your own repo and upload it for other Kodi users to download freely!
Let us know on Twitter or Facebook if we can help you out!
PROTECT YOURSELF ON THE INTERNET
Sign up for a premium Kodi VPN and access the internet unrestricted. We offer exclusive discounts for IPVanish and NordVPN, the highest respected VPNs in the Kodi community. Both of these VPNs have some great features for users:
Apps for Android, iOS, Mac, Linux & more
Zero Logs
Unlimited bandwidth
Tier 1 hardware (no speed slowdown)
Access to servers hundreds of VPN servers


Can you please tell me where part 2 is?
Question: After you have your API keys, enter them in between the brackets of the first four lines of code below.
What about the fifth line? Stuck on it.
I hope this does not start a wave of people making addons and uploading that here today and gone tomorrow. Great post though
Where’s the link for part 2?
Home-made add-ons! It had to happen – around Christmas too.
This looks like fun. Thanks for posting this.
🙂