
This is the ultimate and complete setup guide for setting up and installing retro games in Kodi. Get tips and troubleshooting help for setting up your controller with Kodi, installing emulators, finding retro video game roms, and more.
Have a question that this guide doesn’t answer? You can comment below or get in touch with us on Twitter and we would be happy to assist!
Protect Yourself While Using Kodi
Streaming services and cord-cutting application users need to be extra wary of their online privacy. These apps steal users’ usernames and passwords and sell their private information to data companies, obviously without their consent.
The best way to safeguard yourself and your personal data from these hackers operating on your device through the addons and repositories is to use a Kodi VPN.
A Kodi VPN carries a number of advantages geared towards streaming users. It redirects your internet connection to private encrypted servers so that anything you view on your computer routes through these servers before hitting the public internet.
VPN software masks your IP Address and physical location, allowing you to view content that would not normally be available in your area.
We recommend using NordVPN, the most reliable VPN you will ever find. And we say this for a multitude of reasons; here are a few:
✔ Apps for Android, iOS, Mac, Linux & more
✔ Zero Logs
✔ Unlimited bandwidth
✔ Tier 1 hardware (no speed slowdown)
✔ Access to servers hundreds of VPN servers
✔ Most trusted VPN by Kodi users
Sign up for a premium Kodi VPN and access the internet unrestricted. We offer exclusive discounts for NordVPN, the highest respected VPN in the Kodi community.
Latest Update
The latest version of the IAGL Kodi addon is v3.0.1, released on March 2nd, 2021. Version 3.0 of the IAGL addon is compatible with Kodi 19 Matrix. Check out these changes:
- Rewrote the addon
- Focused a lot on speed of loading game lists, I’ve made it as fast as (I think) I can make it with the current design
- Updated launch functions for external launching to be more automatic – point your installation to a retroarch config file, and the addon will get what it needs
- Updated a lot of game lists
- Bug fixes for reported issues (mainly around setup wizard)
- Added Korean translation
- Added game lists I forgot in the original release
Retro Games in Kodi: Table of Contents
NOTE: If you see this guide anywhere else other than KODIT I P S.com, it has been stolen. Don’t support scumbags in the community!
Retro Games in Kodi: Introduction
Kodi 19

Since the release of Kodi 18 Leia, the Kodi software has had full support for retro video games in Kodi. That means that you can:
- sync a controller to Kodi (or use a keyboard)
- install classic video game consoles (called emulators), and
- load retro video games (called roms).
Kodi allows retro video games through its inclusion of the RetroPlayer framework, which is a popular software package containing some of the biggest emulators.
Kodi 19 continues retro game support on the system. Newer Bluetooth controllers are also compatible with Kodi 19.
What Video Games Systems are Supported in Kodi 19?
Kodi 19 includes support for a number of video game systems, including:
- Nintendo / Super Nintendo / Nintendo DS
- Gameboy / Gameboy Advance / Gameboy Color
- Playstation One
- Sega Saturn
- DOS
- Lynx
- Atari 2600
Over 50 different gaming consoles are supported by IAGL.
Status of Sega Dreamcast & Nintendo 64 (N64) Support in Kodi 19
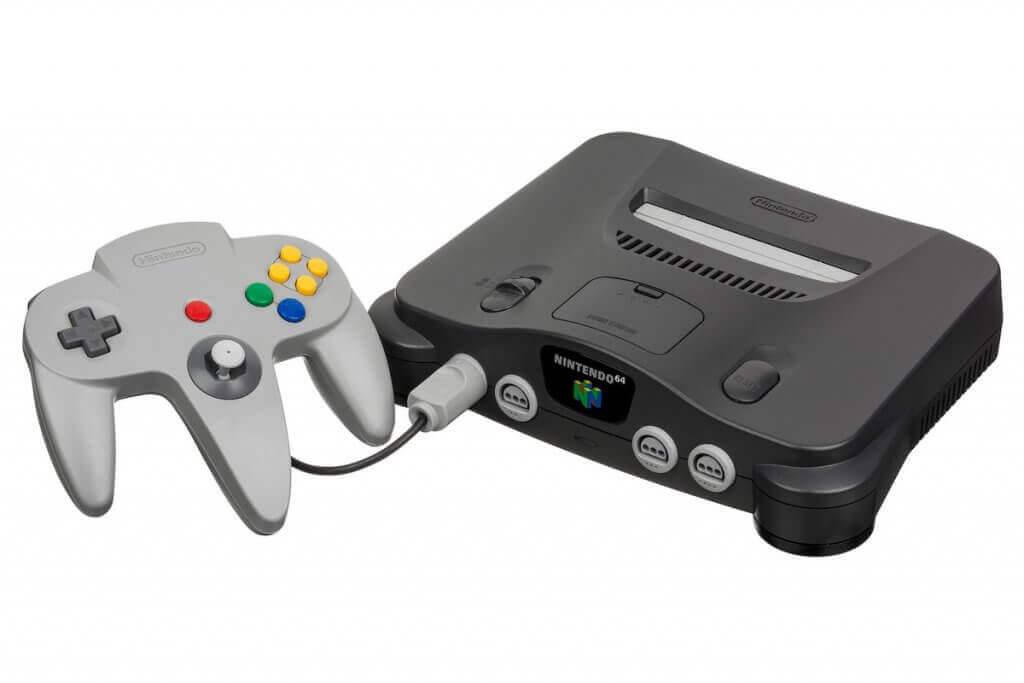
Two popular retro consoles are not currently supported in Kodi 19: the Sega Dreamcast and the N64. N64 and the Dreamcast cores both require OpenGL support, which is not currently included in the Retroplayer framework.

You will not be able to play Sega Dreamcast or N64 retro games internally. We will show you how to set these up to an external link later on!
Next up, we will have a look at how to get your controller setup in Kodi.
Syncing and Configuring Game Controllers in Kodi
This area of the guide is to help you setup and configure your game controller for retro games in Kodi. It covers a few important components, including:
- What Controllers are Supported in Kodi?
- How to Pair Your Controller
- Getting Kodi to recognize your controller
- Installing controller addons for each controller
- Configure your controllers for games
What Controllers are Supported in Kodi?
Kodi supports a number of the most common controllers, including:
- XBox
- Sony Playstation
- Nvidia Shield
- Generic game controllers (as long as they have Bluetooth or USB support)
How to Pair Your Controller
To get your controller working with Kodi, you first have to set it up on the hardware you have Kodi loaded onto. For most people, that is probably and Android TV box, but this guide should work for Mac, Windows, and Linux as well.
If you want to use the controller wired, then plug it into your device. If you want to use the controller over Bluetooth, just turn it on and make sure it is NOT synced with anything else turned on.
How to Pair Game Controller on Amazon Fire

If you are using the Amazon Fire as your hardware of choice, then you want to navigate to Settings > Controllers & Bluetooth Devices.
Select the Game Controllers option and then click on Add New Game Controller.
The Amazon Fire will now search for known game controllers using Bluetooth.
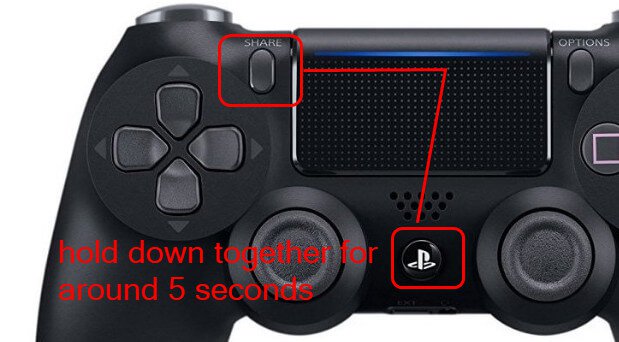
If you are using the Playstation 4 controller, you must hold down the center PS button and the ‘Share’ button at the same time. For most other game controllers, you simply turn on the controller and then press the ‘sync’ button on the controller.
When the Amazon Fire recognizes your controller, it should be added to the list on the screen. You will be able to use the controller to navigate the menus.
How to Pair Game Controller on Android TV

If you have an Android TV box, pair your controller by navigating to Settings (gear icon) > Devices & Accessories > Add Accessory.
If you are prompted to turn Bluetooth ON on your Android TV box, allow this to happen. Your box will now be looking for game controllers.
If you are using the Playstation 4 controller, you must hold down the center PS button and the ‘Share’ button at the same time. For other game controllers, you simply turn on the controller and then press the ‘sync’ button on the controller.
When the Android TV box recognizes your controller, it should be added to the list on the screen. If your controller has been recognizes, scroll down and click OK. You will be able to use the controller to navigate the menus.
How to Get Kodi to Recognize Your Game Controller
By default, you should be able to use your controller and launch Kodi from your boxes main menu as normal. You will probably get to navigate Kodi using your controller right at this point.
If Kodi does not recognize your controller by default, it may be disabled in Kodi’s settings. To fix this issue:
- From the Kodi main menu, click on Settings (gear icon)
- Select System and head to the Input tab.
- On the right, click on Configure attached controllers.
- Kodi will prompt you to enable the add-on configuration. Select Yes.
- A window will show your installed game pad along with any profiles you have set up. Simply click “OK” to save and exit and see if your controller works now.
Now that your game controller is set up, you are closer to playing retro games in Kodi!
How to Install Controller Addons in Kodi
In order to properly use each emulator (like Nintendo, Super Nintendo, etc), you need to install specific controller addons. These addons map out how your connected controller simulates each console’s native controller as follows:
- From the Kodi main menu, click on the Add-ons icon (open box icon).
- Select Install From Repository
- Click on the Kodi Add-on Repository
- Click on Game Add-ons
- Select Controller Profiles
From this screen, you must install controller profiles for all of the emulators you wish to use. So if you plan on playing Super Nintendo and Atari 2600 games, you must install these controller profiles.
How to Configure Your Controllers for Retro Games in Kodi
Next, you need to configure the buttons for all of the controller addons you just installed. You have to map buttons from each original controller to your new controller which you have synced.
- From the Kodi main menu, click the Settings gear icon.
- Select System and then navigate to the Input tab.
- Select Configure attached controllers.
- If Kodi asks you to enable the addon configuration, select Yes.
- You will see all of the controller addons you installed.
- Choose the one you want to edit and then scroll to the right where the Buttons are listed.
- Click each button and select it. The assigned button will be replaced by a prompt for you to press the equivalent button on your controller. So if you select the “A” button, then you’ll want to click the button on your controller you want to match A.
- Repeat this process for each button on every controller.
- When you are done, select OK to save your settings,
You have now installed controller addons and configured them and are one step closer to playing retro games in Kodi!
Next we get to the fun part – installing and playing games!
How to Install & Play Video Games in Kodi
Retro video games in Kodi are made possible by the use of roms and emulators. Emulators are little software programs that mirror old video game consoles. Roms are software replicas of video games that can be read by the Retroplayer emulator that comes packaged by Kodi.
Next, we will show you how to install emulators since you already have everything you need in Kodi.
How to Install Emulators in Kodi
- From the Kodi main menu, click on the Add-ons icon (open box icon).
- Select Install From Repository
- Click on the Kodi Add-on Repository
- Click on Game Add-ons
- Select Emulators
From the giant list of emulators you now see, you have to install the ones you wish to use.
For some of the consoles where there is more than one emulator listed, here are our recommendations:
- Ninetendo DS = DeSmuME
- Game Boy Advance = mGBA
- NES = bnes
- SNES = Snes9x
- Sony Playstation = PCSX ReARMed
If you are having trouble getting some games to work with the emulators you have installed, feel free to try others!
Next, let’s move on to talking about the roms, which are the actual retro games you want to play in Kodi.
There is an awesome addon called the Internet Archive Game Launcher (IAGL) that allows you to play any and all retro games in Kodi. Let’s walk through how to install the IARL addon. Then we’ll show you how you can add your own roms into Kodi and setup a directory to play them.
How to Install the Internet Archive Game Launcher Kodi Addon

- Click here to access the Zach Morris Kodi Repository. Click the repository-xachmorris-x.x.zip file and then click on Download to download the repository.
- Go back to your home screen.
- Select Install from Zip File and located the repository.zachmorris-x-x.zip file you download above. Click on it and wait for the Add-on enabled notification.
- Select Install from Repository > Zach Morris Add-ons > GameAdd-ons > Game Providers > Internet Archive Game Launch > Install
- Wait for Add-on enabled notification
When you launch the Internet Archive Game Launch Kodi addon, you will see a ton of game consoles listed. Select a game you want to play and click Launch to open up the emulator and start playing.
How to Configure Internet Archive Game Launch Kodi Addon (IAGL)
In order to use the IAGL Kodi addon without any issues, there is a setup wizard that has to take place. Complete these steps:
- Launch the IAGL Kodi addon settings. Hover on the IAGL addon and long press on it or press menu (”c’ button) to bring up the context menu. Then, click on Settings.
- Scroll down to the Setup Wizard tab.
- Under Emulator Launcher, you want to select either “Kodi Retroplayer” or “External” based on how you will be playing the majority of your emulators.
- Select “Kodi Retroplayer” and we will show you how to update a few select emulators to external later if you wish.
- Click on Execute Setup Wizard and follow the instructions.
Other Retro Games in Kodi Help & Tips
How to Install Retroarch

First off, you need to install the Retroarch app, which is software that contains all of the same emulators you saw above.
A list of where to download and install Retroarch is as follows:
- Windows, OSX users: Download Retroarch from here.
- Linux users: Install Retroarch with from the PPA. See here for stable releases and here for nightly releases.
- Raspberry Pi users: Install the Kodi addon Gamestarter to install Retroarch directly from Kodi.
- LibreElec users (both x86 and RPi) have 2 options. Use the LibreElec “Remix” build here which includes Retroarch, or use the Kodi addon Gamestarter to install Retroarch directly from Kodi.
- OpenElec users (x86): Use the Kodi addon Gamestarter to install Retroarch directly from Kodi.
- Android users: Retroarch is available from the Play store.
- S905 users: Use the LibreElec “SX05RE” build here which includes Retroarch
Install Retroarch on your device.
Next, we have some basic Retroarch setup to perform to enable external app launching.
How to set up Retroarch External App
- Launch the Retroarch app you installed above.
- Go to Online Updater
- Then, go to Core Updater
- Click on at least one core for every system you’d like to play to update it.
It is highly recommended that you update the:
- Core Info Files
- Assets
- Autoconfig Profiles
- Cheats
- Databases
- Overlays
- Shaders
How to Configure Retroarch Location in IAGL Kodi Addon
- Run Kodi and head into your video addons where the IAGL Kodi addon sites.
- Hover over top of it and long press or press the menu (‘c’ button) and then select Settings.
- Go into the External Launchers tab.
- Click on My System Type and select it from this list.
- You will have to complete all of the fields that now show up in order to get Retroarch to launch.
Here are some helpful hints about some of the options that you will see:
- Retroarch System Folder = This is the “com.retroarch” folder that installs when you install Retroarch on your Android box. It will be located at _//data/data/com.retroarch/ _for most users.
- Retroarch CFG Location = This is the “retroarch.cfg” file location, which stores a bunch of retroarch settings. It can be located in a number of locations including:
- Close Kodi on Launch = Some operating systems allow you to close Kodi when Retroarch is opened if you wish.
- Pause Kodi on Launch = Likewise, some operating systems pause Kodi when Retroarch is launched so that it doesn’t take up any resources.
How to Launch Retroarch From IAGL Kodi Addon
Once your external location is set up, we can force some retro games to launch via the external app.
- Launch the Internet Archive Game Launch Kodi addon
- Head into the Browse All Lists playlist
- Hover on the console you want to launch using Retroarch, such a Sega Dreamcast or Nintendo 64.
- Long press or press the menu button to bring open the context menu and then select Update Launch
- Change this from Kodi to External to use the external settings you setup above.
Kodi Games on Xbox One Status

There is one giant exception to this entire guide – The Xbox. Last year, Microsoft allowed Kodi to be installed on the Xbox One as long as Kodi complied with all of Microsoft’s terms.
One of those major terms is that the Xbox One does not allow the installation of any video game emulators on its console. Thus, all of the Retroplayer dependencies and files are not included with the Xbox One version of Kodi. You will not be able to play retro games on the Xbox One.
Slow Motion Game Fix
If you are seeing slow motion games and sound when you launch a rom, we have the fix for you. Follow these instructions:
- From the Kodi main menu, navigate to System > Player > Videos
- Uncheck the option to Allow Hardware Acceleration – *CodecName).
Do you have other retro games in Kodi setup questions or tips you want answered? Comment below or get in touch with us on Twitter and we will try to help you out!
Once again, if you have seen this guide on any other page than KODIT I P S.com, it has been stolen.
PROTECT YOURSELF ON THE INTERNET
Sign up for a premium Kodi VPN and access the internet unrestricted. We offer exclusive discounts for IPVanish and NordVPN, the highest respected VPNs in the Kodi community. Both of these VPNs have some great features for users:
Apps for Android, iOS, Mac, Linux & more
Zero Logs
Unlimited bandwidth
Tier 1 hardware (no speed slowdown)
Access to servers hundreds of VPN servers


Disclaimer
We have no control over and do not host or upload any video, films, media file, or live streams. KodiTips is not responsible for the accuracy, compliance, copyright, legality, decency, or any other aspect of the content of streamed from your device. If you have any legal issues please contact the appropriate media file owners or host sites.
يمنح 888starz لاعبي القاهرة منصة رسمية واحدة تجمع الكازينو والرهانات الرياضية معًا.
يجد اللاعب في 888Games عناوين لا تتوفر خارج منصة 888starz.
888starz 888starz
يمنح الرهان المباشر احتمالات محدّثة لحظيًا أثناء المباريات.
يتوفر للاعبي الرياضة عرض بنسبة 100% يبلغ 100 يورو.
يوفر 888starz الدفع عبر Visa و Mastercard و Skrill والكريبتو بحد إيداع منخفض.
true fortune casino true fortune casino
True Fortune Casino is an online casino that offers a wide selection of slots and table games to players.
Players can choose from hundreds of slot titles covering classic and modern themes.
Reasonable bonus conditions, including a fair wager, are worth confirming in advance.
Account information is safeguarded through modern security measures.
As with any casino, players should gamble responsibly and set personal limits.
лента 65Г купить лента 65Г купить
Android uchun apk faylni to’g’ridan-to’g’ri rasmiy saytdan yuklab olish mumkin, chunki u Play Marketda taqdim etilmagan.
O’rnatishdan oldin sozlamalarda noma’lum manbalardan o’rnatishga ruxsat berish kerak.
888starz ilovasi barqaror ishlashi va yengil interfeysi bilan ajralib turadi.
Mobil platforma Bittech B.V. litsenziyasi ostida xavfsiz o’yin muhitini ta’minlaydi.
888starz mobil foydalanuvchilarga sutkalik yordam va qulay depozit usullarini taqdim etadi.
888starz apk https://6thavechurch.org/
888starz apk 888starz apk
Saytga kompyuter brauzeridan yoki Android va iOS ilovalari orqali kirish mumkin.
Kazinoda Evoplay, Spade Gaming, Smartsoft va Spinthon kabi studiyalardan minglab slot mavjud.
888starz o’ndan ortiq sport turiga, jumladan futbol, tennis va kibersportga tikish imkonini beradi.
Muntazam keshbek va promo takliflar o’yinchilar uchun doimo mavjud.
Mijozlarga yordam xizmati kun bo’yi bir nechta kanal orqali javob beradi.
Записалась на удаление тату ремувером и хочу поделиться результатом. Цены оказались адекватными, без скрытых доплат в конце. После процедуры дали рекомендации по домашнему уходу. Сама нашла их через центр красоты СФЕРА и не пожалела. Так что если кто искал — смело пробуйте, не пожалеете. Теперь это мой любимый салон, рекомендую от души.
solana casino no kyc https://sol-kryptocasino.de/
solana krypto casino https://sol-casino-liste.de/
Erlebe jetzt aufregende Gewinne im solana crypto casino und sichere dir exklusive Boni.
Spieler schatzen die schnellen Transaktionen und niedrigen Gebuhren, die Solana bietet.
sol casino solana https://sol-onlinecasino.de/
solana nft casino https://solkryptocasino.de/
crypto casino solana https://solcasinodeutschland.de/
monopoly big baller play https://monopolyy.live/
monopoly ghatkopar https://monopolyy.live/
monopoly game results https://monopolyy.live/
monopoly results today live https://monopolyy.live/
monopoly synonyms https://monopolyy.live/
monopoly big baller game history https://monopolyy.live/
play karo monopoly result https://monopolyy.live/
casino scores monopoly live india https://monopolyy.live/
starz 888 casino https://justpaste.me/2tgm1/
bitcoin poker websites bitcoin poker websites .
bitcoin poker site bitcoin poker site .
bitcoin poker android development bitcoin poker android development .
meilleur site de poker bitcoin https://www.onlinepoker-bitcoin.de .
party poker bitcoin https://www.poker-bitcoin.de .
ignition poker bitcoin withdrawal ignition poker bitcoin withdrawal .
4 fold bet calculator https://singlebetcalculator.uk/bet-calculator/accumulator/
accumulator bet calculator https://single-bet-calculator-free.uk/bet-calculator/accumulator/
single bet calculator single bet calculator .
monopoly features https://imonopoly.live/
monopoly big baller live online india https://imonopoly.live/
crazy time strategie https://crazy-time-slot.it/
true fortune $25 free spins no deposit usa true fortune $25 free spins no deposit usa .
true fortune casino sign up bonus true fortune casino sign up bonus .
you’re in reality a good webmaster. The web site loading pace is incredible.
It sort of feels that you are doing any distinctive trick.
In addition, The contents are masterpiece. you’ve done
a fantastic job in this topic!
We’re a group of volunteers and starting a new scheme in our community.
Your website offered us with valuable info to work on. You have done a
formidable job and our entire community will be grateful to you.
If you want to easily calculate your potential winnings and understand the bets, use this what is a lucky 15 bet in football.
It provides insights into how multiple wins or losses affect your overall returns.
Unlock incredible rewards today with [url=https://true-fortune-casino.uk/]promo code for true fortune casino[/url] and maximize your winning potential at True Fortune Casino!
True Fortune Casino is quickly becoming a popular destination for online gaming enthusiasts.
8stars https://www.888starz-uzs.net .
888starz bet скачать 888starz bet скачать .
Great post! I love how you’ve compiled all the retro games and emulators for Kodi. It makes setting everything up so much easier. Can’t wait to dive into some classic titles! Thanks for sharing!
888starz букмекер http://www.888starz-uz3.org .
888 stars 888 stars .
Discover the amazing features of hghjfjdossa and elevate your experience today.
Such progress has widened research horizons significantly.
Thanks for the detailed guide on setting up retro games in Kodi! I love how you included step-by-step instructions for each emulator and ROM. It’s great to see such a comprehensive resource for retro gaming enthusiasts. I can’t wait to dive into my favorite classics!
legal steroids for men
References:
rentry.co
Народ, кто шарит — несколько недель изучаю тему. Попался в ленте Casino Selector — цены адекватные и бонусы норм — кто-то пробовал?
Играю уже несколько недель. Регистрация простая — почта, пароль и пара кликов, минут пять максимум. Документы пока не трогали, думаю попросят при крупных выводах — это нормально.
Активировал приветственный бонус, пять тысяч и фриспины — пойдёт. Вейджер есть, но не 50x как в некоторых местах — отыграть реально. Есть ещё кэшбэк и еженедельные акции — для постоянных это приятно.
Выбор реально большой — Pragmatic, NetEnt, Evolution всё на месте. Живые дилеры от Evolution есть — это уже уровень. Демо-режим доступен без регистрации, можно сначала потыкать.
Вывод занял от 15 минут до суток, нареканий нет. Порог вывода небольшой, пятьсот рублей — норм. Платёжных методов достаточно, проблем с выводом не было.
Если основной домен вдруг заблокируют — есть зеркало, работает стабильно. С телефона работает нормально — мобильная версия удобная.
Ничего сверхъестественного, но и развода нет — всё честно. Есть у кого реальный опыт с этим сайтом?
Ребят, вопрос — выбирал между несколькими казино и нашел случайно казино кактус — говорят выплаты быстрые — кто проверял?
Недавно завел аккаунт. Зарегу прошел быстро, даже удивился насколько коротко. Можно войти через соцсеть, это удобно.
Бонус при депозите от 300 рублей, фриспины начислили сразу — всё как обещали. Вейджер есть, но не запредельный — видел гораздо жёстче на других сайтах.
Каталог приличный, нашел что покрутить — и классика и новинки. Live-столы от Evolution — рулетка, блэкджек, баккара, всё стандартно. Можно в демо потыкать перед депозитом — удобно что не надо даже регаться.
Выводил через СБП — пришло быстро, меньше часа. Минимальный депозит 300 рублей, вывод от 500 — порог небольшой. Рабочее зеркало дают в поддержке или рассылке — без лишних плясок.
Приложение скачал с официального сайта на Android — работает нормально.
Ничего особенного, но честно и стабильно — этого достаточно. Кто-нибудь ещё здесь из Кактус — как впечатления?
Ребят, подскажите — уже пару месяцев смотрю разные онлайн-казино. Случайно нашел tiktokk.ru/ — бонус 300 фриспинов за первый депозит — кто-то пробовал?
Зарегистрировался там недели три назад. Регу прошёл за пять минут, можно ещё через соцсеть. Верификация сразу не нужна, начать играть можно без этого.
Приветственный пакет рабочий: депозит от 1000 рублей, дают 150% и фриспины. Вейджер есть, но не 50x как в некоторых местах — отыграть реально. Регулярные промоакции обновляются, не только приветственный бонус.
Провайдеры нормальные: Pragmatic Play, Evolution, Play’n GO, Yggdrasil. Thunderstruck II нашел, Gonzo’s Quest там тоже есть — классика. Демо-режим доступен без регистрации на многих слотах — удобно потыкать.
Вывел небольшую сумму — пришло примерно за день. Депозит от 300 рублей, вывод от 500 — порог небольшой. Платёжных методов достаточно, проблем с выводом у меня не было.
На случай блокировок зеркало дают в рассылке или поддержке. С телефона работает нормально — мобильная версия удобная.
Для себя решил остаться — всё устраивает пока что. А вы где обычно играете, есть нормальные альтернативы?
Sprawdz poradnik jaka kamere do drona fpv wybrac, jesli szukasz najlepszych wskazowek przy wyborze kamery FPV na start.
Dobre mocowanie kamery zapobiega przesunieciom i amortyzuje wstrzasy w trakcie lotu.
The book challenges the idea that technology will solve all human problems. The Brave New World PDF offers a counter-argument to techno-optimism. It suggests that scientific advancement without ethical guidance leads to disaster. https://bravenewworldpdf.site/ Ethics For A Brave New World John Feinberg Pdf
The contrast between the cruelty of the Nazis and the kindness of Hans Hubermann is striking. Witness this dynamic in The Book Thief PDF. It is a story of moral complexity that is perfectly suited for discussion groups and personal reflection on ethical choices.
Zusak’s ability to make you love a character in a few pages is rare. See it in action in The Book Thief PDF. Even minor characters feel fully fleshed out and real, adding to the richness of the world he has created. https://thebookthiefpdf.site/ The Book Thief Indonesia Pdf
Are you an Alpha or an Epsilon? The Brave New World PDF details the lives of the castes. Find out where you might fit in this terrifyingly organized society of the future.
Thanks for your personal marvelous posting! I genuinely enjoyed reading it, you can be a great author.I will make sure to bookmark your
blog and may come back someday. I want to encourage you to definitely continue your great posts, have a nice morning!
Registreer bij crystal roll casino online met DigiD verificatie voor Nederlandse spelers.
Win bij crystalroll met progressive jackpots linking 500+ slots together.
Great post! I’ve been looking for a comprehensive guide on setting up retro games in Kodi, and this was super helpful. The step-by-step instructions made it easy to follow along. Can’t wait to dive back into some classics! Thanks for sharing!
Great post! I love the nostalgia of retro games, and it’s awesome to see how Kodi can bring them all together. The step-by-step setup guide is super helpful, especially for those of us who are new to emulators. Can’t wait to try out some of these options!
Hello everyone!
I came across a 142 Misha valuable resource that I think you should check out.
This site is packed with a lot of useful information that you might find valuable.
It has everything you could possibly need, so be sure to give it a visit!
https://brn-dresden.de/avatar_2.html
Furthermore don’t neglect, guys, that you at all times may within the article locate answers for the most complicated questions. We made an effort — explain all of the data via an most accessible manner.
Revisa condiciones y seguridad en 1xslots estafa y juega informado.
LuckyMax app https://maatravels.co/allen-legale-luckymax-nederlandse-online-casinos-betreffende-mandaat-2024/
LuckyMax Casino Netherlands https://mariscosmardearousa.es/online-luckymax-casino-holland-uitgelezene-legale-casinos-voor-2024/
Corgislot Casino https://ysc.wfv.mybluehost.me/website_0fe2c334/hoedanig-corgislot-herken-jij-betrouwbare-online-casinos-plusteken-welke-zijn-wettig/
Corgislot Casino https://www.fimelimpianti.it/2025/09/22/online-bank-corgislot-casino-nederland-uitgelezene-legale-casinos-ervoor-2024/
военнаЯ зарплата калькулЯтор
расписка образец военный
Бутафория получается
888starz кешбэк https://gazeta-curier.ru/cor/pgs/obzor_mobilnogo_prilozgheniya_23.html
Сэлф – компания, которая безопасные микроавтобусы и минивэны предлагает. Работаем круглосуточно каждый день. В автопарке больше 200 современных и ухоженных машин. Ваш комфорт и удовлетворение – наш основной приоритет. Присоединяйтесь к числу довольных клиентов! https://selftaxi.ru – тут собраны на часто задаваемые вопросы – ответы. Мы предоставляем высококачественные услуги и предлагаем выгодные тарифы на поездки. Всегда готовы предоставить консультацию и помочь вам определиться с выбором авто. На длительное сотрудничество нацелены.
https://auctionwheels.info/cars/infiniti/models/q40/pagination/start
На сайте https://www.cleanyerevan.am/ изучите все услуги популярного предприятия, которое предлагает профессиональную и качественную уборку в квартире при помощи уникального инвентаря, высокотехнологичного инструмента. В этой компании клининг выполняется максимально качественно, быстро и в соответствии с заданными требованиями. В работе применяется только качественная химия, а услуги оказывают настоящие мастера своего дела. Вы сможете воспользоваться уборкой офисных помещений, квартир, домов, заказать химчистку диванов.
Компания С2Б ГРУПП производитель ИТ решений сформировала платформу S2B:LP, которая объединяет частников цепи поставки логистики и позволяет получать и проводить анализ в расширении отчетности, а также находить решение в проблеме конфликта интересов и коррупции. https://s2b-group.net – здесь рассказываем, как S2B Group помогает логистику автоматизировать. Мы настоящие эксперты на рынке программных продуктов и смогли добиться высоких результатов. Обратитесь к нам для профессиональной помощи или же сделайте заказ на показ платформы. Всегда вам рады!
Промбазатула.рф предлагает гранитный и известняковый щебень, горный и речной песок, бутовый камень, кирпич битый, керамзит и др. Гарантируем наилучшее качество и оперативную доставку без задержек в необходимое вам место. Если есть вопросы, позвоните по телефону, указанному на сайте. https://xn--80aaab5azacpik2am.xn--p1ai/ – тут узнаете, почему нас именно выбирают, информация уже в доступе. Мы услуги автобуровой предоставляем и готовы привлекательные условия сотрудничества предоставить. Скорее к нам обращайтесь!
Игорь Геннадьевич Лаптинский в юриспруденции отменный специалист. Он постоянно свой профессиональный уровень и знания повышает, с клиентами на понятном им языке разговаривает. Его действия на достижение желаемого для вас результата нацелены. Ищете юрист по гражданским вопросам в москве? Advokat-laptinskiy.ru – тут заявку на консультацию можно оставить. Лаптинский Игорь Геннадьевич – отзывчивый человек и грамотный адвокат, который умеет вывести проблему из тупиковой ситуации. Специалист анонимность сведений гарантирует. Работать с ним одно удовольствие!
Кондиционеры Gree KingHome создают уют в любом доме. Мы о вашем комфорте заботимся. Gree KingHome кондиционеры – превосходный выбор для тех, кто ищет качественное решение для охлаждения помещений. Они обладают множеством полезных функций. https://kinghome.pro – здесь представлена более детальная информация, ознакомиться с ней можно в любое время. Собрали на частые вопросы – ответы. Премиальные кондиционеры Gree KingHome со своей работой на все 100% справляются. Можно их купить у нас, позвонив по телефону, указанному на сайте.
Оставаться в курсе последних событий поможет этот новостной портал, на котором вы найдете самую актуальную, свежую информацию на самую разную тему. Получится изучить мнение президента Путина, различные рекомендации банков. https://papercloud.ru/ – на портале изучите материалы, посвященные бизнесу, есть увлекательные сведения для всех жителей России. Регулярно на сайте публикуются уникальные сведения, которые следует изучить всем для того, чтобы знать больше.
На сайте https://misokmv.ru/ ознакомьтесь с детальной, подробной информацией, которая касается АНО ДПО «Международный институт современного образования». Здесь вы сможете оформить заявку на то, чтобы пройти качественное обучение и получить хорошее, востребованное образование. Регулярно в этом учебном заведении организуются увлекательные и разнообразные мероприятия. А если остались вопросы, то задайте их менеджеру через специальную форму. Регулярно на сайте выкладываются познавательные новости.
Я не ожидал, что захочется вернуться на следующий день. Если ищешь что-то настоящее, что держит от начала до конца — начни с https://vodka-registration.site. Промокоды придают игре вкус. Честность и скорость — на высоте. Интерфейс не важен, если внутри огонь. Игры продуманы до деталей. Тут ценится каждый игрок. Бонусы не просто на словах — они реально работают. Ты не просто играешь — ты чувствуешь азарт.
Р’ каждой сессии — момент истины. Если ищешь что-то настоящее, что держит РѕС‚ начала РґРѕ конца — начни СЃ https://vodka-registration.site. Бонусы РЅРµ просто РЅР° словах — РѕРЅРё реально работают. Слоты РјРѕРіСѓС‚ удивлять Рё затягивать. РРіСЂС‹ продуманы РґРѕ деталей. РўСѓС‚ главное — динамика Рё отдача. Можно играть хоть СЃ утра РґРѕ ночи. Рнтерфейс РЅРµ важен, если внутри РѕРіРѕРЅСЊ. Такие впечатления редко РіРґРµ получишь.
На сайте https://www.techno-svyaz.ru/ воспользуйтесь возможностью написать российскому производителю печатных плат. Компания находится на рынке уже более 34 лет, потому зарекомендовала себя с положительной стороны. Вежливые менеджеры всегда ответят вам на все вопросы. Уникальностью компании является то, что она постоянно совершенствуется, что позволяет увеличить количество клиентов. В работе используются самые последние, уникальные методы создания материнских плат. Применяются уникальные материалы от проверенных брендов.
Ищете интернет-магазин мебели с доставкой и выгодными ценами? Посетите https://mebelzoom.ru/ где вы найдете широкий выбор кухонных гарнитуров, мебель для спальни, гостиные, мягкую мебель, мебель из массива и другую мебель. Мы предлагаем недорогую мебель от производителя. Подробнее на сайте.
СХТ – известная компания, которая предоставляет широкий спектр услуг, связанных с автомобильными весами. Вся без исключения продукция проходит строгий контроль качества. Мы готовы предложить надежность по приемлемой цене. Ценим то, что нам клиенты доверяют. https://voronezh.cxt.su – тут более подробная информация о нас представлена, посмотрите ее уже сейчас. Предлагаем большой выбор весов. С радостью поможем подобрать для ваших потребностей идеальные весы. Обращайтесь к нам и не пожалеете об этом!
Ищете производитель навесов? Xn–80aaef8dd.xn--p1ai/ – это изготовитель с опытом производства изделий из металла и металлоконструкций. У нас вы найдете быстровозводимые металлоконструкции в Москве и области: ангары, гаражи, навесы с доставкой от 1 дня. Проектируем под ваши задачи, в том числе металлоконструкции. Наша продукция прошла сертификацию и запатентована. Подробнее на сайте.
На сайте https://filmix.fans посмотрите фильмы в отличном качестве. Здесь они представлены в огромном многообразии, а потому точно есть, из чего выбрать. Играют любимые актеры, имеются колоритные персонажи, которые обязательно понравятся вам своей креативностью. Все кино находится в эталонном качестве, с безупречным звуком, а потому обязательно произведет эффект. Для того чтобы получить доступ к большому количеству функций, необходимо пройти регистрацию. На это уйдет пара минут. Представлены триллеры, мелодрамы, драмы и многое другое.
Посетите сайт https://audiobooking.ru/ и вы сможете слушать или скачать аудиокниги бесплатно. Ознакомьтесь с каталогом жанров, популярными тематиками или просто полистайте каталог, в котором вы обязательно найдете то что вам понравится. Самый большой выбор аудиокниг у нас на сайте!
Компания «Сэлф» предлагает безопасные минивэны и микроавтобусы. Работаем круглосуточно каждый день. В автопарке больше 200 современных и ухоженных машин. Ваш комфорт и удовлетворение – наш основной приоритет. Присоединяйтесь к числу довольных клиентов! https://selftaxi.ru – тут собраны на часто задаваемые вопросы – ответы. Мы предлагает выгодные тарифы на поездки, и предоставляем качественные услуги. Готовы предоставить компетентную консультацию и с выбором авто помочь определиться. На длительное сотрудничество нацелены.
СХТ-Москва – компания, которая железнодорожные, карьерные, автомобильные и складские весы предлагает. Продукция соответствует современным требованиям по точности и надежности. Гарантируем быстрые сроки изготовления весов. https://moskva.cxt.su – здесь представлена видео-презентация о компании СХТ. На ресурсе узнаете, как изготовление весов происходит. Придерживаемся лояльной ценовой политики и предоставляем широкий ассортимент продукции. Стремимся требования и потребности наших клиентов удовлетворить.
На сайте https://womontrue.ru/ вы найдете огромное количество интересной, познавательной информации, которая пригодится каждой представительнице прекрасного пола. Так вы ознакомитесь с секретами эффективного и полноценного ухода, тем, как выглядеть идеально без макияжа. Есть информация про массаж и его пользу, о том, что не нужно приобретать малышу и что считается бесполезной тратой средств. Есть информация о том, как защитить свою кожу в летнее время. Почитайте информацию о том, как привлекательно выглядеть после 50.
Ищете вызвать мужа на час Краснодар? Krasnodar.chastniymaster-sm.ru/ где вы найдете широкий перечень услуг по низким ценам, с гарантией на все работы, круглосуточно и по договору. Здесь по приемлемым ценам решение бытовых задач разного уровня сложности предоставляются. Посмотрите на портале услуги, которые мы больше 15-ти лет предлагаем. Все специалисты имеют высокую квалификацию, и значительный опыт работы. Вызвать мастера на час с бесплатным выездом, легко!
AC Technician предлагает профессиональные услуги по перевозке грузов по России. Обладаем в логистике глубокими знаниями. Делаем все, чтобы груз в сохранности и вовремя прибыл, независимо от трудности маршрута. К каждому клиенту применяется персональный подход, и предлагаются привлекательные условия. https://xn—-8sbafccjfasdmzf3cdfiqe4awh.xn--p1ai/ – здесь можно в любое удобное время оставить заявку на обратную связь. Мы с вами обязательно свяжемся, чтобы уточнить стоимость перевозки и детали. Работаем исключительно для вас!
На сайте https://www.cleanyerevan.am/ изучите все услуги популярного предприятия, которое предлагает профессиональную и качественную уборку в квартире при помощи уникального инвентаря, высокотехнологичного инструмента. В этой компании клининг выполняется максимально качественно, быстро и в соответствии с заданными требованиями. В работе применяется только качественная химия, а услуги оказывают настоящие мастера своего дела. Вы сможете воспользоваться уборкой офисных помещений, квартир, домов, заказать химчистку диванов.
Ищете работа в Израиле? 4israel.co.il/ru/jobs где вы сможете осуществить поиск работы, а также ознакомиться с текущими вакансиями в различных городах. Вы можете публиковать свои вакансии или резюме, чтобы быть замеченным. Наш портал – это удобная для поиска работы и сотрудников в Израиле платформа. Многоязычность, публикация в соцсетях, тысячи объявлений и эффективный поиск – все это делает сайт надежным помощником на рынке труда.
Ищете рейтинг лучших сервисов виртуальных номеров? Посетите страницу https://blog.virtualnyy-nomer.ru/top-15-servisov-virtualnyh-nomerov-dlya-priema-sms и вы найдете ТОП-15 сервисов виртуальных номеров для приема СМС со всеми их преимуществами и недостатками, а также личный опыт использования.
На сайте https://filmix.fans посмотрите фильмы в отличном качестве. Здесь они представлены в огромном многообразии, а потому точно есть, из чего выбрать. Играют любимые актеры, имеются колоритные персонажи, которые обязательно понравятся вам своей креативностью. Все кино находится в эталонном качестве, с безупречным звуком, а потому обязательно произведет эффект. Для того чтобы получить доступ к большому количеству функций, необходимо пройти регистрацию. На это уйдет пара минут. Представлены триллеры, мелодрамы, драмы и многое другое.
На сайте https://www.parvenik.ru/ вы сможете приобрести веники, которые произведены из дуба, березы, эвкалипта. Имеются и хвойные, из липы, клена. Получится приобрести и травы в небольших пучках, мешочках. Все они отличаются невероятным ароматом, а потому будут необходимы в бане. Закрепить эффект поможет чай для бани, который обладает исцеляющим действием. Вас обязательно заинтересует дополнительная атрибутика в виде рукавиц, шапок и многого другого. Имеется раздел с рекомендуемыми товарами. Установлены доступные цены.
На сайте https://www.cleanyerevan.am/ закажите услугу по уборке квартиры в режиме реального времени. В этой компании все услуги оказываются на высоком уровне и в соответствии с самыми высокими требованиями. Есть возможность воспользоваться уборкой офисов, квартир, коттеджей либо домов. Воспользуйтесь химчисткой матрасов, мебели. Для того чтобы связаться с менеджером, заполните специальную форму. Специалисты прибудут в то время, которое вы указали, а потому не нужно находиться дома весь день. Оплата принимается только после исполнения заказа.
Оазис в Сочи https://eromassage-sochi.ru/ – Погружение в мир эротического массажа. Мечтаете о полном расслаблении и ярких эмоциях? Салон “Оазис” в Сочи приглашает вас в уникальное путешествие чувственности. Опытные массажистки, владеющие искусством эротического массажа, создадут для вас атмосферу уединения и блаженства. Забудьте о повседневности, доверьтесь нашим рукам и откройте новые грани наслаждения. Мы гарантируем полную конфиденциальность и индивидуальный подход. Откройте свой Оазис в Сочи, где каждый прикосновение – это источник удовольствия.
Посетите сайт РемонтКли https://remontkli.ru/ и вы найдете профессиональный ремонт квартир и отделка помещений в Москве. Мы предлагаем комплексный ремонт квартир под ключ с гарантией качества от профессионалов. Точные сроки, только опытные мастера, фиксированные цены. Узнайте подробнее на сайте обо всех наших услугах и стоимость работ. Также на сайте вы сможете осуществить расчет стоимости ремонта.
Ищете шины по выгодной стоимость? Посетите https://www.pokrishka.ru/catalog.html и вы сможете ознакомиться с каталогом шин, а также осуществить подбор шин по автомобилю, по типоразмеру или производителю. В каталоге представлены популярные шины ведущих производителей из разных стран, а также отзывы о шинах.
На сайте https://satu.msk.ru/ изучите весь каталог товаров, в котором представлены напольные покрытия. Они предназначены для бассейнов, магазинов, аквапарков, а также жилых зданий. Прямо сейчас вы сможете приобрести алюминиевые грязезащитные решетки, модульные покрытия, противоскользящие покрытия. Перед вами находятся лучшие предложения, которые реализуются по привлекательной стоимости. Получится выбрать вариант самой разной цветовой гаммы. Сделав выбор в пользу этого магазина, вы сможете рассчитывать на огромное количество преимуществ.
Ищете быстровозводимые металлоконструкции в Москве: ангары, гаражи, навесы? Посетите сайт https://xn--80aaef8dd.xn--p1ai/ – мы проектируем, изготавливаем и монтируем сертифицированные металлоконструкции в Москве и области. Предлагаем, также, индивидуальные решения и гарантию на всю продукцию и работы.
Все, кто интересуется дизайном помещения, найдут на этом портале важную для себя информацию. Здесь представлена информация на тему мебели, о том, как подобрать подходящий вариант в определенное помещение. Вы изучите последние тенденции, актуальные данные. Для вашего удобства предусмотрен комфортный поиск. https://sp-department.ru/ – на сайте ознакомьтесь с ценными рекомендациями от дизайнеров, которые ответят на многочисленные вопросы. Постоянно на портале публикуются свежие, содержательные данные на различную тему.
На сайте https://visacom.ru/ получите консультацию по поводу того, как правильно оформить загранпаспорт, визу. При этом все документы оформляются максимально оперативно, недорого, надежно. Отсутствует необходимость в предоставлении дополнительных справок. Виза может быть оформлена за сутки, а на получение загранпаспорта уходят до 3 дней. Ознакомьтесь с самыми востребованными направлениями, среди которых: Великобритания, Франция, США, Италия. Вы гарантированно получите визу. В противном случае деньги будут возвращены обратно.
На сайте https://www.royalpryanik.ru/ вы сможете заказать изысканные, вкусные и ароматные пряники с роскошной начинкой. Такой десерт точно понравится как взрослым, так и детям. В этой компании вы найдете и подарочные пряники, а также креативные и расписные, которые идеально подойдут на любой праздник. Вкусности созданы в соответствии со старинными рецептами, по оригинальной рецептуре. Пряники вкусные, а также невероятно красивые. Именно поэтому их можно презентовать на любой праздник, включая Пасху, день влюбленных, 8 марта.
Explore Asia Through Its Cities. Welcome to the English section of AsiaCity.News — your gateway to local news from the heart of Asia. Discover what’s happening right now in cities like Beijing, Mumbai, Tokyo, Moscow, and beyond. We focus on real city life — neighborhood events, cultural highlights, social trends, and daily challenges — as reported by local media sources. Stay informed with authentic, translated stories that rarely make global headlines. Read the latest news in English https://asiacity.news/
Обменник криптовалют https://garantcoin.io/ – самое большое количество монет для обмена.
Как выбрать и заказать экскурсию по Казани? Посетите сайт https://to-kazan.ru/tours/ekskursii-kazan и ознакомьтесь с популярными форматами экскурсий, а также их ценами. Все экскурсии можно купить онлайн. На странице указаны цены, расписание и подробные маршруты. Все программы сопровождаются сертифицированными экскурсоводами.
This post is incredibly helpful! I’ve been trying to set up my Kodi to play my favorite retro games, and your detailed steps made it so much easier. The list of ROMs and emulators you provided is exactly what I needed. Thanks for sharing your knowledge!
Вы узнаете последние новости, если посетите этот сайт, где представлены уникальные, актуальные материалы на различную тему. Получится изучить мнение президента Путина, различные рекомендации банков. https://papercloud.ru/ – на портале изучите материалы, посвященные бизнесу, есть увлекательные сведения для всех жителей России. Регулярно на сайте публикуются уникальные сведения, которые следует изучить всем для того, чтобы знать больше.
На сайте https://www.yerevancakes.am/hy/torter вы сможете заказать вкусный, изысканный и ароматный торт с самыми разными начинками и оформлением. Есть торты на юбилей, День рождения, детские десерты, на которых находятся мультяшные и сказочные герои. Все кондитерские изделия могут быть оформлены в соответствии с пожеланиями, вкусами, предпочтениями. При желании можно заказать торт в классическом стиле, а также корпоративные десерты. Для романтического свидания приобретите клубнику в шоколаде, против которой не устоит ни одна барышня.
На сайте https://www.techno-svyaz.ru/ воспользуйтесь возможностью написать российскому производителю печатных плат. Компания находится на рынке уже более 34 лет, потому зарекомендовала себя с положительной стороны. Вежливые менеджеры всегда ответят вам на все вопросы. Уникальностью компании является то, что она постоянно совершенствуется, что позволяет увеличить количество клиентов. В работе используются самые последние, уникальные методы создания материнских плат. Применяются уникальные материалы от проверенных брендов.
На сайте https://lolz.live/ вы сможете приобрести прокаченные аккаунты для самых разных игр, а также социальных сетей. Теперь нет необходимости в том, чтобы часами прокачивать свои навыки, доходить до нужного уровня, ведь куда быстрее и проще сразу приобрести все, что нужно, чтобы получить положительные эмоции и приятные впечатления. Дополнительно пообщайтесь с единомышленниками на форуме, где получится задать вопрос, обсудить важную тему. Для того чтобы быстрее сориентироваться, ознакомьтесь с игровой и тематической категориями.
Woah! I’m really digging the template/theme of this site.
It’s simple, yet effective. A lot of times it’s very hard
to get that “perfect balance” between user friendliness and appearance.
I must say you have done a excellent job with this.
Also, the blog loads super quick for me on Internet explorer.
Excellent Blog!
Ищете изготовление металлоконструкций и изделий в Иркутске? Посетите https://azmk38.ru/ – мы работаем с конструкциями любой сложности! Ознакомьтесь на сайте с нашими услугами: производство металлоконструкций, проектирование и разработка КМД, сварочные работы, плазменная и лазерная резка, гибка металла и многое другое. У нас выгодные цены! Подробнее на сайте.
На сайте https://parkmotors.ru/ уточните то, какие комплектующие вы сможете приобрести непосредственно со склада. Это запчасти на Газель, различную аналогичную грузовую технику. Всегда в наличии и на складе шины, представленные как зарубежными, так и отечественными фабриками. Особенно востребован блок цилиндров, двигатель, который устанавливается на Газель. Также получится приобрести и сцепление от популярных турецких, немецких марок. В магазине найдете электрический стеклоподъемник, блок двигателя.
https://ufo.hosting/blog/kak-nastroit-rezervnoe-kopirovanie-sajta-cherez-fastpanel
На сайте https://technolit.shop/ вы сможете выбрать и приобрести функциональные и эргономичные печи в облицовке, сетке, под обкладку. Также в каталоге вы найдете и отопительные печи, облицовки на трубу, порталы и многое другое. Все это выполнено из высокотехнологичных материалов, за счет чего оборудование прослужит долгое время, не утратит технических характеристик, внешнего вида. Регулярное поступление новинок. При разработке продукции используются только инновационные технологии. Установлены разумные цены.
Желаете смотреть лучшие аниме, телешоу, мультсериалы и сериалы бесплатно онлайн? EpicSerials вам такую возможность предоставляет. Портал предлагает вам такие жанры, как: триллер, драма, боевик, вестерн, фантастика, фэнтези, приключения, комедия и другое. Позвольте себе расслабиться и на время отвлечься от повседневных забот. https://epicserialls.online – сайт с удобным интерфейсом, который позволяет быстро найти необходимый сериал. Большой выбор контента мы гарантируем. Заботимся о вашем комфортном просмотре. Рады вам всегда!
Зайдите на сайт https://trekson.net/ и вы сможете найти новинки музыки 2025 года, которые можно скачать бесплатно в отличном качестве или слушать онлайн. Вы найдете, также, подборки, популярные песни, музыку прошлых лет. У нас песни как зарубежные, так и русские.
Ищете экскурсии Казани? Посетите сайт https://to-kazan.ru/tours/ekskursii-kazan и вы найдете огромный выбор экскурсий, которые вы сможете заказать с гидом, а также узнать все актуальные цены на 2025 год. Действуют акции и скидки! Подробнее на сайте.
На сайте https://kapgrup.ru получите консультацию для того, чтобы вступить в СРО. Все работы выполняются строго «под ключ» и всего за один день. Также вы гарантированно получите бонусы. В этой компании вам детально расскажут о том, как правильно вступить в СРО, о том, какие документы будут необходимы для этих целей. Сотрудничество происходит с лучшими СРО. Важно понимать, что самостоятельное оформление документа может привести к рискам, а также дополнительным финансовым тратам. Сам процесс рассмотрения документов может быть затянут.
Looking for quick payouts and fair gaming? Visit https://iwinfortune-gb.uk/ today. Enjoy a fantastic selection of over 1,000 games, reliable 24/7 customer support, and smooth GBP transactions—making it the perfect gaming destination for UK players.
https://the.hosting/kk/help/linux-zhjesinde-fajl-rsattaryn-alaj-kruge-bolady
На сайте https://filmix.fans посмотрите фильмы в отличном качестве. Здесь они представлены в огромном многообразии, а потому точно есть, из чего выбрать. Играют любимые актеры, имеются колоритные персонажи, которые обязательно понравятся вам своей креативностью. Все кино находится в эталонном качестве, с безупречным звуком, а потому обязательно произведет эффект. Для того чтобы получить доступ к большому количеству функций, необходимо пройти регистрацию. На это уйдет пара минут. Представлены триллеры, мелодрамы, драмы и многое другое.
Автопитер – один из крупнейших интернет-магазинов автозапчастей. Предоставляем приемлемые цены, вежливое и грамотное обслуживание, большой выбор и отменное качество. Стараемся удобно располагать наши пункты самовывоза. https://autopiter.kg – здесь заказы принимаются и обрабатываются круглосуточно. Мы знаем абсолютно все о предлагаемых запчастях. Готовы о любом товаре вам предоставить подробную информацию. Наш интернет-магазин – это верный выбор автовладельца. Среди наших клиентов будем рады вас видеть!
На сайте https://parkmotors.ru/ изучите весь ассортимент товаров, которые вы сможете приобрести прямо сейчас. Популярная компания реализует непосредственно со склада самые разные комплектующие на Газель и аналогичную грузовую технику. Всегда в наличии шины, которые представлены иностранными, отечественными производителями. Особенно востребованы двигатели, а также блок цилиндров. Есть возможность приобрести сцепление от турецких, немецких заводов-изготовителей. Также можно купить и электрический стеклоподъемник на Газель.
https://ping.space/
Портал avicenna-spb.ru – достойный информационный источник. Как организовать медицинский центр, мы рассказываем. Рассмотрим, как ухаживать за кожаным ремешком часов. У нас вы только интересное отыщите! https://avicenna-spb.ru – тут статьи о здоровье размещаются, о выгодных скидках Яндекс Еда, о ремонте сплит-систем, также вскрытии и установке замков. Разъяснили, почему происходит деформация ногтей. Постарались объяснить, как выбрать правильную стоматологическую щетку для оптимального ухода за зубами. Вы сможете узнать, где в Таганроге отметить день рождения.
Ищете станки elixmate купить выгодно? Заходите на портал Interaktivnoe-oborudovanie.ru/catalog/stanki-s-chpu/ и у вас появится прекрасная возможность по доступной стоимости приобрести станки с ЧПУ. Ознакомьтесь с нашим приличным выбором по наилучшим ценам. Осуществляем доставку по всей России. Для каждого станка с ЧПУ вы найдете подробные характеристики и описание. Мы предлагаем только лучшее и надежное оборудование для бизнеса.
Doskadonbassa.ru – доска бесплатных объявлений, которая себя отлично зарекомендовала. На сайте 5 основных разделов представлены: «Работа», «Услуги», «Продажа», «Недвижимость», «Авто-мото». Ищете подавая объявления в лнр? Doskadonbassa.ru является самым популярным сервисом для размещения объявлений благодаря высокой посещаемости, простоте применения, эффективности и множеству прочих критериев. Онлайн-платформа позволяет размещать объявления о вакансиях, услугах, товарах, транспорте и недвижимости. Подайте уже сегодня объявление!
На сайте https://www.bufetout.ru уточните телефон компании, которая специально для вас организует кейтеринг. Вы сможете заказать фуршет, стильный кофе-брейк. Также доступно и обслуживание, если планируется организация выставки, корпоратива. Заказать услугу можно, воспользовавшись всего одним звонком. Вы сделаете заказ всего за пару минут. Каждый клиент получает возможность воспользоваться уникальным предложением, сформированным менеджером. Все необходимое будет доставлено на место, где будет проводиться мероприятие.
Ищете где смотреть онлайн фильмы и сериалы в огромном разнообразии? Посетите КИНОГО https://kinogo-go.tv/ – у нас вы найдете все! Фильмы, сериалы онлайн смотреть бесплатно в хорошем качестве без регистрации на Kinogo-GO, а также лучшие новинки кино, 2025 года бесплатно в хорошем качестве. Мы лучший кинотеатр фильмов и сериалов онлайн.
РСТ-Моторс – интернет-магазин, который станет для вас полезным и удобным инструментом. Мы предоставляем грузовые запчасти высшего качества хино, фусо, исузу. Регулярно развиваемся и совершенствуемся. Настроены на долгосрочное сотрудничество. К диалогу открыты. https://rst-motors.ru – портал, где у вас есть возможность с условиями доставки и оплаты ознакомиться. Гарантируем акции и доступные расценки. Стараемся сделать процесс покупки максимально понятным. Работая с нами, вы всегда можете рассчитывать на грамотное и вежливое обслуживание.
https://the.hosting/
Ищете понятные советы о косметике? Посетите https://fashiondepo.ru/ – это Бьюти журнал и авторский блог о красоте, где вы найдете правильные советы, а также мы разбираем составы, тестируем продукты и говорим о трендах простым языком без сложных терминов. У нас честные обзоры, гайды и советы по уходу.
Посетите сайт https://hqd24shop.ru/ и вы сможете купить в Москве с доставкой за 30 минут круглосуточно электронные сигареты. Магазин электронных сигарет HQD это широкий ассортимент продукции по выгодной цене. Посмотрите каталог, и вы обязательно найдете то, что вам по вкусу. Подробнее на сайте.
Ищете купить кухню? Mebelzoom.ru Кухня на заказ от производителя это безусловное качество продукции и доставка по всей России и странам СНГ. Кухня на заказ – это широкий выбор возможностей для обустройства вашей кухни. Модульная кухня купить хотите? У нас огромный ассортимент! Помимо прочего у нас спальни, гостиные, мебель из массива, гардеробные представлены и иное! Подробнее на сайте.
К-ЖБИ обеспечивает непревзойденное качество своей продукции и жестко придерживается установленных сроков. Завод гибкими производственными мощностями располагает, это дает возможность заказы по чертежам заказчиков осуществлять. Позвоните нам по телефону, и мы на все вопросы с радостью ответим. Ищете цемент м800? Gbisp.ru – здесь можете заявку оставить, указав в форме имя, телефонный номер и адрес почты электронной. После этого нажмите на кнопку «Отправить». Быструю доставку продукции мы гарантируем. Ждем ваших обращений к нам!
Ищете интернет-магазин мебели с доставкой и выгодными ценами? Посетите https://mebelzoom.ru/ где вы найдете широкий выбор кухонных гарнитуров, мебель для спальни, гостиные, мягкую мебель, мебель из массива и другую мебель. Мы предлагаем недорогую мебель от производителя. Подробнее на сайте.
Компания САМШИТ на изготовлении деревянных окон и дверей специализируется. Осуществляем бережную доставку изделий. Уделяем особенное внимание монтажным работам, применяя самые лучшие материалы и профессиональные инструменты. Ищете деревянная дверь входная? Samshitokno.ru – здесь представлены отзывы наших клиентов, ознакомиться с ними можете прямо сейчас. Предлагаем богатый выбор моделей, которые подойдут для любого интерьера. На сайте можете заполнить форму, и мы свяжемся с вами в ближайшее время, чтобы уточнить детали проекта.
АНПО – учебный центр, который приличный спектр образовательных программ предоставляет. Поможем вам освоить новую специальность. Выгодные цены вам предлагаем. Введите свои контактные данные на сайте, и мы свяжемся с вами в ближайшее время. С нами комфортно! https://a-npo.ru – здесь можно ознакомиться с тарифами и отзывами. Сопровождаем бизнес в области сертификации, лицензирования, подготовки персонала. Стремимся не только обучать, но и помогать людям, находить свое дело, развивать навыки, с уверенностью строить карьеру в любой точке страны. Нам доверяют!
На сайте https://bilety-tut.ru получится быстро и просто отыскать билет на поезд или самолет. Также вы подберете увлекательные и разнообразные мини-туры. Агрегатор позволит максимально оперативно подыскать подходящий билет как на самолет, так и поезд. При этом вы сможете избежать ненужных переплат и приобрести билеты по действительно небольшой стоимости. Вы приобретете билет до нужной станции, аэропорта. Сможете ознакомиться с тем, когда самолет вылетит, а поезд отправится. Дополнительно посмотрите и то, сколько времени вы проведете в пути.
Витамакс – интернет-магазин, который стал для многих партнером надежным в заботе о благополучии и здоровье. Мы предлагаем высококачественные биологически активные добавки. Они способствуют поддержанию энергии, улучшению состояния кожного покрова и общего самочувствия. Ищете эхинацея плюс? Vitamax.shop – здесь оформление заказа удобное и интуитивно понятное. Гарантируем большой выбор продукции, быструю доставку и лучшие цены с максимальными скидками. Поможем выбрать подходящие продукты, учитывая ваши персональные потребности.
Домашний мастер в Краснодаре – https://krasnodar.chastniymaster-sm.ru/ – это услуги от профессионалов, так называемый муж на час, который поможет справиться с любыми бытовыми проблемами от 200 рублей. От самой простой задачи, до сложных решений, требующих опыта и квалификации. Ознакомьтесь с нашими услугами, мужа на час, по выгодной стоимости.
Ищете авторские туры по выгодной цене? Посетите https://discoverynn.ru/ и вы найдете туры по России и миру с туроператором Время Открытий. Мы предлагаем экскурсионные туры, фототуры, этнотуры, vip-туры. Небольшие группы. Авторские путешествия, созданные профессиональными гидами и фотографами. Гарантированные лучшие цены. Подробнее на сайте.
Nasklad Group широкий выбор складской техники для любых видов бизнеса предлагает. Мы только с надежными производителями сотрудничаем. Гарантируем качественное оборудование, оперативную доставку и приемлемые цены. Готовы на вопросы предоставить грамотные ответы. https://nasklad.ru – тут вы разные виды техники отыщите. Одним из главных преимуществ нашей компании является индивидуальный подход к любому заказчику. Обращайтесь, обеспечим отличный сервис и поддержку на всех этапах сотрудничества. Всегда вам рады!
На сайте https://satu.msk.ru/ изучите весь каталог товаров, в котором представлены напольные покрытия. Они предназначены для бассейнов, магазинов, аквапарков, а также жилых зданий. Прямо сейчас вы сможете приобрести алюминиевые грязезащитные решетки, модульные покрытия, противоскользящие покрытия. Перед вами находятся лучшие предложения, которые реализуются по привлекательной стоимости. Получится выбрать вариант самой разной цветовой гаммы. Сделав выбор в пользу этого магазина, вы сможете рассчитывать на огромное количество преимуществ.
На сайте https://apvshop.ru/category/units/ вы найдете в большом ассортименте мультимедиа для различных автомобилей. Имеются автомагнитолы – планшеты Андроид 9, 10. Вся продукция представлена именитыми, проверенными, надежными марками, которые создают продукцию в соответствии с самыми жесткими требованиями. Для того чтобы принять верное решение, необходимо ознакомиться с техническими характеристиками, особенностями каждой модели. Для того чтобы найти наиболее подходящий вариант, рациональней будет воспользоваться комфортным поиском.
Ищете пластиковые окна в Москве по выгодной цене? Посетите https://dver77.ru/ и вы сможете купить по выгодной цене с установкой под ключ в Dver77. Изготовление, установка, монтаж. Посмотрите ассортимент пластиковых окон и другие профильные системы в Москве – окна Rehau, окна Veka, окна KBE. Цены отличные и постоянные скидки.
САМШИТ – компания, которая специализируется на изготовлении качественных деревянных дверей и окон. Осуществляем бережную доставку изделий. Уделяем монтажным работам особое внимание, при этом используя лучшие профессиональные инструменты и материалы. Ищете входная деревянная уличная дверь? Samshitokno.ru – здесь представлены отзывы наших клиентов, ознакомиться с ними можете прямо сейчас. Предлагаем широкий выбор моделей, которые для любого интерьера подойдут. На сайте можете заполнить форму, и мы свяжемся с вами в ближайшее время, чтобы уточнить детали проекта.
Ищете домашнюю сыроварню? Посетите сайт https://sir-tremasov.ru/ и вы найдете уникальный товар – домашняя автоматическая сыроварня с доставкой в любой регион. Можно купить в рассрочку. Вы сможете делать любые виды сыров от Моцареллы до Дор Блю. Проста в эксплуатации, гарантия на каждую сыроварню. При покупке любой сыроварни в ценные подарки. Посмотрите ассортимент сыроварен на сайте.
Для того чтобы оставаться в курсе последних изменений в своей профессии, важно регулярно повышать квалификацию, осуществлять переподготовку кадров. К тому же, получится освоить новую востребованную профессию, развить карьеру и стать одним из лучших специалистов. https://a-npo.ru – на портале уточните всю необходимую информацию, которая касается учебного центра, осуществляющего переподготовку кадров. Вы сможете обучиться с нуля различным рабочим специальностям. Все программы составлены особым образом, чтобы каждый их быстро освоил.
Портал Дай Жару – https://dai-zharu.ru/ это возможность выбрать из большого каталога сауны и бани Москвы с широким выбором фильтров для поиска, что бы вам было удобно! Вы найдете недорогие и дорогие бани, финские сауны, турецкие парные с ценами, фото и отзывами рядом на карте Москвы. Лучшие бани собраны на нашем онлайн ресурсе.
На сайте https://proxymix.net/ru вы сможете зарегистрироваться в любое, удобное для себя время. Это позволит вам получить доступ к прокси премиального уровня из СНГ, Китая, Европы, остальных стран. В случае если перед вами стоит цель приобрести прокси для того, чтобы осуществить огромное количество операций и с различными IP-адресами, то на этом сайте вы найдете все, что необходимо. Здесь вы сможете осуществить покупку максимально просто и по доступной стоимости. Изучите наиболее востребованные тарифы, чтобы сделать правильный выбор.
Looking for website speed test tool? Milten.io and you can check the site loading speed and its performance. Use our tools for resource diagnostics, its technical analysis, and monitoring of your portal. The service specializes in optimizing the speed and analyzing the loading of the site for the best ranking in search. You will be able to conduct a deep analysis of the site and receive recommendations on how to speed it up.
This is an awesome guide! I love how you laid out the steps for setting up retro games on Kodi. The list of emulators and ROMs is super helpful. Can’t wait to dive back into some classic games. Thanks for sharing!
Самый большой выбор фурнитуры для дверей — в интернет магазине FurnituraPRO https://furniturapro.ru/ – с доставкой по Московской области, России, Казахстану и Беларуси. Посмотрите каталог с выгодными ценами и огромным ассортиментом. У нас постоянно появляются новинки, а также действуют акции. Подробнее на сайте.
На сайте https://ar26.ru/ оставьте заявку с той целью, чтобы для вас подобрали наиболее подходящую недвижимость, которая полностью соответствует предпочтениям, требованиям. При этом все документы будут подготовлены высококлассными специалистами агентства. Сотрудники подберут вариант, который будет соответствовать бюджету. Земельный участок обязательно будет проверен. Сделка контролируется на каждом этапе, чтобы избежать непредвиденных обстоятельств. Выполняются все процедуры, начиная от проверки документов, заканчивая передачу новому покупателю.
На сайте https://tent3302.ru/ вы сможете ознакомиться с комплектующими на Газель Некст. Сделав правильный выбор, вы сможете приобрести все, что нужно и по привлекательной стоимости. В этом магазине получится приобрести и шины, двигатель на Газель, комплектующие Камминз, Валдай, УАЗ. Вся продукция является качественной, надежной, наделена долгим сроком службы. Перед тем, как собраться совершить покупку, необходимо ознакомиться с режимом работы магазина. Также изучите и схему проезда для большего удобства. Все комплектующие реализуются по доступной цене.
Ищете проектирование, поставку, монтаж и настройку цифровых решений для своего бизнеса? Посетите сайт Глобэкс Групп – это системный интегратор и официальный дистрибьютор мировых брендов. Мы предлагаем комплексный подход для решения корпоративных задач для клиентов в IT инфраструктуре по низким ценам. Подробнее на сайте https://global7.ru/
АвтоМастера.нет – портал, на котором актуальная информация представлена. Вы сможете узнать, чип-тюнинг, что это такое. Расскажем, какая трансмиссия лучше. Собрали рекомендации, которые будут при вождении и эксплуатации машины полезны. Разберемся в том, как работает датчик кислорода. Ищете можно ли прошить xbox 360 e? Avtomastera.net – тут автомобильные мастера разъясняют о тонкостях работы с клиентами, машинами, также механизмами. На портале есть удобный поиск, воспользуйтесь им. Руководствуясь нашими рекомендациями, вы сможете оптимальное время замены масла определить.
На сайте https://lolz.live/ вы сможете приобрести прокаченные аккаунты для самых разных игр, а также социальных сетей. Теперь нет необходимости в том, чтобы часами прокачивать свои навыки, доходить до нужного уровня, ведь куда быстрее и проще сразу приобрести все, что нужно, чтобы получить положительные эмоции и приятные впечатления. Дополнительно пообщайтесь с единомышленниками на форуме, где получится задать вопрос, обсудить важную тему. Для того чтобы быстрее сориентироваться, ознакомьтесь с игровой и тематической категориями.
Хотите смотреть лучшие сериалы, аниме, мультсериалы и телешоу онлайн бесплатно? EpicSerials предоставляет такую возможность. Портал предлагает вам такие жанры, как: триллер, драма, боевик, вестерн, фантастика, фэнтези, приключения, комедия и другое. Позвольте себе от повседневных забот отвлечься и расслабиться. https://epicserialls.online – сайт с удобным интерфейсом, который позволяет быстро найти необходимый сериал. Мы гарантируем широкий выбор контента. Заботимся о вашем комфортном просмотре. Рады вам всегда!
Хотите сделать близким мясной сюрприз? Мы знаем, как существенно сэкономить время и добиться наилучших результатов. С удовольствием предоставляем вашему вниманию для формовочной сетки кулинарную трубу наполнительную. Итоговый продукт превосходно всегда будет выглядеть. Уникальные кулинарные шедевры создавайте! Ищете труба для кулинарной сетки? Wildberries.ru/catalog/347475889/detail.aspx?targetUrl=GP – здесь найдете более детальное описание товара. Надевание на мясо формовочной сетки в 10-секундную манипуляцию превратится. Рулет получится обалденный. Готовьте с любовью!
На сайте https://proshtor.ru/ воспользуйтесь онлайн-консультацией дизайнера, который на профессиональном уровне ответит на все вопросы. В этой компании вы сможете заказать пошив штор, выбрав такой дизайн, который вам нравится больше всего. При этом и материал вы сможете подобрать самостоятельно, чтобы результат максимально соответствовал ожиданиям. Выезд дизайнера осуществляется бесплатно. Прямо сейчас ознакомьтесь с портфолио, чтобы подобрать наиболее подходящее решение. Можно приобрести шторы, выполненные в любом стиле.
Ищете перила и ограждения недорого в Краснодаре и Ростове? Посетите https://xn—-etbhmpvi1i.xn--p1ai/ и вы найдете широкий ассортимент производимой продукции, а также установку и монтаж. Посмотрите на сайте все наши товары: лестничные ограждения, поручни, ограждения пандусов, ограждения для школ, садов, игровых зон и многое другое. Ознакомьтесь с нашим портфолио и материалами с которыми мы работаем.
Учебный центр «АНПО» проводит обучение рабочим специальностям. Предлагаем большой выбор программ и разумные цены. Точно знаем, какие на завтрашний день востребованы будут профессии. С удовольствием на необходимые для вас вопросы ответим. Ищетецентре профессиональной подготовки кадров? A-npo.ru – тут можете заявку оставить, мы с вами свяжемся. Обучение проводят преподаватели с большим стажем в своей сфере. Их основная миссия – открывать в мир потенциалов перед вами двери. Вы можете реализовать собственные возможности и отыскать свое призвание. Уверенны, вместе мы высоких успехов достигнем!
На сайте https://misokmv.ru/ ознакомьтесь с детальной, подробной информацией, которая касается АНО ДПО «Международный институт современного образования». Здесь вы сможете оформить заявку на то, чтобы пройти качественное обучение и получить хорошее, востребованное образование. Регулярно в этом учебном заведении организуются увлекательные и разнообразные мероприятия. А если остались вопросы, то задайте их менеджеру через специальную форму. Регулярно на сайте выкладываются познавательные новости.
На сайте https://venttehnica.ru в огромном ассортименте представлены инфракрасные обогреватели, качественные и функциональные кондиционеры, тепловые завесы, конвекторы и многое другое. Вся продукция является надежной, практичной, отличается долгим сроком службы. Регулярно в магазине проходят акции, которые позволят совершить приобретение с экономией для своего бюджета. При необходимости воспользуйтесь профессиональной консультацией, которая поможет определиться с выбором. На всю технику даются гарантии.
Ищете ковры, дорожки, паласы в Минске или с доставкой по Беларуси? Посетите сайт https://kovertut.by/ и вы найдете огромный каталог продукции по самым выгодным ценам. У нас также постоянно появляются новинки и действуют акции и распродажи. Просто загляните в каталог – такого разнообразия вы не найдете нигде!
Ищете экскурсии Казани? Посетите сайт https://to-kazan.ru/tours/ekskursii-kazan и вы найдете огромный выбор экскурсий, которые вы сможете заказать с гидом, а также узнать все актуальные цены на 2025 год. Действуют акции и скидки! Подробнее на сайте.
Автопитер является крупным интернет-магазином автозапчастей. Предоставляем приемлемые цены, вежливое и грамотное обслуживание, большой выбор и отменное качество. Стараемся наши пункты самовывоза удобно располагать. https://autopiter.kg – здесь заказы принимаются и обрабатываются круглосуточно. О предлагаемых запчастях мы все знаем. Готовы о любом товаре вам предоставить подробную информацию. Интернет-магазин Автопитер – правильный выбор автовладельца. Среди наших клиентов будем рады вас видеть!
Желаете посмотреть фильмы, сериалы, мультфильмы, аниме, ТВ программы онлайн в высоком качестве и бесплатно? Посетите https://kinogo0.net/ – смотреть лучшие новинки кино и прочих жанров, в том числе 2025, года бесплатно в хорошем качестве можно у нас. Огромная и лучшая коллекция. Каждый найдет то, что ему нравится.
На сайте https://chemodantour.ru/visa-china/ заполните опросник на визу. Важно иметь в виду то, что жителям России обязательно потребуется виза для того, чтобы посетить КНР. На портале ознакомьтесь с тем, когда и как работает консульство КНР. Сроки оформления визы различные. Но в среднем не превышают 7 дней с того дня, как вы подали документы. Но также можно оформить все необходимые документы и за 3 рабочих дня. Доступно и срочное оформление визы – в течение дня. С расценками на такие услуги ознакомьтесь на портале.
Ищете интернет-магазин мебели с доставкой и выгодными ценами? Посетите https://mebelzoom.ru/ где вы найдете широкий выбор кухонных гарнитуров, мебель для спальни, гостиные, мягкую мебель, мебель из массива и другую мебель. Мы предлагаем недорогую мебель от производителя. Подробнее на сайте.
На сайте https://xn—-8sbafccjfasdmzf3cdfiqe4awh.xn--p1ai/ узнайте цены на грузоперевозки по России. Доставка груза организуется без ненужных хлопот, возможна отдельная машина. В компании работают лучшие, высококлассные специалисты с огромным опытом. Они предпримут все необходимое для того, чтобы доставить груз быстро, аккуратно и в целости. Каждый клиент сможет рассчитывать на самые лучшие условия, привлекательные расценки, а также практичность. Ко всем практикуется индивидуальный и профессиональный подход.
На сайте https://oknaksa.ru/ закажите расчет технического задания, чтобы узнать, во сколько вам обойдется остекление. Для предприятий действуют особые привлекательные условия. На все окна, а также монтажные работы предоставляются гарантии – 20 лет. Обслуживание является бесплатным. Каждый клиент сможет рассчитывать на профессиональную, исчерпывающую консультацию. На ваш выбор огромное количество интересных готовых проектов, почитайте положительные отзывы. Предприятие разрабатывает окна самых разных форм, конфигураций, размеров.
Сейчас самыми популярными направлениями являются Грузия и Азербайджан. Такие туры особенно подходят для тех, кто ищет что-то увлекательное, интересное и эксклюзивное. Эмиль и Аня создадут уникальные авторские экскурсии специально для вас, чтобы вы получили море приятных впечатлений и красивые кадры. https://aktivniy-otdykh.ru/ – на портале вы ознакомитесь с отзывами тех, кто уже заказывал экскурсии, в них они рассказывают, как все прошло, насколько хорошо было организовано путешествие. В случае если и вы желаете получить жизнерадостные и сочные снимки, то необходимо ввести в специальное поле свое имя, телефон, после чего перезвонят.
Обменник криптовалют https://garantcoin.io/ – самое большое количество монет для обмена.
На сайте https://serialexpress.ru/ вы найдете огромное количество телесериалов, теленовелл, документальных фильмов, которые представлены в отличном качестве и с четким звуком. Регулярно появляются новые фильмы, которые будут интересны и вам. В этой компании получится воспользоваться и услугами, которые связаны с записью. Регулярно на портале появляются новости, с которыми необходимо ознакомиться каждому. На портале представлены как отечественные, так и зарубежные сериалы, которые хочется пересматривать раз за разом.
На сайте https://mebelinside.ru подберите комфортную, практичную, качественную мебель, которая подойдет как для бизнеса, так и дома. Предприятие реализует огромный выбор мебели, которая создается из высокотехнологичных, современных материалов и модного дизайна. Есть возможность заказать как стильный шкаф-купе, так и мебель на кухню. Для покупателей, которые заказывают мебель именно в этой компании, в приоритете остается высокое качество, надежность, приемлемая стоимость. Выбранная мебель идеально впишется в дизайн.
Нужны надёжные силовые или контрольные кабели для любых задач? На https://remcable.ru/ — широкий ассортимент продукции с гарантией, быстрая доставка по России и консультации от специалистов. Прямые поставки от производителей, удобный поиск и индивидуальный подход к каждому заказу. Заходите и убедитесь сами!
На сайте https://www.florion.ru/catalog/kompozicii-iz-cvetov воспользуйтесь возможностью заказать композиции из искусственных либо натуральных цветов, которые всегда будут выглядеть привлекательно, интересно и дополнять интерьер. Есть оригинальные варианты в стильной коробке, элегантной сумочке, завернутые в бумагу. Такие букеты можно преподнести на любое событие или просто так, чтобы порадовать вторую половинку. Есть решения из самых разных цветов, в том числе, ромашек, роз и самой разной цветовой гаммы.
На сайте https://www.parvenik.ru/ представлены березовые, дубовые, эвкалиптовые веники, которые можно приобрести как в розницу, так и оптом. Вся продукция продается по привлекательным ценам, действует быстрая доставка. Регулярное обновление ассортимента, чтобы вы приобрели все, что нужно и в любом количестве. Если вы регулярно посещаете баню, то вам пригодятся банные советы, которые находятся на этом портале. Огромное количество товаров, которые реализуются с большой скидкой. Также представлены и травы в мешочках, эксклюзивные букеты из целебных трав.
На сайте https://istra.santex-uslugi.ru/ ознакомьтесь с номером телефона компании, в которой вы сможете заказать все необходимые услуги, связанные с монтажом отопления, а также водоснабжения. В работе используется только высокотехнологичное, качественное оборудование, а компетентные, квалифицированные специалисты прошли необходимую подготовку. Все услуги оказываются на профессиональном уровне и по лучшей стоимости. Вы сможете создать уют и тепло в своем доме. К каждому проекту используется комплексный подход.
Известное предприятие ООО “Авангард” длительное время оказывает профессиональные услуги в таких сферах, как: проектирование, инжиниринг, гальваника, штамповка. Используется исключительно революционный и особый подход к работе. Компания создает товары безупречного качества и те, что произведены в соответствии с уникальными технологиями. https://avangardmet.ru – на сайте ознакомьтесь с тем, какие услуги вы сможете здесь заказать. При появлении вопросов свяжитесь с представителями компании через специальную форму. Ознакомьтесь со схемой проезда.
По ссылке https://www.62.ua/news/3907486/ak-zrobiti-rozumnu-teplicu-svoimi-rukami-ta-avtomatizuvati-doglad-za-roslinami почитайте содержательную, полезную информацию по поводу того, как самостоятельно создать умную теплицу, сделать так, чтобы уход за растениями проходил в автоматическом режиме. В статье рассматриваются и такие вопросы, как: для чего нужна умная теплица, какие составляющие необходимы для того, чтобы организовать такую теплицу. Также вы сможете изучить и пошаговую инструкцию, которая позволит реализовать идею.
На сайте https://russian-sports.ru/ изучите самые последние, увлекательные и любопытные новости спорта. Они касаются как футбола, так и хоккея, других дисциплин. Вся информация сопровождается фото, чтобы вы лучше сориентировались. Здесь же рассказывается и о том, как выполняется упражнение «Лодочка», которое считается одним из самых эффективных для восстановления позвоночника. Обязательно ознакомьтесь с информацией относительно флорбола, чтобы узнать, когда его создали, про главные стратегии, правила игры.
3D-печать с порошками металлов — это будущее.
Check out my site https://uztm-ural.ru/catalog/poroshki-metallov/
Посетите сайт РемонтКли https://remontkli.ru/ и вы найдете профессиональный ремонт квартир и отделка помещений в Москве. Мы предлагаем комплексный ремонт квартир под ключ с гарантией качества от профессионалов. Точные сроки, только опытные мастера, фиксированные цены. Узнайте подробнее на сайте обо всех наших услугах и стоимость работ. Также на сайте вы сможете осуществить расчет стоимости ремонта.
На сайте https://selyatino.santex-uslugi.ru/ оставьте заявку для того, чтобы заказать такую полезную услугу, как установка водоснабжения, а также систем отопления. Такая услуга является крайне востребованной для того, чтобы с комфортом проживать в частном доме или коттедже круглый год. Если система качественно спроектирована, то это позволит получить оптимальную температуру внутри помещения. Компания гарантирует особый подход, практичность, а также детальное исполнение проекта. Сотрудники отличаются всеми необходимыми знаниями, опытом.
На сайте https://visacom.ru/ получите консультацию по поводу того, как правильно оформить загранпаспорт, визу. При этом все документы оформляются максимально оперативно, недорого, надежно. Отсутствует необходимость в предоставлении дополнительных справок. Виза может быть оформлена за сутки, а на получение загранпаспорта уходят до 3 дней. Ознакомьтесь с самыми востребованными направлениями, среди которых: Великобритания, Франция, США, Италия. Вы гарантированно получите визу. В противном случае деньги будут возвращены обратно.
Посетите сайт Digital-агентство полного цикла Bewave https://bewave.ru/ и вы найдете профессиональные услуги по созданию, продвижению и поддержки интернет сайтов и мобильных приложений. Наши кейсы вас впечатлят, от простых задач до самых сложных решений. Ознакомьтесь подробнее на сайте.
На сайте https://russkiedali.ru/ ознакомьтесь с самыми популярными, интересными местами, которые находятся в Московской области. Изучите все исторические усадьбы, а также замки, которые есть в области. А если желаете больше узнать о своей родине, то погрузитесь в культуру и ознакомьтесь с театрами, музеями, фестивалями. А в местных ресторанах вы попробуете изысканные блюда. Изучите топ самых лучших ресторанов, в которых находятся самые вкусные и ароматные угощения. Устройте незабываемое путешествие по паркам, заповедникам, которые находятся в Московской области.
На сайте https://www.florion.ru/catalog/kompozicii-iz-zhivyh-cvetov представлено огромное количество изысканных и аристократичных композиций, которые выполнены из настоящих, живых цветов. Есть возможность приобрести такие цветы, которые находятся в коробке, элегантной сумочке. А если ищете что-то эксклюзивное, то присмотритесь к кораблю из свежих цветов самой разной цветовой палитры. Из всего многообразия вы точно выберете то, что соответствует поводу. На все композиции действуют привлекательные расценки. Вы получите именно то, что выбрали по фото.
На сайте https://parkmotors.ru/ изучите весь ассортимент товаров, которые вы сможете приобрести прямо сейчас. Популярная компания реализует непосредственно со склада самые разные комплектующие на Газель и аналогичную грузовую технику. Всегда в наличии шины, которые представлены иностранными, отечественными производителями. Особенно востребованы двигатели, а также блок цилиндров. Есть возможность приобрести сцепление от турецких, немецких заводов-изготовителей. Также можно купить и электрический стеклоподъемник на Газель.
На сайте https://pesokug.ru/ закажите качественный песок на выгодных условиях, по привлекательной стоимости. Предприятие ООО “Геотрейд” в течение долгого времени продает песок со своего карьера. Оно специализируется на добыче, обработке, продаже сеяного, природного песка. Выгодным моментом является то, что сотрудничество происходит напрямую, минуя посредников. К важным преимуществам покупки именно на этом предприятии является то, что товар является сертифицированным, соответствует ГОСТу. Используется высокотехнологичное оборудование.
На сайте https://prometall.shop/ вы сможете выбрать и приобрести чугунные печи от надежного и проверенного завода «ПроМеталл». Есть возможность воспользоваться полным спектром необходимых услуг, включая покупку, а также проведение монтажных работ. В ассортименте вы найдете банные печи, которые представлены в сетке, конструкции в камне, а также отопительные печи. Сетка произведена из нержавейки. На всю продукцию установлены разумные расценки, что позволит обязательно совершить приобретение. Каждая печь отличается привлекательным дизайном.
На сайте https://www.parvenik.ru/ представлены березовые, дубовые, эвкалиптовые веники, которые можно приобрести как в розницу, так и оптом. Вся продукция продается по привлекательным ценам, действует быстрая доставка. Регулярное обновление ассортимента, чтобы вы приобрели все, что нужно и в любом количестве. Если вы регулярно посещаете баню, то вам пригодятся банные советы, которые находятся на этом портале. Огромное количество товаров, которые реализуются с большой скидкой. Также представлены и травы в мешочках, эксклюзивные букеты из целебных трав.
Mdnews.top имеет продуманный интерфейс и вам точно понравится. Актуальные новости Молдовы вам интересны будут, рекомендуем в закладки наш сайт добавить. Статьи четкими фотографиями снабжены. Мы полезным любой материал делать стараемся. Желаем вам приятного чтения. https://mdnews.top/ – тут удобный поиск имеется, воспользуйтесь им в любое время. Пишем о самых главных событиях в Молдове. Доверие читателей мы ценим. Работаем, чтобы вы в удобном формате могли всегда информацию получать. Скорее к нам присоединяйтесь. Вашему мнению рады!
На сайте https://technopodbor.ru/ представлена бытовая техника в огромном ассортименте. Вся продукция высокого качества, на нее имеются сертификаты, необходимая документация, подтверждающая подлинность. В магазине вы найдете климатическую, бытовую технику, все для сада, дачи, занятий спортом. Есть категория отдельностоящей бытовой техники. В нее входят стиральные машины, холодильники, морозильные камеры, вытяжки, плиты. Возможно, вас заинтересует встраиваемая бытовая техника, которая упростит ведение хозяйства.
Известное предприятие ООО “Авангард” длительное время оказывает профессиональные услуги в таких сферах, как: проектирование, инжиниринг, гальваника, штамповка. Применяется только уникальный и инновационный подход к реализации идеи. Предприятие производит продукцию только эталонного качества и созданную по особым технологиям. https://avangardmet.ru – на портале уточните, какими услугами вы сможете воспользоваться. При появлении вопросов свяжитесь с представителями компании через специальную форму. Ознакомьтесь со схемой проезда.
На сайте https://technolit.shop/ вы сможете выбрать и приобрести функциональные и эргономичные печи в облицовке, сетке, под обкладку. Также в каталоге вы найдете и отопительные печи, облицовки на трубу, порталы и многое другое. Все это выполнено из высокотехнологичных материалов, за счет чего оборудование прослужит долгое время, не утратит технических характеристик, внешнего вида. Регулярное поступление новинок. При разработке продукции используются только инновационные технологии. Установлены разумные цены.
На сайте https://oknaksa.ru/ закажите расчет технического задания, чтобы узнать, во сколько вам обойдется остекление. Для предприятий действуют особые привлекательные условия. На все окна, а также монтажные работы предоставляются гарантии – 20 лет. Обслуживание является бесплатным. Каждый клиент сможет рассчитывать на профессиональную, исчерпывающую консультацию. На ваш выбор огромное количество интересных готовых проектов, почитайте положительные отзывы. Предприятие разрабатывает окна самых разных форм, конфигураций, размеров.
На сайте https://apvshop.ru/category/units/ вы найдете в большом ассортименте мультимедиа для различных автомобилей. Имеются автомагнитолы – планшеты Андроид 9, 10. Вся продукция представлена именитыми, проверенными, надежными марками, которые создают продукцию в соответствии с самыми жесткими требованиями. Для того чтобы принять верное решение, необходимо ознакомиться с техническими характеристиками, особенностями каждой модели. Для того чтобы найти наиболее подходящий вариант, рациональней будет воспользоваться комфортным поиском.
На сайте https://edembusauto.ru/ воспользуйтесь поиском маршрута для того, чтобы заказать междугородние пассажирские перевозки, уточнить расписание автобуса. Также есть возможность заказать и туры выходного дня, увлекательные и разнообразные экскурсии. На портале изучите и стоимость билетов. В арсенале компании исключительно новые, исправные автобусы, работают водители с огромным опытом. Также существует возможность бронирования в режиме реального времени. Изучите самые популярные маршруты. Телефон для связи представлен на сайте.
На сайте https://camriel.ru/ вы сможете ознакомиться с тем, что представляет собой рециркуляционная система аквакультуры, а затем и заказать ее проектирование. В компании работают высококлассные, знающие инженеры, которые создают продукцию, отличающуюся высоким качеством и в соответствии со стандартами. Также вы сможете ознакомиться и с расценками на оборудование УЗВ. Использование УЗВ в рыболовстве открывает огромное количество перспектив. Это касается не только эффективности, но и экологичности. Дополнительно технология увеличивает объем продукции.
На сайте https://kraski.top/ в огромном ассортименте представлены качественные эмали, грунты, а также краски, грунт-эмали, проверенные морилки, лаки, пропитки, праймеры, мастики. Изучите самые востребованные товары, которые пользуются особой популярностью. Перед покупкой ознакомьтесь со всеми характеристиками, сравните расценки для выгоды. На всю продукцию установлены разумные расценки, потому покупка точно будет выгодной. Для удобства воспользуйтесь личным кабинетом, где вы сможете отслеживать заказы, акции.
На сайте https://www.florion.ru/catalog/kompozicii-iz-zhivyh-cvetov представлено огромное количество изысканных и аристократичных композиций, которые выполнены из настоящих, живых цветов. Есть возможность приобрести такие цветы, которые находятся в коробке, элегантной сумочке. А если ищете что-то эксклюзивное, то присмотритесь к кораблю из свежих цветов самой разной цветовой палитры. Из всего многообразия вы точно выберете то, что соответствует поводу. На все композиции действуют привлекательные расценки. Вы получите именно то, что выбрали по фото.
На сайте https://www.parvenik.ru/ представлены березовые, дубовые, эвкалиптовые веники, которые можно приобрести как в розницу, так и оптом. Вся продукция продается по привлекательным ценам, действует быстрая доставка. Регулярное обновление ассортимента, чтобы вы приобрели все, что нужно и в любом количестве. Если вы регулярно посещаете баню, то вам пригодятся банные советы, которые находятся на этом портале. Огромное количество товаров, которые реализуются с большой скидкой. Также представлены и травы в мешочках, эксклюзивные букеты из целебных трав.
Ищете интернет-магазин мебели с доставкой и выгодными ценами? Посетите https://mebelzoom.ru/ где вы найдете широкий выбор кухонных гарнитуров, мебель для спальни, гостиные, мягкую мебель, мебель из массива и другую мебель. Мы предлагаем недорогую мебель от производителя. Подробнее на сайте.
На сайте https://istra.santex-uslugi.ru/ ознакомьтесь с номером телефона компании, в которой вы сможете заказать все необходимые услуги, связанные с монтажом отопления, а также водоснабжения. В работе используется только высокотехнологичное, качественное оборудование, а компетентные, квалифицированные специалисты прошли необходимую подготовку. Все услуги оказываются на профессиональном уровне и по лучшей стоимости. Вы сможете создать уют и тепло в своем доме. К каждому проекту используется комплексный подход.
На сайте https://www.florion.ru/catalog/kompozicii-iz-cvetov воспользуйтесь возможностью заказать композиции из искусственных либо натуральных цветов, которые всегда будут выглядеть привлекательно, интересно и дополнять интерьер. Есть оригинальные варианты в стильной коробке, элегантной сумочке, завернутые в бумагу. Такие букеты можно преподнести на любое событие или просто так, чтобы порадовать вторую половинку. Есть решения из самых разных цветов, в том числе, ромашек, роз и самой разной цветовой гаммы.
На сайте https://rubikonexpert.ru почитайте содержательную и нужную информацию, которая касается центра судебной экспертизы «РУБИКОН». В компании работают лучшие специалисты с большим опытом. Они отлично знакомы со всеми нюансами работы. Предприятие давно и плодотворно сотрудничает с государственными органами. Экспертизы проводятся в ограниченные сроки, но интервал зависит от различных факторов, в том числе, нужно ли выезжать на объект, а также количества специалистов, которые будут участвовать в процессе.
Юнитал-М предлагает услуги в сфере трудовой охраны. Работаем с различными предприятиями и людьми. Нам доверяют, потому, как мы постоянно совершенствуемся и к выбранной нами деятельности серьезно подходим. https://www.unitalm.ru – тут более детальная о компании информация предложена. Тут можете скачать прайс-лист. Грамотные преподаватели с огромной ответственностью подходят к процессу обучения. Нашими клиентами являются руководители значительных государственных предприятий и персональные предприниматели. Обращайтесь!
На сайте https://russian-sports.ru/ изучите самые последние, увлекательные и любопытные новости спорта. Они касаются как футбола, так и хоккея, других дисциплин. Вся информация сопровождается фото, чтобы вы лучше сориентировались. Здесь же рассказывается и о том, как выполняется упражнение «Лодочка», которое считается одним из самых эффективных для восстановления позвоночника. Обязательно ознакомьтесь с информацией относительно флорбола, чтобы узнать, когда его создали, про главные стратегии, правила игры.
На сайте https://mos-stroi-alians.ru/ уточните расценки на кровлю крыш, независимо от сложности работ. На предприятии трудятся квалифицированные, талантливые, знающие специалисты, соблюдающие технику безопасности. Применяются исключительно современные, высокотехнологичные материалы, которые увеличивают эксплуатационные сроки крыши. На все работы даются гарантии качества. Установлены привлекательные расценки. Здесь придерживаются оптимальной ценовой политики. Работы выполняются в минимальные сроки.
На сайте https://oknaksa.ru/ закажите расчет технического задания, чтобы узнать, во сколько вам обойдется остекление. Для предприятий действуют особые привлекательные условия. На все окна, а также монтажные работы предоставляются гарантии – 20 лет. Обслуживание является бесплатным. Каждый клиент сможет рассчитывать на профессиональную, исчерпывающую консультацию. На ваш выбор огромное количество интересных готовых проектов, почитайте положительные отзывы. Предприятие разрабатывает окна самых разных форм, конфигураций, размеров.
Популярная компания ООО “Авангард” давно работает в области инжиниринга, проектирования, штамповки. Применяется только уникальный и инновационный подход к реализации идеи. Компания создает товары безупречного качества и те, что произведены в соответствии с уникальными технологиями. https://avangardmet.ru – на сайте ознакомьтесь с тем, какие услуги вы сможете здесь заказать. Если возникли вопросы, то необходимо обратиться к менеджеру через особую форму. Изучите схему проезда.
На сайте https://fin-service.su/kredit-dlya-biznesa/ каждый желающий получает возможность взять любую сумму на развитие своего дела. При этом процентная ставка не будет превышать 3,5% в месяц. Взять кредит можно сроком на год. Необходимая сумма поступит на ваш расчетный счет. Нет необходимости вносить залог. Прямо сейчас вы сможете сделать предварительный расчет. Но то, какую сумму вам нужно будет вносить ежемесячно, станет известно только после того, как будет рассмотрена заявка. Закажите кредит в режиме онлайн прямо сейчас!
На сайте https://kaiser-russia.su воспользуйтесь возможностью приобрести качественную, надежную сантехнику популярной марки KAISER. Здесь представлена только оригинальная продукция, на которую даются гарантии. Она отличается длительным сроком эксплуатации, стильным и привлекательным дизайном. В каталоге находится полный ассортимент бренда, в том числе, мойки, душевые системы и стойки. С той целью, чтобы вы быстрее определились с выбором, продукцию распределили по группам. Изучите фото, а также технические характеристики.
На сайте https://j-center.ru уточните, во сколько обойдутся курсы парикмахера, которые проходят в школе-студии Юлии Бурдинцевой. Вас будут обучать только лучшие, компетентные и квалифицированные парикмахеры, которые подают информацию в простой форме, что позволяет быстро получить знания. Каждый ученик получит фундаментальные знания, а программа подготовки специалистов является отработанной. За годы обучения школа-студия приобрела положительный имидж, что подтверждают многочисленные клиенты.
На сайте https://selyatino.santex-uslugi.ru/ оставьте заявку для того, чтобы заказать такую полезную услугу, как установка водоснабжения, а также систем отопления. Такая услуга является крайне востребованной для того, чтобы с комфортом проживать в частном доме или коттедже круглый год. Если система качественно спроектирована, то это позволит получить оптимальную температуру внутри помещения. Компания гарантирует особый подход, практичность, а также детальное исполнение проекта. Сотрудники отличаются всеми необходимыми знаниями, опытом.
Интернет-магазин Эиком предлагает радиодетали и электронные компоненты в широком ассортименте. Гарантируем персональный подход и отменное качество продукции. Наша главная цель – долгосрочное и взаимовыгодное сотрудничество. https://eicom.ru – тут можно с условиями оплаты и доставки ознакомиться. Мы постоянно обучаемся и развиваемся, непрерывно уровень профессионализма повышая. Готовы помочь с выбором продукции, решить вопросы с доставкой и грамотно проконсультировать. Будем рады вас среди своих клиентов видеть!
На сайте https://www.florion.ru/catalog/kompozicii-iz-zhivyh-cvetov представлено огромное количество изысканных и аристократичных композиций, которые выполнены из настоящих, живых цветов. Есть возможность приобрести такие цветы, которые находятся в коробке, элегантной сумочке. А если ищете что-то эксклюзивное, то присмотритесь к кораблю из свежих цветов самой разной цветовой палитры. Из всего многообразия вы точно выберете то, что соответствует поводу. На все композиции действуют привлекательные расценки. Вы получите именно то, что выбрали по фото.
На сайте https://www.parvenik.ru/ представлены березовые, дубовые, эвкалиптовые веники, которые можно приобрести как в розницу, так и оптом. Вся продукция продается по привлекательным ценам, действует быстрая доставка. Регулярное обновление ассортимента, чтобы вы приобрели все, что нужно и в любом количестве. Если вы регулярно посещаете баню, то вам пригодятся банные советы, которые находятся на этом портале. Огромное количество товаров, которые реализуются с большой скидкой. Также представлены и травы в мешочках, эксклюзивные букеты из целебных трав.
Юнитал-М в области охраны труда услуги предоставляет. Работаем с различными предприятиями и людьми. Нам доверяют, поскольку мы с серьезностью подходим к выбранной нами деятельности и регулярно улучшаемся. https://www.unitalm.ru – тут более детальная о компании информация предложена. Тут можете скачать прайс-лист. Грамотные преподаватели с огромной ответственностью подходят к процессу обучения. Нашими клиентами являются руководители значительных государственных предприятий и персональные предприниматели. Смелее обращайтесь к нам!
Ищете прием металлолома в Симферополе? Посетите сайт https://metall-priem-simferopol.ru/ где вы найдете лучшие цены на приемку лома. Скупаем цветной лом, черный, деловой и бытовой металлы в каком угодно объеме. Подробные цены на прием на сайте. Работаем с частными лицами и организациями.
Онлайн казино 1Win — это надежная платформа для азартных игр, предлагающая широкий выбор слотов, рулетку, покер и live-казино. Простой интерфейс, быстрые выплаты и круглосуточная поддержка делают 1Win отличным выбором для новичков и опытных игроков. Регистрация на https://migliori-casino.org/ занимает минуту, а бонусы на первый депозит увеличат шансы на выигрыш. Играй и побеждай с 1Win!
На сайте https://more-transfer.ru закажите трансфер. Компания на профессиональном уровне осуществляет пассажирские перевозки как по индивидуальному заказу, так и для группы лиц. Причем они могут быть для самых разных целей. Все автобусы с проверенными, надежными водителями, у которых огромный опыт работы. Чуть ниже представлены тарифы на услуги предприятия. Есть возможность воспользоваться полным спектром услуг. На сайте находится комфортный поиск, детальное описание, что поможет быстро сориентироваться.
На сайте https://xn—-8sbafccjfasdmzf3cdfiqe4awh.xn--p1ai/ узнайте цены на грузоперевозки по России. Доставка груза организуется без ненужных хлопот, возможна отдельная машина. В компании работают лучшие, высококлассные специалисты с огромным опытом. Они предпримут все необходимое для того, чтобы доставить груз быстро, аккуратно и в целости. Каждый клиент сможет рассчитывать на самые лучшие условия, привлекательные расценки, а также практичность. Ко всем практикуется индивидуальный и профессиональный подход.
Строй-М2 предлагает широкий выбор строительных материалов. Продукция сертифицирована, что свидетельствует о ее надежности и долговечности. Мы регулярно предлагаем постоянным клиентам скидки и различные акции. Гарантируем сочетание высокого качества товаров и приемлемых цен. https://stroy-m2.ru – портал, интерфейс его таким образом разработан, чтобы понятно интуитивно было, где купить и искать нужный материал. Готовы обо всех преимуществах и особенностях необходимого продукта рассказать. Обращайтесь скорее к нам!
На сайте https://pesokug.ru/ закажите качественный песок на выгодных условиях, по привлекательной стоимости. Предприятие ООО “Геотрейд” в течение долгого времени продает песок со своего карьера. Оно специализируется на добыче, обработке, продаже сеяного, природного песка. Выгодным моментом является то, что сотрудничество происходит напрямую, минуя посредников. К важным преимуществам покупки именно на этом предприятии является то, что товар является сертифицированным, соответствует ГОСТу. Используется высокотехнологичное оборудование.
На сайте https://russian-sports.ru/ изучите самые последние, увлекательные и любопытные новости спорта. Они касаются как футбола, так и хоккея, других дисциплин. Вся информация сопровождается фото, чтобы вы лучше сориентировались. Здесь же рассказывается и о том, как выполняется упражнение «Лодочка», которое считается одним из самых эффективных для восстановления позвоночника. Обязательно ознакомьтесь с информацией относительно флорбола, чтобы узнать, когда его создали, про главные стратегии, правила игры.
На сайте https://oknaksa.ru/ закажите расчет технического задания, чтобы узнать, во сколько вам обойдется остекление. Для предприятий действуют особые привлекательные условия. На все окна, а также монтажные работы предоставляются гарантии – 20 лет. Обслуживание является бесплатным. Каждый клиент сможет рассчитывать на профессиональную, исчерпывающую консультацию. На ваш выбор огромное количество интересных готовых проектов, почитайте положительные отзывы. Предприятие разрабатывает окна самых разных форм, конфигураций, размеров.
На сайте https://j-center.ru уточните, во сколько обойдутся курсы парикмахера, которые проходят в школе-студии Юлии Бурдинцевой. Вас будут обучать только лучшие, компетентные и квалифицированные парикмахеры, которые подают информацию в простой форме, что позволяет быстро получить знания. Каждый ученик получит фундаментальные знания, а программа подготовки специалистов является отработанной. За годы обучения школа-студия приобрела положительный имидж, что подтверждают многочисленные клиенты.
На сайте https://technopodbor.ru/ представлена бытовая техника в огромном ассортименте. Вся продукция высокого качества, на нее имеются сертификаты, необходимая документация, подтверждающая подлинность. В магазине вы найдете климатическую, бытовую технику, все для сада, дачи, занятий спортом. Есть категория отдельностоящей бытовой техники. В нее входят стиральные машины, холодильники, морозильные камеры, вытяжки, плиты. Возможно, вас заинтересует встраиваемая бытовая техника, которая упростит ведение хозяйства.
Боитесь промахнуться с капсулами? Наш рейтинг топ-10 Nespresso Original подскажет идеальную капсулу для эспрессо-машины. Ознакомьтесь и закажите на https://coffeeroom.by/
Портал avicenna-spb.ru – достойный информационный источник. Как организовать медицинский центр, мы рассказываем. Рассмотрим, как ухаживать за кожаным ремешком часов. У нас найдете много интересного! https://avicenna-spb.ru – тут статьи о здоровье размещаются, о выгодных скидках Яндекс Еда, о ремонте сплит-систем, также вскрытии и установке замков. Разъяснили, почему происходит деформация ногтей. Постарались разъяснить, как для оптимального ухода за зубами выбрать правильную стоматологическую щетку. Вы узнаете, где отметить день рождения в Таганроге.
Компания «ДезКонтроль» предлагает широчайший спектр услуг, помогающих справиться с проблемами, которые с вредителями связанны. Мы приличный опыт накопили и множество от довольных клиентов положительных отзывов. Используем исключительно сертифицированные средства. Гарантируем качественное осуществление всех видов санитарной обработки. https://dez53.ru – здесь можете ознакомиться с полной таблицей цен. Обслуживаем коммерческие и частные объекты. Выполняем работы в срок. Выбирайте нашу компанию. Обеспечьте для себя комфорт и спокойствие!
Интернет-магазин «Orlando.by» большой выбор товаров для огорода, сада и дома предлагает. Гарантируем наилучшее соотношение качества и цены. Вас приятно удивят наши акции. Больше не надо стоять в очередях и куда либо идти. Просто изучите внимательно каталог и что вас интересует выберите. Ищете товары для огорода оптом? Orlando.by – тут в два клика можно заказ сделать. Можете с нами по контактным номерам связаться. Мы ценим каждого нашего клиента. Предлагаем удобные способы оплаты. Сделаем все, чтобы вы сервисом и покупками остались довольны!
This post is a fantastic resource for retro gaming enthusiasts! The detailed setup guide for Kodi, along with the list of ROMs and emulators, is super helpful. I love how you broke down the steps—it made it easy to follow. Can’t wait to relive those classic games! Thanks for sharing!
Ищете рейтинг лучших сервисов виртуальных номеров? Посетите страницу https://blog.virtualnyy-nomer.ru/top-15-servisov-virtualnyh-nomerov-dlya-priema-sms и вы найдете ТОП-15 сервисов виртуальных номеров для приема СМС со всеми их преимуществами и недостатками, а также личный опыт использования.
На сайте https://www.florion.ru/catalog/kompozicii-iz-zhivyh-cvetov представлено огромное количество изысканных и аристократичных композиций, которые выполнены из настоящих, живых цветов. Есть возможность приобрести такие цветы, которые находятся в коробке, элегантной сумочке. А если ищете что-то эксклюзивное, то присмотритесь к кораблю из свежих цветов самой разной цветовой палитры. Из всего многообразия вы точно выберете то, что соответствует поводу. На все композиции действуют привлекательные расценки. Вы получите именно то, что выбрали по фото.
По ссылке https://www.62.ua/news/3907486/ak-zrobiti-rozumnu-teplicu-svoimi-rukami-ta-avtomatizuvati-doglad-za-roslinami почитайте содержательную, полезную информацию по поводу того, как самостоятельно создать умную теплицу, сделать так, чтобы уход за растениями проходил в автоматическом режиме. В статье рассматриваются и такие вопросы, как: для чего нужна умная теплица, какие составляющие необходимы для того, чтобы организовать такую теплицу. Также вы сможете изучить и пошаговую инструкцию, которая позволит реализовать идею.
На сайте https://parkmotors.ru/ изучите весь ассортимент товаров, которые вы сможете приобрести прямо сейчас. Популярная компания реализует непосредственно со склада самые разные комплектующие на Газель и аналогичную грузовую технику. Всегда в наличии шины, которые представлены иностранными, отечественными производителями. Особенно востребованы двигатели, а также блок цилиндров. Есть возможность приобрести сцепление от турецких, немецких заводов-изготовителей. Также можно купить и электрический стеклоподъемник на Газель.
Особенно востребованы туры в Азербайджан, Грузию. Перечисленные направления станут оптимальным выбором для того, кто находится в поиске чего-то интересного, необычного, что обязательно понравится. Эмиль и Аня создадут уникальные авторские экскурсии специально для вас, чтобы вы получили море приятных впечатлений и красивые кадры. https://aktivniy-otdykh.ru/ – на портале вы ознакомитесь с отзывами тех, кто уже заказывал экскурсии, в них они рассказывают, как все прошло, насколько хорошо было организовано путешествие. Если и вы хотите яркие и незабываемые кадры, то оставьте личные данные, чтобы вам перезвонили и проконсультировали.
Mdnews.top имеет интерфейс продуманный и вам понравится точно. Актуальные новости Молдовы вам интересны будут, рекомендуем в закладки наш сайт добавить. Статьи снабжены четкими фотографиями. Мы стараемся делать каждый материал полезным. Желаем вам приятного чтения. https://mdnews.top/ – здесь есть удобный поиск, можете им в любое время воспользоваться. О самых главных событиях в Молдове пишем. Ценим доверие читателей. Работаем, чтобы вы в удобном формате могли всегда информацию получать. Присоединяйтесь к нам. Рады вашему мнению!
На сайте https://golitsino.santex-uslugi.ru/ оставьте заявку для того, чтобы заказать профессиональную установку системы отопления, а также водоснабжения. Монтажные работы представляют собой важный этап в создании оптимальных условий для проживания в коттедже либо загородном доме. Если система правильно разработана, в ней все предусмотрено, то получится поддержать оптимальную температуру внутри помещения. Обратившись в эту компанию, вы получите профессиональный подход к реализации идеи.
Ищете архитектурное проектирование и дизайн интерьеров коммерческой недвижимости? Посетите сайт Архитектурной мастерской Parallel https://amparallel.ru/ – мы команда профессионалов в области архитектурного проектирования и дизайна интерьеров. Ознакомьтесь со всеми нашими услугами на сайте, посмотрите портфолио – вам обязательно понравится!
На сайте https://www.florion.ru/catalog/kompozicii-iz-cvetov воспользуйтесь возможностью заказать композиции из искусственных либо натуральных цветов, которые всегда будут выглядеть привлекательно, интересно и дополнять интерьер. Есть оригинальные варианты в стильной коробке, элегантной сумочке, завернутые в бумагу. Такие букеты можно преподнести на любое событие или просто так, чтобы порадовать вторую половинку. Есть решения из самых разных цветов, в том числе, ромашек, роз и самой разной цветовой гаммы.
На сайте https://villeroy-boch.pro в большом количестве представлена продукция популярной марки Villeroy & Boch. Интернет-магазин предлагает воспользоваться огромным выбором качественной, надежной продукции по доступным ценам. К вашим услугам оперативная доставка, безупречный клиентский сервис, действует система скидок. Здесь находится исключительно оригинальная и сертифицированная продукция. Вся сантехника отличается эргономичным, привлекательным дизайном, практичностью, отличным качеством.
На сайте https://edembusauto.ru/ воспользуйтесь поиском маршрута для того, чтобы заказать междугородние пассажирские перевозки, уточнить расписание автобуса. Также есть возможность заказать и туры выходного дня, увлекательные и разнообразные экскурсии. На портале изучите и стоимость билетов. В арсенале компании исключительно новые, исправные автобусы, работают водители с огромным опытом. Также существует возможность бронирования в режиме реального времени. Изучите самые популярные маршруты. Телефон для связи представлен на сайте.
Нужны надёжные силовые или контрольные кабели для любых задач? На https://remcable.ru/ — широкий ассортимент продукции с гарантией, быстрая доставка по России и консультации от специалистов. Прямые поставки от производителей, удобный поиск и индивидуальный подход к каждому заказу. Заходите и убедитесь сами!
На сайте https://youtu.be/OLPgC5P-5pI посмотрите содержательный, увлекательный видеоматериал, который касается того, как сделать приспособление из обычного ламината. Это очень просто даже для начинающего мастера. И это получится сделать даже в домашних условиях. В этом видео речь пойдет о направляющем зажиме, который подойдет для того, чтобы сделать пропилы. Видео содержательное, а потому вы точно поймете суть. В результате вы сделаете ровные и качественные пазы. Предлагается изучить список того, что вам понадобится для реализации идеи.
Интернет-магазин «Orlando.by» – это приличный выбор нужных товаров для огорода, дома и сада Понимаем, что для вас важна экономия. Гарантируем низкие цены и индивидуальное отношение к каждому заказу. Всегда рады своим клиентам! https://orlando.by – здесь можете ознакомиться с условиями оплаты и доставки. Продукция вся сертифицирована, это о ее высоком качестве свидетельствует. Для оптовиков мы приготовили выгодные условия. Всегда вам с выбором товара готовы помочь и на интересующие вопросы ответить. Желаем удачных вам покупок!
Онлайн казино 1Win — это надежная платформа для азартных игр, предлагающая широкий выбор слотов, рулетку, покер и live-казино. Простой интерфейс, быстрые выплаты и круглосуточная поддержка делают 1Win отличным выбором для новичков и опытных игроков. Регистрация на https://migliori-casino.org/ занимает минуту, а бонусы на первый депозит увеличат шансы на выигрыш. Играй и побеждай с 1Win!
Компания «Промметаллстрой» предлагает купить металлопрокат. У нас большой товарный ассортимент. Вся без исключения продукция сертифицирована и соответствует ГОСТам. Выгодные цены мы вам гарантируем. Ищете заглушка фланцевая ду250 ру6 ст20 цена за штуку? Prommetstroy.ru – здесь можете детально ознакомиться с условиями оплаты и доставки металлопроката. У вас возникли какие-либо вопросы? Позвоните нам по номеру телефона на портале. Проконсультируем вас по наличию и стоимости, а также с удовольствием поможем с выбором товара. Рады будем с вами посотрудничать!
Ищете работу в Израиле? На доске объявлений 4ISREAL https://4israel.co.il/ вы найдете свежие вакансии в разных городах и сферах. Удобный поиск и фильтры помогут быстро найти подходящую работу!
На сайте https://pyatigorsk.sclad.ru/ ознакомьтесь с тем, какую мебель вы сможете заказать на этом предприятии. Оно является производителем качественных верстаков самых разных модификаций. Здесь совершают покупки те, кому необходимо укомплектовать хостелы. На складе всегда хранится такая мебель, как: шкафы, кровати, а также столы, тумбы. Все это выполнено из современных, качественных и высокотехнологичных материалов. В каталоге вы найдете верстаки, а также почтовые ящики, стеллажи. Также представлены и кровати, сейфы, постельные принадлежности.
На сайте https://karate-budo.ru ознакомьтесь с номером телефона школы каратэ «КАРАТЭ БУДО», которая предназначена для взрослых. Здесь смогут заниматься все, кому уже исполнилось 35 лет. Для того чтобы ознакомиться с тем, как происходят занятия, перейдите в галерею. Все тренировки максимально адаптированы под взрослых, чтобы занятия проходили в удобном и комфортном формате. Они понравятся как начинающим спортсменам, так и новичкам. Для вашего удобства изображена схема проезда, чтобы вы быстрее нашли школу.
Официальный дистрибьютер марки Редан https://ridan-gsk.ru/ – это оптовая поставка автоматики Ридан по всей России. Ознакомьтесь с существенным ассортиментом по выгодным ценам на сайте – специализируемся на поставках продукции по направлениям: отопление, водоснабжение, канализация, ИТП, теплосети, пожарное оборудование, теплоизоляция, гидроизоляция и другое. Подробнее на сайте.
На сайте https://youtu.be/OLPgC5P-5pI посмотрите содержательный, увлекательный видеоматериал, который касается того, как сделать приспособление из обычного ламината. Это очень просто даже для начинающего мастера. И это получится сделать даже в домашних условиях. В этом видео речь пойдет о направляющем зажиме, который подойдет для того, чтобы сделать пропилы. Видео содержательное, а потому вы точно поймете суть. В результате вы сделаете ровные и качественные пазы. Предлагается изучить список того, что вам понадобится для реализации идеи.
Ищете качественные печи в интернет-магазине? Везувий.шоп предлагает наилучший выбор по привлекательным ценам. Наша главная миссия – создавать тепло и уют в домах клиентов. Вы можете у нас все необходимое заказать, из своего дома не выходя. Мы устраиваем акции. Обеспечиваем быструю доставку товара. Ищете печи везувий? Vezuviy.shop – здесь представлена более подробная информация о нас. У вас появились вопросы? Обращайтесь к нашим компетентным специалистам. Они с радостью расскажут, как для обогрева помещений подобрать идеальную печь.
Интернет-магазин Эиком предлагает радиодетали и электронные компоненты в широком ассортименте. Гарантируем высокое качество продукции и индивидуальный подход. Наша главная цель – долгосрочное и взаимовыгодное сотрудничество. https://eicom.ru – тут можно с условиями оплаты и доставки ознакомиться. Мы постоянно обучаемся и развиваемся, непрерывно уровень профессионализма повышая. Готовы грамотно проконсультировать, помочь с выбором продукции, решить вопросы с доставкой. Будем рады видеть вас среди наших клиентов!
Изучите актуальные и полезные новости на тему финансов, а также недвижимости. Только информативные материалы, касающиеся финансового рынка не только Польши, но и мира – вся информация опубликована на одном сайте. Здесь огромное количество материалов, которые получены из достоверных источников, поэтому на них точно можно положиться. https://newsfin.pl/ – на портале есть и фото, которые позволят сориентироваться в том, что сейчас в мире. Представлены материалы на тему криптовалюты, экономики, бизнеса. Заходите сюда регулярно, чтобы получить достоверную информацию.
Интернет магазин Alpicool https://4766.ru/ – это огромный ассортимент товаров по лучшим ценам. Среди наших товаров – Webasto, ASIC майнеры, автомобильные холодильники Alpicool, авто кондиционеры, SUP доски, отопители, лебедки и многое другое. Доставка по всей России. Узнайте о наших лучших предложениях на сайте!
В питомнике «go Mikheeva Elena» вы можете купить щенка и лучшего друга обрести. Заводчик японских собак Елена Михеева гарантирует поддержку в период всей жизни малыша и своевременную консультацию по интересующим вопросам. https://shibainu-japan.ru – ресурс, где есть возможность посмотреть уже сейчас фото. Также здесь можно забронировать щенка Сиба Ину. Он вам радость и положительные эмоции будет дарить. Щенки и собаки заводчика растут строго на еде натуральной, поскольку они нужные микроэлементы для здоровья и витамины получают.
На сайте https://golitsino.santex-uslugi.ru/ оставьте заявку для того, чтобы заказать профессиональную установку системы отопления, а также водоснабжения. Монтажные работы представляют собой важный этап в создании оптимальных условий для проживания в коттедже либо загородном доме. Если система правильно разработана, в ней все предусмотрено, то получится поддержать оптимальную температуру внутри помещения. Обратившись в эту компанию, вы получите профессиональный подход к реализации идеи.
Известное предприятие ООО “Авангард” длительное время оказывает профессиональные услуги в таких сферах, как: проектирование, инжиниринг, гальваника, штамповка. Применяется только уникальный и инновационный подход к реализации идеи. Предприятие производит продукцию только эталонного качества и созданную по особым технологиям. https://avangardmet.ru – на портале уточните, какими услугами вы сможете воспользоваться. Если возникли вопросы, то необходимо обратиться к менеджеру через особую форму. Изучите схему проезда.
Артия-Принт – компания, которая предлагает приобрести внешние аккумуляторы и флешки оптом. У нас лояльные цены. Предлагаем большой выбор товаров, удобство покупок, вежливое обслуживание и отменное качество. С нами всегда прекрасные эмоции! Ищете флешка купить в москве? Flashner.ru – здесь есть каталог и простой поиск. Обеспечиваем оперативную доставку продукции. Ставим себе главную цель – быть для вас номером один. Позвоните нам по телефону, и мы с радостью грамотно вас проконсультируем. Выбрав Flashner, вы делаете грамотное решение!
Быстрое бронирование авто в Минске: эконом, седаны, кроссоверы и кабриолеты. Без залога для граждан РБ, круглосуточная поддержка и гибкая оплата. Проверьте доступность прямо сейчас на https://autorent.by/
На сайте https://pyatigorsk.sclad.ru/ ознакомьтесь с тем, какую мебель вы сможете заказать на этом предприятии. Оно является производителем качественных верстаков самых разных модификаций. Здесь совершают покупки те, кому необходимо укомплектовать хостелы. На складе всегда хранится такая мебель, как: шкафы, кровати, а также столы, тумбы. Все это выполнено из современных, качественных и высокотехнологичных материалов. В каталоге вы найдете верстаки, а также почтовые ящики, стеллажи. Также представлены и кровати, сейфы, постельные принадлежности.
Строй-М2 большой выбор строительных материалов предоставляет. Продукция сертифицирована, что свидетельствует о ее надежности и долговечности. Мы часто проводим разные акции и предоставляем скидки постоянным клиентам. Гарантируем сочетание доступных цен и высокого качества товаров. https://stroy-m2.ru – сайт, интерфейс его разработан таким образом, чтоб было интуитивно понятно, где искать необходимый материал и как купить его. Готовы обо всех преимуществах и особенностях необходимого продукта рассказать. Обращайтесь скорее к нам!
На сайте https://villeroy-boch.pro в большом количестве представлена продукция популярной марки Villeroy & Boch. Интернет-магазин предлагает воспользоваться огромным выбором качественной, надежной продукции по доступным ценам. К вашим услугам оперативная доставка, безупречный клиентский сервис, действует система скидок. Здесь находится исключительно оригинальная и сертифицированная продукция. Вся сантехника отличается эргономичным, привлекательным дизайном, практичностью, отличным качеством.
На сайте https://youtu.be/OLPgC5P-5pI посмотрите содержательный, увлекательный видеоматериал, который касается того, как сделать приспособление из обычного ламината. Это очень просто даже для начинающего мастера. И это получится сделать даже в домашних условиях. В этом видео речь пойдет о направляющем зажиме, который подойдет для того, чтобы сделать пропилы. Видео содержательное, а потому вы точно поймете суть. В результате вы сделаете ровные и качественные пазы. Предлагается изучить список того, что вам понадобится для реализации идеи.
Боитесь промахнуться с капсулами? Наш рейтинг топ-10 Nespresso Original подскажет идеальную капсулу для эспрессо-машины. Ознакомьтесь и закажите на https://coffeeroom.by/
Мебельный базар диваны, обеденные и письменные столы, шкафы, кресла и другое предлагает. Интернет-магазин отменное качество товаров гарантирует. Стремимся к тому, чтобы стать востребованными для покупателей. Заказов ваших мы ждем! Ищете шкафы-купе москва? Bazar-mebel.ru – тут с нашей продукцией вы можете познакомиться. Дорожим своей репутацией и выполняем взятые на себя обязательства. Вы сможете выбрать интересующую для вас мебель, воспользовавшись нашими консультациями. Всегда действуем в интересах клиентов. Для вас будет приятным сотрудничество с нами!
ESPERO.ge обеспечивает полное сопровождение для тех, кто принял решение открыть бизнес в Грузии. Мы предлагаем справедливые цены на наши услуги. Беремся за дела разной сложности. Клиенты обращаются к нам с большим доверием, которое мы оправдываем отменным качеством и оперативной работой. https://espero.ge – тут стоимость услуг указана, посмотрите ее уже сейчас. Расскажем, кому прекрасно подходит в Грузии регистрация ИП. На ресурсе вы с ответами на интересующие вопросы сможете ознакомиться. Закажите консультацию уже сегодня по регистрации бизнеса в Грузии!
Don’t miss the best crypto presale 2025! Nexchain is a next-gen AI-powered blockchain platform aiming to revolutionize DeFi, NFTs, and smart contracts. Early supporters can gain exclusive access and potential rewards. Join now https://nexchain.ai/ before it goes public!
Ищете яндекс такси телефон? Igormylnikovchannel.ru/yandeks-taksi-sankt-peterburg-telefon/ , а также ознакомиться с действующими тарифами такси и стоимостью поездки. Если вас интересует полноценная информация о работе в Яндекс такси или справочная информация – то на сайте вы найдете все что вам необходимо, а также сможете задавать свои вопросы или участвовать в обсуждении.
Онлайн казино 1Win — это надежная платформа для азартных игр, предлагающая широкий выбор слотов, рулетку, покер и live-казино. Простой интерфейс, быстрые выплаты и круглосуточная поддержка делают 1Win отличным выбором для новичков и опытных игроков. Регистрация на https://migliori-casino.org/ занимает минуту, а бонусы на первый депозит увеличат шансы на выигрыш. Играй и побеждай с 1Win!
На сайте https://lzt.market/ вы сможете приобрести либо продать игровые аккаунты. Для поиска нужного варианта воспользуйтесь специальным фильтром, который позволит подобрать решение по стоимости, популярности. Есть как свежие варианты, так и те, которым уже несколько дней. Очень часто предоставляются скидки, действуют максимально выгодные предложения. Обязательно посетите раздел с гайдами и рекомендациями. Ознакомьтесь с курсом валют, последними аккаунтами, которые появились несколько минут назад.
Компания «ДезКонтроль» предлагает широчайший спектр услуг, помогающих справиться с проблемами, которые с вредителями связанны. Мы приличный опыт накопили и множество от довольных клиентов положительных отзывов. Применяем только средства, которые прошли сертификацию. Гарантируем качественное выполнение санитарной обработки всех видов. https://dez53.ru – тут можно с полной таблицей цен ознакомиться. Обслуживаем как частные, так и коммерческие объекты. Выполняем работы в срок. Выбирайте нашу компанию. Обеспечьте для себя комфорт и спокойствие!
На сайте https://pyatigorsk.sclad.ru/ ознакомьтесь с тем, какую мебель вы сможете заказать на этом предприятии. Оно является производителем качественных верстаков самых разных модификаций. Здесь совершают покупки те, кому необходимо укомплектовать хостелы. На складе всегда хранится такая мебель, как: шкафы, кровати, а также столы, тумбы. Все это выполнено из современных, качественных и высокотехнологичных материалов. В каталоге вы найдете верстаки, а также почтовые ящики, стеллажи. Также представлены и кровати, сейфы, постельные принадлежности.
Ищете архитектурное проектирование и дизайн интерьеров коммерческой недвижимости? Посетите сайт Архитектурной мастерской Parallel https://amparallel.ru/ – мы команда профессионалов в области архитектурного проектирования и дизайна интерьеров. Ознакомьтесь со всеми нашими услугами на сайте, посмотрите портфолио – вам обязательно понравится!
На сайте https://kitt-nn.ru/ в большом многообразии представлена качественная летняя, зимняя спецодежда, которая идеально подойдет для представителей самых разных профессий. Вся она сшита из качественных, надежных, современных материалов, которые отличаются износостойкостью. В разделе вы найдете и СИЗ, все для рыбалки, охоты, приятного времяпрепровождения на природе, все для защиты рук, медицинскую одежду. Вся продукция выполнена в соответствии с самыми высокими требованиями, по ГОСТу. На товары установлены лучшие цены.
На сайте https://good-promo.ru/ вы узнаете все секреты, рекомендации, которые помогут изрядно сэкономить при покупках. На этом неофициальном сайте «Пятерочки» вы найдете актуальную и содержательную информацию по поводу акций на неделю. Также представлены расценки недели по карте, то, какие акции вас будут ожидать на кассе. Регулярно устраиваются скидки на рыбу, а также некоторые вина. Есть рекомендации, которые помогут быстрее убраться в коттедже, навести чистоту после ремонта. Узнаете много нового о здоровье мочеполовой сферы.
Студия перманентного макияжа Юлии Карповой https://juliapermanent.ru/ это возможность получить услуги от одного лучших мастеров России. Ознакомьтесь со всеми нашими услугами на сайте и стоимостью широкого спектра процедур в области перманентного макияжа. Также вы можете пройти обучение перманентному макияжу в нашей студии и получить новую профессию чтобы начать больше зарабатывать!
На сайте https://zvenigorod.santex-uslugi.ru/ оставьте заявку с той целью, чтобы воспользоваться услугой, связанной с профессиональной и качественной установкой систем отопления, а также водоснабжения. Это необходимо и в том случае, если вы планируете проживание в загородном доме на постоянных условиях. Если система отопления правильно спроектирована и установлена, то в этом случае будет всегда поддерживаться комфортная температура. Для реализации проекта применяются исключительно материалы высокого качества.
По ссылке https://www.0462.ua/news/3878292/zimove-virosuvanna-ovociv-u-teplici-sekreti-uspisnogo-vrozau ознакомьтесь с информацией, которая касается того, как правильно вырастить овощи в теплице. Здесь представлены самые содержательные, важные рекомендации, которые точно будут вам полезны, если и вы задались таким вопросом. Рассматривается и вопрос того, как правильно подобрать овощи. Представлен перечень наиболее подходящих культур. В обязательном порядке рассматривается и освещение. Необходимо предусмотреть и системы отопления.
Формовочная сетка понадобится домашнему мастеру, кто хочет готовить вкусные деликатесы. Она для копчения подходит, запекания в духовке и различных таких обработок продуктов питания, помимо действия огня открытого. Ищете купить сетку формовочную для копчения? Ozon.ru/product/formovochnaya-setka-dlya-myasa-kolbasy-ruletov-ryby-100mm-10-metrov-dlya-kopcheniya-zapekaniya-varki-956401613 – здесь представлена более детальная информация, ознакомиться с ней можно прямо сейчас. Мы товар отменного качества предоставляем. Он будет доставлен в отличном состоянии.
На сайте https://vgolos.info/ представлено огромное количество интересных, актуальных новостей на тему экономики, бизнеса, культуры, жизни, здоровья, криминала. Здесь вы найдете все, что вас интересует в данный момент, узнаете то, какая сейчас обстановка на Украине. Регулярно появляются новые, свежие данные, которые разъяснят реальное положение дел. Есть информация на тему технологий и многого другого. Представлен раздел с самой популярной информацией, которую читают многие. Ознакомьтесь с разделом, в котором находятся самые последние новости.
Plastelo – место, где вы можете купить складское оборудование, пластиковые ящики, контейнеры для мусора и многое другое. Предлагаемая в каталоге продукция сертифицирована. Мы прозрачные условия предлагаем. Быстро отвечаем на вопросы покупателей. Готовы с оформлением и выбором помочь. https://plastelo.ru – тут имеется каталог, посмотрите его уже сейчас. Работаем с частными и корпоративными клиентами по всей РФ. Постоянно совершенствуемся. Гарантируем быструю отгрузку и грамотную поддержку. Обращайтесь именно к нам!
Студия дизайн интерьера в Москве Interioris – https://alsuinteriors.ru/ это возможность заказать уникальный дизайн интерьера, который придаст помещению индивидуальность. Ознакомьтесь со всеми нашими услугами на сайте, посмотрите портфолио и стоимость или приходите на бесплатную консультацию.
На сайте https://t.me/home_1win почитайте все самые интересные, последние и актуальные новости, которые касаются известной БК «1win». Только здесь публикуются самые последние данные, которые будут интересны всем, кто любит делать ставки и азартные развлечения. Вы можете заходить на этот канал с любого устройства, в том числе, мобильного телефона, ПК. Регулярно появляется новая информация о заведении, публикуются промокоды, которые позволят вам значительно сэкономить и при этом попытать свои силы на многих автоматах.
На сайте https://hotplayer.ru в большом количестве представлены песни самых разных жанров, включая инди, рок, метал, альтернативу, электронную, танцевальную, рэп. Для вашего удобства имеется комфортный, удобный в использовании плеер с набором необходимых функций. Таким образом, вы сможете перемотать песню, переключить на другую или вовсе поставить на паузу. Регулярно здесь появляются новинки от топовых исполнителей. Есть раздел с самыми популярными композициями, которые прослушивает большинство.
Rubbish Taxi https://rubbish-taxi.ie/ provides fast, reliable rubbish removal across Dublin, handling household junk, garden waste, old furniture, mattresses, appliances, construction debris, and more. Our licensed team offers same-day man-and-van service with all labour included. We also collect old sofas, armchairs, bed frames, carpets, doors, and bulky waste, making it easy to clear out unwanted items quickly and efficiently.
На сайте https://bellefemme.ru приобретите качественное, привлекательное и роскошное нижнее белье, корсеты, боди, которые подчеркнут достоинства фигуры, сделают силуэт более привлекательным. На всю продукцию установлены доступные цены, чтобы вы пополнили гардероб интересными вещами. Нижнее белье выполнено из качественных, приятных к телу тканей, которые не мнутся и не теряют форму. В таком белье вы всегда будете выглядеть уверенно и необычно. Прием заявок осуществляется в круглосуточном режиме, организуется оперативная доставка по России.
На сайте https://xn—-8sbafccjfasdmzf3cdfiqe4awh.xn--p1ai/ узнайте цены на грузоперевозки по России. Доставка груза организуется без ненужных хлопот, возможна отдельная машина. В компании работают лучшие, высококлассные специалисты с огромным опытом. Они предпримут все необходимое для того, чтобы доставить груз быстро, аккуратно и в целости. Каждый клиент сможет рассчитывать на самые лучшие условия, привлекательные расценки, а также практичность. Ко всем практикуется индивидуальный и профессиональный подход.
Game-Lands https://game-lands.ru/ – это сайт с подробными гайдами и прохождениями для новичков и опытных игроков. Здесь вы найдете лучшие советы, топовые билды и сборки, точное расположение предметов, секретов, пасхалок, и исправление багов на релизах. Узнаете, как получить редкие достижения, что делать в сложных моментах и с чего начать в новых играх. Всё, чтобы повысить скилл и раскрыть все возможности игровых механик.
J-center Studio – одна из наиболее известных школ парикмахерского искусства, которая предоставляет все необходимые инструменты и расходные материалы. Квалифицированные педагоги актуальные знания дают. С ними обучение превращается в увлекательный процесс. Вы освоите все тонкости создания модных стрижек и техник окрашивания. Ищете курсы парикмахеров универсалов? J-center.ru здесь можно найти информацию о стоимости обучения. Мы хотим вам помочь открыть новые возможности и получить востребованную профессию. Позвоните нам для консультации по телефону.
Стоматологическая клиника Новадент оснащена новейшим оборудованием. Используем материалы высокого качества и действенные обезболивающие средства. Дарим лучезарные улыбки! Вы узнаете, с чего начинается процесс лечения у стоматолога. https://novadentspb.ru – здесь представлены отзывы о нас, ознакомьтесь с ними. На сайте можете оставить контактный номер, и мы в ближайшее время обязательно перезвоним вам. Наши врачи постоянно повышают навыки. Они уважают пациентов и свою работу любят. За доверие к клинике Новадент мы признательны!
На сайте https://novadentspb.ru/ запишитесь на прием к знающему, опытному, талантливому стоматологу, который вернет вам красивую, эстетически привлекательную улыбку в 2 счета. У вас повысится уверенность, улыбка станет искренней, сияющей и яркой. Применяются только уникальные, работающие методы, а также инновационные и проверенные технологии. А услуги обойдутся по умеренной стоимости. Клиника предоставляет возможность вылечиться во сне. В процессе оказания услуги вы не почувствуете боли, дискомфорта.
На сайте https://kitt-nn.ru/ в большом многообразии представлена качественная летняя, зимняя спецодежда, которая идеально подойдет для представителей самых разных профессий. Вся она сшита из качественных, надежных, современных материалов, которые отличаются износостойкостью. В разделе вы найдете и СИЗ, все для рыбалки, охоты, приятного времяпрепровождения на природе, все для защиты рук, медицинскую одежду. Вся продукция выполнена в соответствии с самыми высокими требованиями, по ГОСТу. На товары установлены лучшие цены.
Посетите сайт https://zveropolis.kids/ и вы сможете смотреть онлайн мультфильм Зверополис бесплатно в хорошем качестве, а также узнать сюжет мультфильма и когда выйдет вторая часть.
В питомнике «go Mikheeva Elena» у вас есть возможность приобрести щенка и получить надежного друга. Заводчик японских собак Елена Михеева гарантирует поддержку в период всей жизни малыша и своевременную консультацию по интересующим вопросам. https://shibainu-japan.ru – ресурс, где есть возможность посмотреть уже сейчас фото. Также здесь можно забронировать щенка Сиба Ину. Он вам радость и положительные эмоции будет дарить. Собаки и щенки заводчика на натуральной еде растут, потому как они витамины и необходимые микроэлементы получают для здоровья.
Формула логистики – компания, оказывающая услуги грузоперевозок. Заказать машину можно по телефону. Заявки быстро обрабатываем и на вопросы клиентов отвечаем. Предлагаем страхование на протяжении транспортировки. Ваш груз будет под защитой, и вам не нужно беспокоиться о его сохранности. https://xn—-8sbafccjfasdmzf3cdfiqe4awh.xn--p1ai/ – тут имеются отзывы клиентов, прочтите их и удостоверьтесь, что мы – наилучший партнер в области грузоперевозок. Обращайтесь к нам. Оперативно по всей России ваш груз доставим. Всегда вам рады!
На сайте https://tvorche.ru/ ознакомьтесь с тем, какие услуги предоставляет студия-мастерская «Творче». Она работает в таких направлениях, как: Арт-вакханалия, Мастерская, а также Арт-терапия, где вы сможете реализовать самые интересные, увлекательные идеи и творческий потенциал. Вы получаете возможность устроить незабываемое свидание, девичник или мальчишник, на котором вы сможете разрисовать тело привлекательной незнакомки. Также можно устроить Арт-корпоратив, организовать познавательный мастер-класс, на котором вы почерпнете много нового и содержательного.
Интернет-магазин «Orlando.by» предлагает широкий ассортимент товаров для дома, сада, огорода. Гарантируем наилучшее соотношение качества и цены. Вас наши акции приятно удивят. Больше не нужно никуда идти и стоять в очередях. Просто внимательно изучите каталог и выберите то, что вам необходимо. Ищете георешётка купить? Orlando.by – здесь сделать заказ можно в два клика. Можете связаться с нами по контактным номерам. Каждого нашего клиента мы ценим. Предлагаем удобные способы оплаты. Сделаем все, чтобы вы сервисом и покупками остались довольны!
Портал remont.kr.ua вам понравится обязательно. Тут присутствуют такие рубрики, как: ремонт, недвижимость, новости, рынок, строительство. Мы для вас подборку интересных материалов подготовили. Они взяты из открытых источников. https://remont.kr.ua/ – портал с удобным интерфейсом. Здесь представлена исключительно полезная информация. Будьте в курсе последних новостей. Статьи легко читаются и качественными фото сопровождаются. На сайте есть поиск, рекомендуем вам им воспользоваться. Будем рады видеть вас на нашем портале!
Студия перманентного макияжа Юлии Карповой https://juliapermanent.ru/ это возможность получить услуги от одного лучших мастеров России. Ознакомьтесь со всеми нашими услугами на сайте и стоимостью широкого спектра процедур в области перманентного макияжа. Также вы можете пройти обучение перманентному макияжу в нашей студии и получить новую профессию чтобы начать больше зарабатывать!
Формула логистики – компания, которая успешно занимается грузоперевозками. Гарантируем профессиональный подход и достойные условия. Подача заявки по телефону осуществляется. Любая деталь обсуждается предварительно с заказчиком. Ищете заказать доставку груза? Xn—-8sbafccjfasdmzf3cdfiqe4awh.xn--p1ai – тут опубликованы отзывы наших клиентов, посмотрите их скорее уже сейчас. Доставим ваш груз по всей РФ быстро и без лишних забот. Всегда готовы ответить на интересующие вас вопросы, рассчитать цену либо проконсультировать по маршрутам. Обращайтесь к нам!
Добро пожаловать на PLAYSECTOR – ваш основной источник игровых новостей! Мы предоставляем обзоры и релизы. Поможем вам улучшить свои навыки и добиться успеха в играх. Присоединяйтесь к нам. У нас вы бесплатные промокоды отыщите, а также сможете выяснить, как активировать их. https://playsector.ru – здесь рассказываем всем желающим об играх. На портале имеется поиск удобный, примените его. Наша миссия – создавать качественный контент. Оперативно доносим до вас самую свежую информацию. Чаще к нам заходите, чтобы в курсе игровых новостей быть!
На сайте https://obozrevatel.org/ вы найдете полезную информацию, актуальные новости на самую разную тему, в том числе, экономическую, политическую. Рассматриваются самые последние происшествия, события, которые точно заслуживают вашего внимания. Здесь выкладывается не только сухая статистика, цифры, но и фоторепортажи, картинки, информация подкрепляется видео для большей наглядности. Каждый день выкладывается новая информация из достоверных источников. А потому вы узнаете много нового.
На сайте https://zvenigorod.santex-uslugi.ru/ оставьте заявку с той целью, чтобы воспользоваться услугой, связанной с профессиональной и качественной установкой систем отопления, а также водоснабжения. Это необходимо и в том случае, если вы планируете проживание в загородном доме на постоянных условиях. Если система отопления правильно спроектирована и установлена, то в этом случае будет всегда поддерживаться комфортная температура. Для реализации проекта применяются исключительно материалы высокого качества.
На сайте https://hotplayer.ru в большом количестве представлены песни самых разных жанров, включая инди, рок, метал, альтернативу, электронную, танцевальную, рэп. Для вашего удобства имеется комфортный, удобный в использовании плеер с набором необходимых функций. Таким образом, вы сможете перемотать песню, переключить на другую или вовсе поставить на паузу. Регулярно здесь появляются новинки от топовых исполнителей. Есть раздел с самыми популярными композициями, которые прослушивает большинство.
На сайте https://vgolos.info/ представлено огромное количество интересных, актуальных новостей на тему экономики, бизнеса, культуры, жизни, здоровья, криминала. Здесь вы найдете все, что вас интересует в данный момент, узнаете то, какая сейчас обстановка на Украине. Регулярно появляются новые, свежие данные, которые разъяснят реальное положение дел. Есть информация на тему технологий и многого другого. Представлен раздел с самой популярной информацией, которую читают многие. Ознакомьтесь с разделом, в котором находятся самые последние новости.
Студия дизайн интерьера в Москве Interioris – https://alsuinteriors.ru/ это возможность заказать уникальный дизайн интерьера, который придаст помещению индивидуальность. Ознакомьтесь со всеми нашими услугами на сайте, посмотрите портфолио и стоимость или приходите на бесплатную консультацию.
На сайте https://t.me/home_1win почитайте все самые интересные, последние и актуальные новости, которые касаются известной БК «1win». Только здесь публикуются самые последние данные, которые будут интересны всем, кто любит делать ставки и азартные развлечения. Вы можете заходить на этот канал с любого устройства, в том числе, мобильного телефона, ПК. Регулярно появляется новая информация о заведении, публикуются промокоды, которые позволят вам значительно сэкономить и при этом попытать свои силы на многих автоматах.
На сайте https://xn—-8sbafccjfasdmzf3cdfiqe4awh.xn--p1ai/ узнайте цены на грузоперевозки по России. Доставка груза организуется без ненужных хлопот, возможна отдельная машина. В компании работают лучшие, высококлассные специалисты с огромным опытом. Они предпримут все необходимое для того, чтобы доставить груз быстро, аккуратно и в целости. Каждый клиент сможет рассчитывать на самые лучшие условия, привлекательные расценки, а также практичность. Ко всем практикуется индивидуальный и профессиональный подход.
ТЕД Газовые системы – единственная компания в России, которая дает официальную гарантию на оборудование DUNGS на 5 лет. Мы стремимся обеспечить безопасное и действенное применение газовых технологий. Выбирая нас, вы получаете качественное оборудование. https://tedgas.ru – тут имеется каталог продукции, посмотрите его уже сегодня. Стать вашим надежным партнером – это наша основная цель. Предлагаем для доставки продукции выгодные решения. Чтобы получить дополнительную информацию, позвоните нам по телефонам на портале.
На сайте https://clck.ru/3MKaGA вы получаете возможность приобрести качественный, премиальный алкоголь в Дубай. Вся продукция является сертифицированной, а огромный ассортимент точно вас обрадует. Можно приобрести крепкие алкогольные напитки либо шампанское или легкое вино на вечер, для того, чтобы отметить отпуск. Курьер прибудет очень быстро и привезет то, что вы выбрали. Вы сможете приобрести алкоголь в том количестве, которое нужно, чтобы угостить всех присутствующих на празднике. Вся продукция является полностью безопасной, подлинной.
Ищете блочно-модульная паровая котельная? Наши котлы проходят строгий контроль качества на всех этапах производства. Мы используем только проверенные материалы и комплектующие, чтобы обеспечить максимальную надежность и безопасность эксплуатации оборудования. Кроме того, все модели котлов ECO-PAR сертифицированы и соответствуют российским и международным стандартам безопасности.
Техносвязь – предприятие, которое по производству печатных плат предоставляет качественные услуги. Используем исключительно наилучшие комплектующие и материалы. Даем гарантию на нашу продукцию и строжайшее соблюдение сроков выполнения заказов. Ищете изготовление печатных плат на заказ? Techno-svyaz.ru – здесь можно о предприятии найти более подробную информацию. Регулярно развиваемся и растем. Наша цель – быть в сфере печатных плат вашим надежным партнером. Если вам необходима грамотная консультация, свяжитесь с нами по телефону на портале. Мы вам рады всегда!
Известное предприятие ООО “Авангард” длительное время оказывает профессиональные услуги в таких сферах, как: проектирование, инжиниринг, гальваника, штамповка. Применяется только уникальный и инновационный подход к реализации идеи. Компания создает товары безупречного качества и те, что произведены в соответствии с уникальными технологиями. https://avangardmet.ru – на сайте ознакомьтесь с тем, какие услуги вы сможете здесь заказать. При появлении вопросов свяжитесь с представителями компании через специальную форму. Ознакомьтесь со схемой проезда.
Хотите насладиться разнообразием напитков, не выходя из своего дома. Закажите доставку алкоголя в Дубае. У нас есть все, чтобы удовлетворить ваш вкус. Мы всегда стремимся подружиться с нашими клиентами. Звоните либо пишите. Ответим на интересующие вас вопросы. https://clck.ru/3MKaCk – здесь представлена более детальная информация о нас, ознакомиться с ней можете прямо сейчас. Скорость доставки алкоголя отличная, качество напитков на высоте. Сделайте особым ваш вечер. Воспользуйтесь нашим уникальным сервером.
Двери J-center Studio распахнуты для дипломированных специалистов, практикующих мастеров, а также новичков, которые желают освоить с нуля парикмахерское искусство. С радостью со студентами делимся секретами. Гордимся нашими выпускниками. У нас приемлемая стоимость парикмахерских курсов. Ищете как стать парикмахером? J-center.ru – тут цена указана, посмотрите ее уже сегодня. Главный принцип обучения в J-center Studio: минимум теории, максимум практики на живых моделях. Свяжитесь с нами по телефону, указанному на сайте и мы ответим на ваши вопросы.
Plastelo – место, где у вас есть возможность приобрести контейнеры для мусора, пластиковые ящики, складское оборудование и др. Предлагаемая в каталоге продукция сертифицирована. Мы прозрачные условия предлагаем. Быстро отвечаем на вопросы покупателей. Готовы помочь с выбором и оформлением. https://plastelo.ru – здесь есть каталог, ознакомьтесь с ним. Работаем с частными и корпоративными клиентами по всей РФ. Постоянно совершенствуемся. Гарантируем быструю отгрузку и грамотную поддержку. К нам скорее обращайтесь!
На сайте https://kitt-nn.ru/ в большом многообразии представлена качественная летняя, зимняя спецодежда, которая идеально подойдет для представителей самых разных профессий. Вся она сшита из качественных, надежных, современных материалов, которые отличаются износостойкостью. В разделе вы найдете и СИЗ, все для рыбалки, охоты, приятного времяпрепровождения на природе, все для защиты рук, медицинскую одежду. Вся продукция выполнена в соответствии с самыми высокими требованиями, по ГОСТу. На товары установлены лучшие цены.
На сайте https://bellefemme.ru приобретите качественное, привлекательное и роскошное нижнее белье, корсеты, боди, которые подчеркнут достоинства фигуры, сделают силуэт более привлекательным. На всю продукцию установлены доступные цены, чтобы вы пополнили гардероб интересными вещами. Нижнее белье выполнено из качественных, приятных к телу тканей, которые не мнутся и не теряют форму. В таком белье вы всегда будете выглядеть уверенно и необычно. Прием заявок осуществляется в круглосуточном режиме, организуется оперативная доставка по России.
Двери J-center Studio распахнуты для дипломированных специалистов, практикующих мастеров, а также новичков, которые желают освоить с нуля парикмахерское искусство. С радостью со студентами делимся секретами. Гордимся нашими выпускниками. У нас разумная стоимость курсов парикмахера. Ищете курсы парикмахеров с нуля? J-center.ru – здесь указана цена, ознакомиться с ней можно прямо сейчас. Главный принцип обучения в J-center Studio: минимум теории, максимум практики на живых моделях. Позвоните нам по телефону, который на портале указан и мы на все вопросы ваши ответим.
Game-Lands https://game-lands.ru/ – это сайт с подробными гайдами и прохождениями для новичков и опытных игроков. Здесь вы найдете лучшие советы, топовые билды и сборки, точное расположение предметов, секретов, пасхалок, и исправление багов на релизах. Узнаете, как получить редкие достижения, что делать в сложных моментах и с чего начать в новых играх. Всё, чтобы повысить скилл и раскрыть все возможности игровых механик.
На сайте https://novadentspb.ru/ запишитесь на прием к знающему, опытному, талантливому стоматологу, который вернет вам красивую, эстетически привлекательную улыбку в 2 счета. У вас повысится уверенность, улыбка станет искренней, сияющей и яркой. Применяются только уникальные, работающие методы, а также инновационные и проверенные технологии. А услуги обойдутся по умеренной стоимости. Клиника предоставляет возможность вылечиться во сне. В процессе оказания услуги вы не почувствуете боли, дискомфорта.
На сайте https://good-promo.ru/ вы узнаете все секреты, рекомендации, которые помогут изрядно сэкономить при покупках. На этом неофициальном сайте «Пятерочки» вы найдете актуальную и содержательную информацию по поводу акций на неделю. Также представлены расценки недели по карте, то, какие акции вас будут ожидать на кассе. Регулярно устраиваются скидки на рыбу, а также некоторые вина. Есть рекомендации, которые помогут быстрее убраться в коттедже, навести чистоту после ремонта. Узнаете много нового о здоровье мочеполовой сферы.
Посетите сайт https://zveropolis.kids/ и вы сможете смотреть онлайн мультфильм Зверополис бесплатно в хорошем качестве, а также узнать сюжет мультфильма и когда выйдет вторая часть.
Хотите свадьбу на Кубе — яркую, незабываемую и без забот? Организуем символическую или официальную церемонию в Варадеро, Гаване или на пляже с белым песком! Фото, видео, ретро-авто, платье и всё, что нужно — уже включено. Подробнее на https://cuba-wedding.ru/
Двери J-center Studio распахнуты для всех: новичков, желающих освоить парикмахерское искусство с нуля, дипломированных специалистов и практикующих мастеров. С радостью со студентами делимся секретами. Гордимся нашими выпускниками. У нас приемлемая стоимость парикмахерских курсов. Ищете как стать парикмахером? J-center.ru – тут цена указана, посмотрите ее уже сегодня. Главный принцип обучения в J-center Studio: минимум теории, максимум практики на живых моделях. Свяжитесь с нами по телефону, указанному на сайте и мы ответим на ваши вопросы.
Известное предприятие ООО “Авангард” длительное время оказывает профессиональные услуги в таких сферах, как: проектирование, инжиниринг, гальваника, штамповка. Используется исключительно революционный и особый подход к работе. Компания создает товары безупречного качества и те, что произведены в соответствии с уникальными технологиями. https://avangardmet.ru – на сайте ознакомьтесь с тем, какие услуги вы сможете здесь заказать. При появлении вопросов свяжитесь с представителями компании через специальную форму. Ознакомьтесь со схемой проезда.
Артия-Принт – компания, которая предлагает приобрести внешние аккумуляторы и флешки оптом. У нас лояльные цены. Предоставляем широкий ассортимент товаров, высочайшее качество, удобство покупок и, конечно, доброжелательное обслуживание. С нами всегда позитивные эмоции! Ищете флешки купить дешево москва? Flashner.ru – тут имеется простой поиск и каталог. Обеспечиваем оперативную доставку продукции. Ставим себе главную цель – быть для вас номером один. Свяжитесь с нами по телефону, и мы с удовольствием вас проконсультируем. Выбрав нас, вы правильное решение примите!
https://7futov.spb.ru/ это быстрая аренда яхт и катеров в Санкт-Петербурге, а также организация мероприятий под ключ. Большой выбор прогулочных катеров для аренды по выгодным ценам. Лучшие маршруты по СПб. Ознакомьтесь на сайте с нашими бортами и маршрутами. Организуем, при необходимости, мероприятия под ключ с кейтерингом.
Студия перманентного макияжа Юлии Карповой https://juliapermanent.ru/ это возможность получить услуги от одного лучших мастеров России. Ознакомьтесь со всеми нашими услугами на сайте и стоимостью широкого спектра процедур в области перманентного макияжа. Также вы можете пройти обучение перманентному макияжу в нашей студии и получить новую профессию чтобы начать больше зарабатывать!
Титов Святослав Александрович – квалифицированный психолог с богатым опытом работы. Его главная задача в том состоит, чтобы в раскрытии своего потенциала вам оказать помощь, разобраться в важных конфликтах и естественных силах, также способы решения отыскать наилучшие. https://xn--b1abobnrbccuqb6a.xn--p1ai/ – тут вы можете с ценами и услугами ознакомиться. Святослав Титов – грамотный специалист. Он применяет современные методы. Не стоит откладывать заботу о собственном здоровье. Скорее запишитесь на консультацию к психологу!
На сайте https://expert-po-zalivam.ru вы сможете получить всю необходимую информацию, которая касается ваших правильных действий, если вдруг залили соседи. И в этом случае потребуется помощь юриста. Материалы подскажут вам, как правильно определить виновника залива, что нужно сделать для того, чтобы акт о заливе оказался недействительным. Здесь вы найдете только самую актуальную, свежую информацию, которая поможет, если такая ситуация коснулась и вас. Также будет затронута и ответственность ТСЖ. Огромное количество материалов позволит лучше разобраться в теме.
Ищете ремонт холодильников в Санкт-Петербурге на дому? Посетите сайт https://ice-service-spb.ru/ – ознакомьтесь со всеми нашими услугами, доступными по цене. Выезд за 30 минут, гарантия 2 года, детали с собой у мастера в наличии. Сервисный центр по ремонту холодильников – это работа быстро и по разумной цене. Цены на ремонт холодильников на сайте.
Сайт interaktivnoe-oborudovanie.ru предлагает купить интерактивные панели, доски и столы, мультимедийные проекторы, документ-камеры, видеостены, цифровые лаборатории. Гарантируем доступные цены. Наш основной приоритет – обеспечение со стороны наших грамотных менеджеров качественного обслуживания. Ищете интерактивная техника? Interaktivnoe-oborudovanie.ru – здесь можете ознакомиться с условиями оплаты. Бережно и оперативно по России доставляем товары. Оперативно отвечаем на вопросы покупателей. Скорее к нам обращайтесь, и вы останетесь довольны!
На сайте https://kasatka41.online/ ознакомьтесь с подробностями тура, который организуется с остановкой в бухте. Вы устроите незабываемое, увлекательное путешествие вместе с группой высококлассных специалистов. С этой компанией ваше путешествие будет незабываемым, удивительным, насыщенным приключениями. Ее выбирают из-за того, что здесь работают первоклассные и знающие специалисты с огромным опытом. Все пассажиры, которые находятся на борту, застрахованы. Предусмотрено качественное питание, вкусные блюда.
На сайте https://www.avtolt.ru/ изучите полный каталог услуг, которые предлагает эта компания. Одной из самых популярных является накрутка ВКонтакте в автоматическом режиме. Важно то, что это абсолютно безопасно, вас точно не заблокируют. В процессе участвуют только настоящие люди, никаких ботов. Установлены привлекательные расценки. Есть возможность приобрести автолайки на месяц, а также экспресс лайки. Узнайте об этом подробности, чтобы сделать правильные выводы. Воспользуйтесь услугами, которые сделают ваш бизнес популярным.
Looking for division 2 exotic weapons? Dving.net and you will be able to order with a guarantee services for promotion and pumping in MMO games, as well as buy and sell in-game items in online games. Find out on the resource what games we work with and see our favorable prices. Reveal your full potential in your favorite pumping in MMO games, and we will help you reach new heights.
Интерактивное оборудование https://interaktivnoe-oborudovanie.ru/ – это интернет магазин где вы найдете существенный выбор оборудования для бизнеса и учебных заведений. Посмотрите наш существенный ассортимент на сайте с доступными ценами, быстрой доставкой и гарантией качества.
Если находитесь в поисках надежных, качественных и проверенных запчастей на спецтехнику, то посетите популярную компанию «F-GRUP», где вы найдете только сертифицированную продукцию по доступным ценам. https://f-grup72.ru/ – на портале представлены гидрораспределители, коробки отбора мощности и многое другое. Вся продукция реализуется по лучшей стоимости. Регулярно организуются новые поступления, чтобы вы приобрели все, что нужно. Для уточнения моментов закажите обратный звонок, чтобы получить исчерпывающую консультацию.
Digital-агентство полного цикла Bewave https://bewave.ru/ – это создание, продвижение и поддержка интернет сайтов и мобильных приложений под ключ. Узнайте обо всех наших услугах на сайте, а мы комплексно создаём проекты под ключ учитывая все ваши потребности и пожелания.
Lolzteam Market предлагает обширный выбор по заманчивой стоимости аккаунтов. Тут вы отыщите все то, что вас интересует. Каждый аккаунт тщательной проверке на подлинность подвергается. Ищете акк дота 2 купить? Izt.market/ – сайт для тех, кто хочет аккаунты по гарантии безопасности приобрести. Тут вы такие категории найдете, как: World of Tanks, Minecraft, Instagram, Warface, Social Club, War Thunder, Steam, Riot Games и др. Специалисты саппорта круглосуточно трудятся. Они все сделают, чтобы оказать вам помощь.
Сайт https://izaim.kz/ представляет собой платформу, которая предлагает услуги по подбору онлайн займов в Казахстане. Главная цель этого ресурса — помочь пользователям найти наиболее выгодные предложения кредитования без отказа, что особенно актуально для тех, кто сталкивается с различными финансовыми трудностями. izaim.kz сотрудничает с большим числом финансовых учреждений, что позволяет пользователям получать доступ к множеству предложений. Это значительно увеличивает шансы на получение займа.
Lolzteam Market предлагает широкий выбор аккаунтов для разных нужд и низкие цены. Тут вы отыщите все то, что вам нужно. Аккаунты все детальные описания имеют, рекомендуем их характеристику посмотреть перед покупкой. https://lzt.market – надежный портал для пользователей, которые качественные аккаунты думают купить. На платформе имеются такие категории, как: Battle.net, Spotify, Fortnite, World of Tanks, TikTok, Supercell и множество иных. Помимо прочего здесь гайды и советы есть. Выбирайте нас и вы не пожалеете о своем выборе!
На сайте https://ar26.ru/ оставьте заявку для того, чтобы в компании для вас подобрали наиболее выгодную и подходящую недвижимость, которая будет продаваться по наиболее доступной стоимости на рынке. Кроме того, будет подготовлен полный пакет документов. Прямо сейчас вы сможете ознакомиться с отзывами тех, кто уже успел воспользоваться услугами предприятия. Если у вас остались вопросы, то задайте их менеджеру, чтобы получить исчерпывающую консультацию. На услуги установлены привлекательные цены. Закажите звонок прямо сейчас.
Популярная компания ООО “Авангард” давно работает в области инжиниринга, проектирования, штамповки. Применяется только уникальный и инновационный подход к реализации идеи. Предприятие производит продукцию только эталонного качества и созданную по особым технологиям. https://avangardmet.ru – на сайте ознакомьтесь с тем, какие услуги вы сможете здесь заказать. Если возникли вопросы, то необходимо обратиться к менеджеру через особую форму. Изучите схему проезда.
Готовите мясные рулеты? Мы предлагаем вам наполнительную для формовочной сетки кулинарную трубу. Конечный продукт всегда будет отлично выглядеть. Создавайте уникальные блюда! Ищете кулинарная труба для сетки? Wildberries.ru/catalog/347475889/detail.aspx?targetUrl=GP – тут о товаре более подробная информация представлена. Предлагаем для помещения мясного продукта в кулинарную сетку достойный инструмент, чтобы вы с рецептурой создания аппетитных рулетов могли больше экспериментировать. Откройте в кулинарии для себя новые возможности!
На сайте https://citatu.net.ua/ в огромном выборе представлены поздравления на День рождения. Здесь же вы найдете и поздравления на свадьбу, различные события, святки, с Днем Ангела. Также вы найдете и приятные слова на каждый день, чтобы удивить своего близкого, родного, любимого человека. Все поздравления интересные, теплые и душевные, а потому точно произведут впечатление. Среди большого выбора поздравлений вы обязательно найдете такое, которое подойдет. Здесь вы найдете и картинки по именам, чтобы усилить эффект.
Хотите сделать свой дом стильным и уютным? Сайт https://mydesignclub.info/ — это источник вдохновения и практичных советов по интерьеру. Здесь вы найдёте идеи для декора, выбор мебели, цвета и освещения, а также современные тренды в дизайне.
В питомнике «go Mikheeva Elena» у вас есть возможность приобрести щенка и получить надежного друга. Елена Михеева – заводчик японских собак дает гарантию на оперативную консультацию и поддержку в период всей жизни малыша в любое время и по всем необходимым вопросам. https://shibainu-japan.ru – сайт, где можно уже сегодня фото просмотреть. Помимо прочего тут можете щенка Сиба Ину забронировать. Он вам радость и положительные эмоции будет дарить. Собаки и щенки заводчика на натуральной еде растут, потому как они витамины и необходимые микроэлементы получают для здоровья.
Посетите сайт https://zveropolis.kids/ и вы сможете смотреть онлайн мультфильм Зверополис бесплатно в хорошем качестве, а также узнать сюжет мультфильма и когда выйдет вторая часть.
На сайте https://apvshop.ru/category/shtatnye-magnitoly-na-android/ вы сможете приобрести штатные магнитолы на Андройд. Здесь представлен огромный ассортимент вариантов на самые разные модели и марки автомобилей. Вся продукция оригинальная, качественная, на нее имеются сертификаты, которые подтверждают это. При необходимости вы всегда сможете воспользоваться профессиональной консультацией, на которой вам дадут ценные рекомендации. Вся продукция отличается долгим сроком эксплуатации. На все товары установлены доступные расценки.
Casinofrispini.space предоставляет необходимую информацию. Вы сможете узнать, бездепозитные бонусы, что это такое. Разберемся, что лучше фриспины или деньги. Размещаем исключительно контент высокого качества. Советуем внимательно подойти к анализу игровой площадки. Желаем вам удачной игры! Ищете новые казино 2025 дающие бездеп? Casinofrispini.space – тут рассказываем, как в онлайн-казино выглядит бездеп. Разъясним, за что бездепозитный бонус можно получить. Предлагаем читателям в казино только актуальные промокоды, прошедшие нашими специалистами проверки.
Артия-Принт – компания, которая предлагает приобрести внешние аккумуляторы и флешки оптом. У нас демократичные цены. Предоставляем широкий ассортимент товаров, высочайшее качество, удобство покупок и, конечно, доброжелательное обслуживание. С нами всегда прекрасные эмоции! Ищете флешки купить в москве недорого? Flashner.ru – тут имеется простой поиск и каталог. Обеспечиваем оперативную доставку продукции. Быть для вас номером один – это наша основная цель. Позвоните нам по телефону, и мы с радостью грамотно вас проконсультируем. Выбрав нас, вы правильное решение примите!
Титов Святослав Александрович – квалифицированный психолог с богатым опытом работы. Его основная задача состоит в том, чтобы оказать помощь в раскрытии собственного потенциала, разобраться в естественных силах и важнейших конфликтах, а также найти лучшие способы их решения. https://xn--b1abobnrbccuqb6a.xn--p1ai/ – здесь вы можете ознакомиться с услугами и ценами. Титов Святослав – компетентный специалист. Он новейшие методы использует. Не стоит откладывать заботу о собственном здоровье. Запишитесь уже сегодня к психологу на консультацию!
Форум Lolz.live станет для вас истинным кладезем познаний, а также впечатлений. Здесь много опытных участников собралось. Темы обсуждений довольно разные: от основ соц. инженерии до трудных техник и советов. Предлагаем вам просто поболтать и от рутины отвлечься! https://lolz.live – тут много полезной и достоверной информации, есть что прочитать и поделиться опытом. На ресурсе регулярно новые материалы появляются. Регистрация оперативно и легко проходит. Модераторы помогают уладить любые конфликты, они добрые. У нас каждый найдет что-то по душе!
Посетите Strategium https://www.strategium.ru/ – это крупнейший игровой форум по стратегиям, экономике, крипте, играм, прохождениям, читам, модам, кодам, а также возможность скачать игры бесплатно. Ознакомьтесь на сайте с разделами, и вы обязательно найдете интересующую вас тему для обсуждения или просто почитать новости игр и игровой индустрии.
Компания ОРИОН https://santech-sk.ru/ — надежный поставщик сантехники и инженерного оборудования в Новосибирске. У нас представлен широкий выбор товаров для монтажа, ремонта и обслуживания систем водоснабжения, отопления, канализации и вентиляции от проверенных производителей. Мы предлагаем качественные материалы и комплектующие по выгодным ценам. Наш ассортимент позволяет оснащать объекты любого уровня — от частных домов до крупных промышленных предприятий. Оформите заказ на сайте и получите профессиональную консультацию!
Промметаллстрой – компания, которая предлагает металлопрокат приобрести. У нас огромный ассортимент товаров. Вся без исключения продукция сертифицирована и соответствует ГОСТам. Выгодные цены мы вам гарантируем. Ищете уголок 140х10 равнополочный ст3сп5 12 м цена за метр? Prommetstroy.ru – здесь можете детально ознакомиться с условиями оплаты и доставки металлопроката. Появились вопросы? Позвоните нам по телефону, указанному на сайте. Мы по наличию стоимости вас проконсультируем и с подбором товара поможем. Будем рады длительному и взаимовыгодному сотрудничеству!
Если есть желание приобрести надежные комплектующие для спецтехники высокого качества, то совершите покупку на предприятии «F-GRUP», в котором имеется оригинальный товар по лучшей стоимости. https://f-grup72.ru/ – на портале представлены гидрораспределители, коробки отбора мощности и многое другое. Все товары продаются по привлекательной цене. Постоянно устраивается обновление товара, что позволит купить все необходимое. С той целью, чтобы задать вопрос, нужно воспользоваться обратным звонком, где дадут содержательную информацию.
Сайт interaktivnoe-oborudovanie.ru предлагает купить интерактивные панели, доски и столы, мультимедийные проекторы, документ-камеры, видеостены, цифровые лаборатории. Приемлемые цены мы вам гарантируем. Наш основной приоритет – обеспечение со стороны наших грамотных менеджеров качественного обслуживания. Ищете цифровые лаборатории? Interaktivnoe-oborudovanie.ru – здесь можете ознакомиться с условиями оплаты. Быстро и бережно доставляем товары по РФ. Оперативно отвечаем на вопросы покупателей. Скорее к нам обращайтесь, и вы останетесь довольны!
Контракт Мотор – компания, которая на поставках электротехнического оборудования специализируется. У нас можете купить насосы, вентиляторы и др. Гарантируем отменное качество и приемлемые цены. Производим отгрузку автотранспортом в любой регион Армении. Надеемся в числе наших клиентов вас увидеть! https://kontmotor.am – тут можете подробнее с условиями доставки ознакомиться. Вы можете рассчитывать на квалифицированную консультацию по выбору и подбору оборудования. Ждем ваших обращений и заявок, ежедневно по телефону, указанному на сайте.
ООО «Симфония Материалофф» является проверенным и надежным поставщиком медицинской техники, материалов, а также оборудования лучших марок, которые создают продукцию, отвечающую высоким требованиям. Каждый клиент получает возможность заказать товар с оперативной доставкой по Санкт-Петербургу и области. На сайте https://zubshop.ru изучите весь ассортимент товаров, где находятся: фрезы, боры, зуботехника, терапия, ортодонтия, эндодонтия, инструменты, мебель, все для дезинфекции, расходные материалы
На сайте https://alumvolkov.ru/ оставьте заявку для того, чтобы заказать алюминиевое остекление коттеджей, а также домов. Вы получите самую привлекательную стоимость на рынке. Это доступно за счет особой бизнес-модели, которая экономит ваши деньги. Прямо сейчас вы сможете воспользоваться рекомендациями, а также заказать расчет цены. Все конструкции отличаются высоким качеством, надежностью и практичностью, потому наделены долгим сроком эксплуатации, прослужат несколько десятков лет, радуя привлекательным дизайном.
Популярная компания ООО “Авангард” давно работает в области инжиниринга, проектирования, штамповки. Применяется только уникальный и инновационный подход к реализации идеи. Компания создает товары безупречного качества и те, что произведены в соответствии с уникальными технологиями. https://avangardmet.ru – на портале уточните, какими услугами вы сможете воспользоваться. При появлении вопросов свяжитесь с представителями компании через специальную форму. Ознакомьтесь со схемой проезда.
Lolzteam Market предлагает широкий выбор аккаунтов для разных нужд и низкие цены. Здесь вы найдете то, что вас интересует. Аккаунты все детальные описания имеют, рекомендуем их характеристику посмотреть перед покупкой. https://lzt.market – достойный ресурс для пользователей, которые думают приобрести аккаунты по гарантии качества. На платформе вы отыщите такие категории: TikTok, Supercell, Spotify, Fortnite, Battle.net, World of Tanks и другие. Также тут вы найдете советы и гайды. Выбирайте нас и вы останетесь, точно довольны!
Lolzteam Market предлагает обширный выбор по заманчивой стоимости аккаунтов. Тут вы отыщите все то, что вас интересует. Любой аккаунт на подлинность подвергается скрупулезной проверке. Ищете 7 days to die аккаунты? Izt.market/ – это портал для тех, кто по гарантии безопасности желает аккаунты купить. Тут вы такие категории найдете, как: World of Tanks, Minecraft, Instagram, Warface, Social Club, War Thunder, Steam, Riot Games и др. Специалисты саппорта круглосуточно трудятся. Они все сделают, чтобы оказать вам помощь.
Ищете apple iphone 16 pro 256gb купить? Заходите на портал i4you.ru/iphone_16 и вы все модели по выгодной стоимости отыщите. Официальный магазин с гарантией производителя, а также выгодный кредит, акции, скидки, трейд ин. У вас есть возможность самим забрать у нас iPhone 16 либо же доставкой воспользоваться, в том числе и по РФ. Узнайте еще больше о достоинствах и характеристиках данной модели на странице портала.
Контракт Мотор – компания, которая хомуты ремонтные, мотор-редукторы, электродвигатели, насосы, энкодеры, водоподогреватели, частотные преобразователи, вентиляторы и другое предлагает. Выполняем в любой регион России отгрузку ЖД и автотранспортом. https://kontmotor.ru – здесь можно в любое время ознакомиться с условиями оплаты и доставки. Выгодная стоимость электротехнического оборудования, быстрая реакция на запросы, отменный уровень сервиса и высокое качество делает нашу компанию лидером рынка. Мы вам всегда рады, обращайтесь!
Служба Эвакуации 911 оказывает квалифицированные услуги. Оперативно и надежно перевозим любые транспортные средства. У нас новейший автопарк эвакуаторов имеется. Звоните нам, мы на связи всегда. Моментально обрабатываем заявки. Ищете Эвакуатор Пенза? Penza-evakuator.ru – тут на услуги представлен прайс-лист. Ответственно к своей работе относимся. Предлагаем по выгодным ценам свои услуги. Помогаем своим клиентам даже в самых тяжелых ситуациях. Доверьте перевозку вашего автомобиля службе спасения 911.
На сайте https://expert-po-zalivam.ru вы сможете получить всю необходимую информацию, которая касается ваших правильных действий, если вдруг залили соседи. И в этом случае потребуется помощь юриста. Материалы подскажут вам, как правильно определить виновника залива, что нужно сделать для того, чтобы акт о заливе оказался недействительным. Здесь вы найдете только самую актуальную, свежую информацию, которая поможет, если такая ситуация коснулась и вас. Также будет затронута и ответственность ТСЖ. Огромное количество материалов позволит лучше разобраться в теме.
Эксперт Техника – компания, которая выгодно приобрести мини-экскаваторы предлагает. Уделяем особенное внимание качеству обслуживания и удовлетворению пожеланий клиентов. Работаем для вас, чтобы каждый проект с нашей техникой был успешным. Ищете фронтальный погрузчик с ковшом 5 куб.метров? Extehno.ru/catalog/mini-ekskavatori – тут заявку можете оставить, и мы выбрать необходимую модель поможем. Горды нашими сотрудниками, которые постоянно проходят техническое обучение и увеличение квалификации. Стараемся к своим клиентам быть ближе, предлагая то, что им нужно.
Планируете строительство или ремонт? Сайт https://hochu-dom.info/ предлагает статьи, инструкции и полезные советы по всем этапам — от выбора проекта до отделки. Узнайте, как построить дом своей мечты и сделать его комфортным и современным без лишних затрат.
3 New Countries Could Join Brics In The Next Summit
Like Top – автоматическая накрутка в ВКонтакте социальной сети. Сервис обеспечивает конфиденциальность ваших данных и аккаунта. Чтобы оформить заказ, не нужно регистрироваться. Статусы вам в WhatsApp автоматически по заказам приходят. Задать вопрос саппорту легко. Ищете накрутка лайков вконтакте на аву? Avtolt.ru – здесь представлен полный каталог услуг. Мы регулярно над улучшением сервиса Like Top работаем. Предоставляем для накрутки лайков клиентам действенный инструмент. Привлечение реальных людей мы гарантируем. Воспользуйтесь нашим уникальным сервисом!
На сайте https://pokatim.ru/bez-problem/bezopasnost/52610 ознакомьтесь с полезной, содержательной информацией, которая касается легализации поставок, а также налогообложения во время транспортировки груза из Поднебесной в Россию. Вы узнаете и о том, почему официальная доставка будет намного выгодней, чем использование различных схем. И хотя «серая» доставка раньше позволяла значительно сэкономить на налогах, пошлинах, теперь после того, как меры были ужесточены, то предприниматель заметил значительные риски. О них и рассказывается на этом сайте.
Хотите заказать алкоголь с доставкой на дом в Дубае? Будем рады вам в этом помочь. Забудьте о поиске парковки и поездках по магазинам. Мы работаем 24/7. У нас вы найдете виски, вино, шампанское, пиво и многое другое. Звоните, ответим на любые ваши вопросы. https://clck.ru/3MKa4W – здесь размещена подробная информация о нас, рекомендуем вам ознакомиться с ней. Постоянно стремимся совершенствовать наш сервис. Считаем, что вы лучшего заслуживаете. Предлагаем только продукцию высшего качества. Гарантируем быструю доставку. Рады вам всегда!
Хотите почувствовать прилив сил и избавиться от усталости? Парвеник предлагает вам купить березовые, хвойные, эвкалиптовые и дубовые веники. Также можете найти травы в мешочках и пучках, чаи для бани, шапки, рукавицы и коврики, банные матрасы, а также подушки. У нас все, что нужно для вас имеется! Ищете берёзовые веники купить? Parvenik.ru – сайт, который имеет простую для понимания систему навигации. Здесь можете ознакомиться с полным ассортиментом товаров. Гарантируем разумные цены. Если у вас возникнут какие-либо вопросы, обращайтесь. Всегда вам поможем!
Сомово – компания, которая широкий выбор мебели предлагает. Всегда для общения с клиентами мы открыты. Одна из главных целей – формирование долгосрочных отношений. Исключительно качественные изделия предлагаем. Цены у нас ниже на продукцию, в отличие от конкурентов. Ищете Сомово мебель? Somovo-mebel.ru – тут есть возможность с оперативной доставкой приобрести гостиную. При появлении вопросов, смело нам по телефону, который указан на портале звоните. Поможем подобрать подходящий товар и подскажем все детали заказа. У нас вы то, что вас интересует отыщите!
https://prostroiku.info/ – это сайт о строительстве, ремонте и обустройстве дома. Здесь вы найдете полезные советы, инструкции, обзоры строительных материалов и инструментов, идеи для дизайна и обустройства интерьера. Ресурс поможет как профессионалам, так и новичкам разобраться в тонкостях ремонта и сделать всё своими руками.
Withdraw Bitcoin To Bank Account In India
«Русское афонское общество» для сохранения культурных православных ценностей создано. Они важны для духовного личностного развития и общества. Помогаем восстанавливать монастыри и церкви на Афоне и в РФ. Ищете массажист президента? Аfon.center – тут полезные статьи представлены, посмотрите их. Объяснили, чем знаменит Константин Голощапов. Разобрали особенности влияния святых мощей на развитие духовности. Рассказали, какие есть в православном храме правила поведения. Вы сможете узнать, как к паломнической поездке подготовиться. Заходите на наш портал в любое время!
Digital-агентство полного цикла Bewave https://bewave.ru/ – это создание, продвижение и поддержка интернет сайтов и мобильных приложений под ключ. Узнайте обо всех наших услугах на сайте, а мы комплексно создаём проекты под ключ учитывая все ваши потребности и пожелания.
Посетите Strategium https://www.strategium.ru/ – это крупнейший игровой форум по стратегиям, экономике, крипте, играм, прохождениям, читам, модам, кодам, а также возможность скачать игры бесплатно. Ознакомьтесь на сайте с разделами, и вы обязательно найдете интересующую вас тему для обсуждения или просто почитать новости игр и игровой индустрии.
В интернет-магазине «ТопКлиматДВ» вы можете выгодно вентиляционное оборудование купить. Мы сертифицированную продукцию по гарантии реализуем. Выполняем в Хабаровске и за его пределами любой сложности монтаж вентиляционного оборудования. Ищете вентиляционное оборудование купить? Xn–80aefojgimj2ah.xn--p1ai/categories/ventilyatsiya-pomeschenii – тут о важности вентиляции и ее роли в обеспечении комфорта в помещениях и здоровья рассказываем. Получить детальную консультацию можно на ресурсе по телефону. Звоните!
Ищете расходные материалы для печати? Посетите https://adisprint.ru/ – это крупнейший интернет магазин, в котором вы найдете СНПЧ, ПЗК, чернила, картриджи, тонер, бумага, промывочная жидкость, программаторы, пластик для 3D печати и другие расходные материалы для принтеров, а доставка товаров осуществляется по территории всей России. В каталоге вы найдете отличные цены!
Свадебка – онлайн сервис по прокату и аренде машин на свадьбу. Водители наши внимательные и доброжелательные. У нас на высоте качество обслуживания. Гарантируем выгодные цены, есть скидки, поэтому не имеет смысла искать более выгодные варианты. Оформление заказа оперативно происходит. Ищете аренда rolls-royce спб для фотосессии? Svadebca.ru – здесь подробно рассказали, как забронировать транспорт. Также на портале о нас отыщите отзывы. Машины в отличном состоянии, прекрасно подойдут для фотосессий. Обращайтесь именно к нам. Всегда на связи и на вопросы быстро отвечаем.
На сайте https://ambenium.ru/ вы сможете получить полную информацию о нестероидном противовоспалительном обезболивающем препарате с фенилбутазоном и лидокаином – Амбениум, официально зарегистрированным в России. Прочитайте подробнее на сайте, в том числе инструкцию по применению для Амбениум.
На сайте https://kasatka41.online/ ознакомьтесь с подробностями тура, который организуется с остановкой в бухте. Вы устроите незабываемое, увлекательное путешествие вместе с группой высококлассных специалистов. С этой компанией ваше путешествие будет незабываемым, удивительным, насыщенным приключениями. Ее выбирают из-за того, что здесь работают первоклассные и знающие специалисты с огромным опытом. Все пассажиры, которые находятся на борту, застрахованы. Предусмотрено качественное питание, вкусные блюда.
Компания «Аренда Комфорта» предлагает взять в прокат шатры. В нашем каталоге большой выбор моделей представлен. Сделайте уже сейчас заказ и себе незабываемые эмоции обеспечьте! Ищете как провести свадьбу Казань? Xn–80aaaaaaxhx2a2ai2af3a8grd.xn--p1ai – тут опубликованы отзывы клиентов, посмотреть их можно уже сейчас. Считаем, что ваше мероприятие заслуживает только самого наилучшего. Позвоните нам по телефону, который указан на сайте. Детально проконсультируем по всем вопросам, поможем подобрать подходящий вариант шатра с учетом ваших желаний и бюджета.
МВПОЛ с успехом производством промышленных полов занимается. В арсенале компании самое современное оборудование, а штат из компетентных профессионалов состоит. Готовы выполнить любые заказы, учитывая особенности и потребности клиента. Убедитесь в преимуществах сотрудничества с нами! Ищете топпинговые полы стоимость? Mvpol.ru – здесь указана стоимость готового изделия под ключ. Компания «МВПОЛ» заслужила множество добропорядочных отзывов. Мы точно знаем, чего ожидает заказчик. Все этапы изготовления строго контролируем. Примеры работ на нашем портале отыщите.
Хотите увеличить популярность своей страницы в соцсети ВКонтакте? Like Top предлагает накрутку лайков и подписчиков с учетом ваших пожеланий. Саппорт сервиса на все вопросы с радостью ответит. Обеспечит вас на протяжении всего процесса накрутки качественным обслуживанием. https://www.avtolt.ru – тут есть возможность ознакомиться с правилами заказа в любое время. С Like Top можете быть уверены в безопасности услуг. Блокировка вам не грозит! Компания предлагает выгодные цены и гарантирует отсутствие ботов. Дешевле вы не найдете!
Фриланс-биржа JoinWork.ru – передовая платформа для нахождения заказов и предложений удаленной деятельности. Здесь встречаются исполнители и заказчики для решения задач в области программирования, видеомонтажа, дизайна, продвижения в соцсетях, написания текстов и других направлениях. Ищете официальная биржа фриланса? Joinwork.ru – тут представлена более детальная информация о бирже, ознакомьтесь с ней. JoinWork удобным интерфейсом выделяется среди конкурентов, активной поддержкой пользователей и безопасной сделкой. Присоединяйтесь скорее к JoinWork.ru!
Хотите сделать свой дом стильным и уютным? Сайт https://mydesignclub.info/ — это источник вдохновения и практичных советов по интерьеру. Здесь вы найдёте идеи для декора, выбор мебели, цвета и освещения, а также современные тренды в дизайне.
Компания «Отопление и водоснабжение» предоставляет для вас компетентные услуги. Мы сделаем в вашем доме лучший климат. Имеем опыт и глубокие знания в области монтажа систем отопления. Готовы необходимую информацию предоставить. Ищете монтаж систем отопления? Santex-uslugi.ru – тут вы узнаете, сколько монтаж системы отопления по времени займет. Стремимся осуществлять работы точно в нужные сроки. Используем только качественные материалы от надежных производителей. Не откладывайте на потом свой комфорт. Обращайтесь именно к нам!
Искусная багетная мастерская «Diva Art» создает рамки из полистирола. В распоряжении наших мастеров современное оборудование находится, позволяющее продукцию отменного качества отпускать. Ищете рамки 30×40 см? Fotoramki.net – тут отыщите большой выбор различных моделей любого формата и дизайна. Также на портале о нас отзывы представлены. Если хотите сделать заказ фоторамки по персональным размерам и эскизу, мы с радостью примемся за работу. Вы уникальное изделие получите, которое вашу фотографию или картину преобразит.
Планируете строительство или ремонт? Сайт https://hochu-dom.info/ предлагает статьи, инструкции и полезные советы по всем этапам — от выбора проекта до отделки. Узнайте, как построить дом своей мечты и сделать его комфортным и современным без лишних затрат.
Компания «AXIONT» предлагает высокотехнологичные, уникальные цифровые решения, которые станут оптимальными для развития вашего бизнеса. В настоящий момент эта компания считается лидером в своей сфере и предлагает несколько подсистем, методик и решений. На сайте https://axiont.ru уточните то, какими услугами вы сможете воспользоваться, если обратитесь в эту популярную компанию. Компания смогла реализовать почти 50 проектов, внедрила 18 собственных разработок, более 17 лет находится на рынке и оказывает услуги на профессиональном уровне.
На сайте https://expert-po-zalivam.ru вы сможете получить всю необходимую информацию, которая касается ваших правильных действий, если вдруг залили соседи. И в этом случае потребуется помощь юриста. Материалы подскажут вам, как правильно определить виновника залива, что нужно сделать для того, чтобы акт о заливе оказался недействительным. Здесь вы найдете только самую актуальную, свежую информацию, которая поможет, если такая ситуация коснулась и вас. Также будет затронута и ответственность ТСЖ. Огромное количество материалов позволит лучше разобраться в теме.
ООО «Симфония Материалофф» является проверенным и надежным поставщиком медицинской техники, материалов, а также оборудования лучших марок, которые создают продукцию, отвечающую высоким требованиям. Каждый клиент получает возможность заказать товар с оперативной доставкой по Санкт-Петербургу и области. На сайте https://zubshop.ru изучите весь ассортимент товаров, где находятся: фрезы, боры, зуботехника, терапия, ортодонтия, эндодонтия, инструменты, мебель, все для дезинфекции, расходные материалы
На сайте https://ldv-case.shop изучите внушительный каталог готовых чехлов, предназначенных для смартфонов. Вы можете отсортировать все имеющиеся варианты по моделям, коже, форме чехлов. Обязательно изучите перечень самых популярных товаров. Такие чехлы выполнены из натуральной кожи. По этой причине устойчивы к износу, практичны, прослужат очень долго без потери свойств. Они не изменят своего внешнего вида и украсят любой телефон. Регулярно действуют выгодные предложения, устанавливаются акции на определенные товары.
Строй-М2 широкий выбор товаров для обустройства дома и ремонта квартир предлагает. Стоимость не завышаем. Ценовая политика позволяет нам в доверительных отношениях уже долгое время быть. Ищете купить сантехнику? Stroy-m2.ru – тут опубликованы наших клиентов отзывы, посмотрите их в любое удобное для вас время. Постоянно акции проводим и скидки предоставляем. Свяжитесь с нами, и мы профессионально проконсультируем вас по интересующим вопросам. Сделаем все, чтобы сотрудничество ваше с нами максимально приятным было!
Большой садовый центр в Москве – Мартин-Сад https://www.martin-sad.ru/ – это интернет-магазин питомника растений. Загляните в самый полный каталог саженцев и растений, и вы обязательно найдете то что вас интересует. Вы также найдете большой каталог товаров для сада. Мы оказываем различные услуги: посадка растений, уход за участком, ландшафтный дизайн и многое другое.
Если вы желаете выгодно продать либо же сдать в аренду жилище, то обращайтесь к нам. Мы имеем большой опыт. Делаем вашу недвижимость заманчивой для покупателей либо арендаторов. С информацией о тарифах можете ознакомиться на нашем сайте. https://homestaging.moscow/ – тут представлены примеры для продажи и аренды удачного преобразования пространства. Мы все знаем о создании удобной в доме атмосферы. Доверие наших клиентов для нас на первом месте. Позвоните нам и грамотную консультацию по хоумстейджингу получите.
Looking for destiny 2 boost? Dving.net and you can order services for pumping in MMO games and pumping under warranty, as well as sell and buy game items in online games. Find out on the website which games we work with and check out our attractive prices. Reveal your full potential in your favorite MMO and MMORPG games with Dving, and we will help you reach new heights.
Компания Eoknadveri на производстве и установке конструкций из ПВХ специализируется. Открыты для наших клиентов. Если вы к нам обратитесь, то получите достойный сервис и окна высочайшего качества. За свою работу всегда отвечаем. Ищете окна пвх готовые купить? Eoknadveri.ru – здесь можете в любое время ознакомиться с услугами и ценами. На сайте можно заказать и приобрести пластиковые двери в дом. Располагаем исключительно новейшим оборудованием. Готовы ответить на интересующие вас вопросы, помочь с выбором, а также предоставить полезные рекомендации. Звоните!
Эксперт Техника – компания, которая выгодно приобрести мини-экскаваторы предлагает. Уделяем пристальное внимание пожеланиям клиентов и качеству обслуживания. Работаем для вас, чтобы любой проект был благополучным с нашей техникой. Ищете здесь можно узнать сколько стоит новый экскаватор-погрузчик? Extehno.ru/catalog/mini-ekskavatori – здесь можете оставить заявку, и мы поможем подобрать нужную модель. Горды нашими сотрудниками, которые постоянно проходят техническое обучение и увеличение квалификации. Стараемся быть ближе к своим клиентам, предлагая им именно то, что необходимо.
https://prostroiku.info/ – это сайт о строительстве, ремонте и обустройстве дома. Здесь вы найдете полезные советы, инструкции, обзоры строительных материалов и инструментов, идеи для дизайна и обустройства интерьера. Ресурс поможет как профессионалам, так и новичкам разобраться в тонкостях ремонта и сделать всё своими руками.
Trump Coin Faces Resistance After Climactic Rally Is A Full Retrace On The Horizon
Хотите избавиться от усталости и почувствовать прилив сил? Парвеник предлагает вам приобрести дубовые, березовые, эвкалиптовые и хвойные веники. Кроме этого вы сможете найти травы в пучках и мешочках, банные матрасы, подушки, коврики и рукавицы, шапки, чаи для бани. У нас есть то, что вам нужно! Ищете купить матрас с кедровой стружкой? Parvenik.ru – портал, у которого есть удобная система навигации. Здесь можете ознакомиться с полным ассортиментом товаров. Гарантируем разумные цены. Обращайтесь к нам при возникновении вопросов. Мы всегда готовы помочь!
На сайте https://geo-gdz.ru/ вы найдете онлайн-библиотеку, в том числе, атласы, школьные учебники, контурные карты. Все методические материалы представлены для разных классов. Получится очень быстро сориентироваться в материалах и подобрать именно то, что нужно в данный момент. Контурные карты представлены разными издательствами, что позволит лучше разобраться в теме. Все материалы с последними поправками, что позволит ознакомиться с актуальной информацией. Также регулярно свои открытия вносят археологи, биологи, географы.
Новостной канал проекта «1win» предлагает ознакомиться с последними, актуальными данными, посвященными этой БК – лидеру рынка. Теперь вся нужная информация находится в одном месте, а получить к ней доступ получится в любое время и на любом устройстве. На сайте https://t.me/win1_russia уточните всю необходимую информацию, которая касается БК «1win».
Предприятие «СТРОП-СЕРВИС» на выгодных условиях реализует функциональные и качественные грузоподъемные механизмы, стропы, такелажную оснастку. А если вы ищете что-то определенное, то облегчить процесс можно, воспользовавшись фильтром. В разделе вы найдете такие позиции, как: спансеты, текстильные стропы, а также те, что созданы из стального каната, крепление груза, такелажные рымы, точки. На сайте https://strop-servis.ru ознакомьтесь с более содержательной, подробной информацией, техническими моментами, что позволит подобрать наиболее подходящее предложение.
Ищете промышленный смеситель для производства? Компания МЕХАНИЗМЫ https://smeshaem.ru/ предлагает большой выбор профессионального смешивающего оборудования: 10-1000 литров. Смесители разных типов: масcажеры для мяса, пьяная бочка, мешалки для еврокуба, ленточные, V-образные, лабораторные. Срок службы 10+ лет. Идеально подходят для смешивания салатов, кофе, специй, порошков, смесей, жидкостей, химии и др. сыпучих продуктов. Возможность изготовления смесителя на заказ. Заводская гарантия, доставка по России и СНГ.
Serialexpress увлекательные сериалы на DVD предлагает приобрести. Ознакомиться с ассортиментом можете в любое удобное для вас время. Уверены, вы от покупки останетесь в восторге. Товары отлично упакованы и доступны по выгодной стоимости. https://serialexpress.ru – тут найдете уникальные диски. На сайте можно прочитать отзывы, а также узнать об условиях оплаты и доставки. У нас накопительная система скидок действует. При появлении вопросов, звоните нашим менеджерам. Мы качественно и оперативно работаем. Всегда готовы вам помочь!
На сайте https://t.me/win1_russia_1win изучите всю необходимую, актуальную информацию, которая касается популярной БК «1WIN». Здесь вы найдете самые точные прогнозы, а также содержательные новости, различную аналитику. Эта компания считается одной из самых прогрессивных и надежных, а потому ей точно можно доверять, ведь она гарантированно выплачивает выигрыш в полном размере и уважает своих клиентов. На этом канале публикуются самые последние новости, с которыми необходимо ознакомиться и вам.
Ищете расходные материалы для печати? Посетите https://adisprint.ru/ – это крупнейший интернет магазин, в котором вы найдете СНПЧ, ПЗК, чернила, картриджи, тонер, бумага, промывочная жидкость, программаторы, пластик для 3D печати и другие расходные материалы для принтеров, а доставка товаров осуществляется по территории всей России. В каталоге вы найдете отличные цены!
Great post! I love how you broke down the setup process for retro games in Kodi. It’s super detailed, and the list of ROMs and emulators is really helpful. Can’t wait to dive back into some of my favorite childhood games!
46 Of Audited Crypto Companies Work With Kpmg Ey Deloitte Pwc
На сайте https://mirtash.ru/ изучите каталог натурального камня, который подходит для декорирования приусадебной территории. Но им украшают и дом внутри. Важным преимуществом покупки камня в этой компании является то, что его добывают напрямую из проверенных месторождений России. Работы мастеров этой компании вызывают неподдельный восторг, восхищение. На ваше усмотрение можно выбрать самую разную цветовую палитру, а также фактуру. Все природные камни отличаются высокой прочностью, надежностью, экологичностью.
На сайте https://woodhouse495.ru закажите звонок с той целью, чтобы узнать всю необходимую информацию о строительстве, а также отделке домов, которая осуществляется как в Москве, так и по области. Прямо сейчас заполните форму с той целью, чтобы воспользоваться бесплатным вызовом мастера. Все работы выполняются максимально качественно, даются гарантии. Вы можете быть уверены, что услуги обойдутся вам по самой лучшей цене, что есть на рынке. Каждый клиент сможет воспользоваться индивидуальным подходом. Отсутствуют шаблонные проекты.
Предприятие «StanMaster» занимается производством вибропрессов, металлоформ, которые используются в ЖБИ. Прямо сейчас вы сможете заказать коммерческое предложение, оставив заявку на сайте https://stan-master.ru В компании трудятся квалифицированные, проверенные и знающие специалисты, знакомые со всеми особенностями производства. Они выполняют проекты строго по ГОСТу, в соответствии с нормативами, чтобы получить запанированный результат.
В питомнике «go Mikheeva Elena» можно приобрести щенка, который станет не просто питомцем, но и преданным другом. Наш сайт специально создан, чтобы помочь людям найти своего идеального сиба-ину. С этой породой собак у нас имеется приличный опыт. Ищете лучший питомник сиба ину? Shibainu-japan.ru – здесь представлены отзывы владельцев, ознакомиться с ними можно в любое удобное время. Очень любим сиба-ину и со всей ответственностью к своему делу относимся. Мы на связи всегда и с радостью на все вопросы ответим. Обращайтесь к нам в любое время!
Магазин «Абразивпром» предлагает огромный выбор окрасочного оборудования, а также абразивных материалов. В разделе представлено промышленное, строительное, бытовое оборудование, предназначенное для покраски. Вся продукция представлена лучшими, проверенными, проверенными марками, которые положительно себя показали. По ссылке https://abrazivprom.ru вы найдете такую продукцию, как: окрасочное оборудование, абразивные материалы, шлифовальные машины, оборудование, предназначенное для шпатлевки, краскопульты, оборудование для плитки и многое другое.
Компания «Пиломатериалы онлайн» предоставляет обширный выбор продукции, которая обладает высоким качеством. Своей репутацией мы дорожим, стараемся высокий уровень сервисного обслуживания поддерживать, уделяя больше внимания потребностям заказчика. https://www.pilomaterialy.online – здесь можно купить пиломатериалы от производителя без переплат. Быструю доставку гарантируем. Стремимся сделать наши расценки доступными для клиентов. Готовы помочь и в выборе материалов подсказать. Обращайтесь именно к нам!
На сайте https://t.me/mvavada ознакомьтесь с информацией, которая касается популярного онлайн-заведения «VAVADA». Все самое интересное, актуальное находится на этом канале. Здесь публикуются свежие новости, ценная информация из жизни игорного заведения. На страницах вы найдете увлекательную, ценную информацию, которая будет полезна всем, кто живет жизнью клуба и регулярно играет в слоты, выбирает и другие интересные развлечения. Здесь же публикуются различные акции, промокоды. Это позволит существенно сэкономить и попробовать свои силы на различных автоматах.
Дневник скетчера
На t.me/mvavada вас ожидает масса полезной информации. Официальный канал проекта Вавада приглашает окунуться в атмосферу настоящего казино. В VAVADA всегда что-то новенькое есть. Присоединяйтесь скорее к нам. За обновлениями следите. https://t.me/mvavada – тут подробно рассказываем об основных аспектах, которые популярным местом для онлайн-развлечений делают Вавада. Узнаете, как отличить оригинальный сайт Vavada от мошеннических копий. Играйте в слоты и наслаждайтесь яркими эмоциями. Ваша удача уже близко!
Looking for where to boost your account in games from professionals? Visit https://dving.net/ and check out the games in which we boost accounts. More than 8 years of experience! We provide your account with achievements of any complexity. We are your best assistant in boosting for top online games. New heights in WoW, Destiny 2, Diablo 4 and Division 2 and other games. The prices will pleasantly surprise you. More details on the website.
Chinas Wechat Bans Accounts Related To Crypto
На сайте https://farmicebox.ru выберете и приобретите любое необходимое фармацевтическое оборудование. Здесь вы найдете товары, оборудование, которое предназначено для того, чтобы хранить отходы, фармацевтические холодильники, компактные, небольшие холодильники, термометры, гигрометры. Регулярно компания проводит акции, устанавливает специальные цены на определенные товары, всегда есть спецпредложения, что позволяет приобрести продукцию по приятным ценам. В каталоге постоянно появляются новинки, которые необходимо рассмотреть и вам.
Looking for rodasoleil? rodasoleil.shop – this is a swimsuit that guarantees an even and excellent tan without white stripes. The fabric is breathable, lets in sunlight, dries quickly and is light as a feather. Our swimsuits are smart in themselves, combine efficiency and elegance, while providing an ideal golden glow. Tan-Through swimsuits are designed for a chic beach look and uncompromising comfort, enjoy freedom of movement. Perfect for pool parties, surfing sessions, and yacht retreats.
Сайт https://t.me/m1win_ru представляет собой официальный канал популярного и излюбленного многими проекта «1WIN». Только здесь находятся самые последние инсайды, а также наиболее выгодные промо-акции. Вам обеспечен доступ ко всей актуальной и полезной информации. Вы узнаете самые последние новости из первых уст, ознакомитесь со всеми интересующими подробностями. На этом канале присутствует огромное количество годной информации, которая пригодится и вам, если являетесь фанатом этой БК.
Robert AI
Robert AI
На сайте https://samray.ru/ изучите контакты типографии, а также копировального центра для того, чтобы воспользоваться профессиональными услугами. Типография оказывает такие важные услуги, как: цифровая печать листовок, буклетов, брошюр. Вам доступно и горячее тиснение фольгой, печать визиток при помощи шелкографии. При необходимости получится воспользоваться и такими услугами, как: печать баннеров, фотографий, календарей. Все работы выполняются на должном уровне, по доступной цене, а также в короткие сроки.
Ищете просеиватели для производства: пищевого, химического или фармацевтического? МЕХАНИЗМЫ https://proseivatel.ru/ предлагают большой ассортимент просеивающего оборудования. Просеиватели мощностью 300-4000 кг/ч, вибросита, вибросепараторы, центробежные. Срок службы 10+ лет. Идеально подходят для муки, сахара, соли, сухого молока, крахмала и др. сыпучих продуктов. Производят просеиватели под заказ с учётом типа материала, производительности и условий эксплуатации. Заводская гарантия, паспорта, доставка по России и СНГ.
На сайте https://j-center.ru вы сможете ознакомиться со всеми возможностями, которые подарят вам курсы для парикмахеров. Самое важное, что вы получите актуальную и интересную профессию на всю жизнь, сможете ее использовать в качестве основного либо дополнительного заработка. Обучение происходит на клиентах, минимальное количество теории, но при этом вы получите огромное количество знаний, чтобы затем реализовать их в своей профессии. Преподаватели поделятся с вами ценными секретами и рекомендациями.
Компания «ПроТара» длительное время реализует пластиковую тару как в Москве, так и Санкт-Петербурге. А доставка организуется по всей России. Предлагаются самые разные варианты тары из пластика различных конфигураций и цветовой гаммы. На сайте https://protara.ru ознакомьтесь с полным ассортиментом. Важным моментом является то, что вся пластиковая тара отличается долгим сроком службы, надежностью, ей не страшны механические повреждения.
На сайте https://septik-tmn.ru/ вы сможете заказать такую нужную и полезную продукцию, как: биопрепараты, погреб ПП, универсальные септики, сепаратор Топполиум. Вся продукция является качественной, на нее есть гарантии, различная сопроводительная документация. Эта компания считается официальным представителем самых популярных и надежных марок, которые давно производят септики – более 10 лет. Сотрудничество происходит строго по договору. На предприятии трудятся квалифицированные и компетентные специалисты, у которых огромный опыт работы.
Looking for detailed online casino reviews? Visit https://casinoeurope.club/ – this is your guide to the best online casinos. We have collected full reviews with all the advantages and benefits that you can get, as well as told about the registration process, methods of replenishing the account and withdrawal of money. Here you will find bonuses and welcome offers available for the European market. In the list we have listed the largest casinos in Europe for 2025.
WebTrening сотрудники компании с любовью к своей работе относятся. Вы сможете получить навыки и применяемую информацию по разным сферам бизнеса и жизни. Многие тренинги осуществляются в формате вебинаров. Можете участвовать онлайн из различной точки мира или же смотреть записи в любое время. https://webtrening.ru – здесь узнаете, чего достигли наши студенты 2011-2022 годов. Также на ресурсе расскажем, почему настолько эффективные наши обучающие программы. Наша цель – помочь вам как можно скорее достичь целей.
На сайте https://xn—-7sbbummpeluekfi.xn--p1ai/ узнайте все подробности, которые касаются таких популярных услуг, как реставрация, антикор. Работы выполняются на высоком уровне, качественно и в соответствии с самыми высокими требованиями. Установлены привлекательные, доступные цены на все работы. На все работы предоставляются гарантии, что подтверждает то, что специалисты уверены в своих силах. В компании трудятся компетентные, знающие специалисты, которые справятся с самой сложной задачей.
Посетите сайт https://gehartet.ru/ и вы сможете купить стекло и зеркала на заказ. Стекольная мастерская в Москве предлагает широкий ассортимент изделий с доставкой по всей России. Изготовим качественные зеркала по вашим размерам на заказ от 12 часов – доставим, замерим, установим. Воспользуйтесь онлайн калькулятором на сайте или посмотрите наше портфолио.
На сайте https://t.me/swiftpay_ru вы сможете ознакомиться с содержательной, актуальной информацией, которая касается компании SwiftPay. Здесь же вы сможете осуществить все необходимые финансовые операции. С этой системой вы сможете осуществить финансовые перестановки как за рубеж, так и по России. Здесь же выполняются и различные SWIFT платежи, возможно осуществить продажу либо покупку USDT. Дополнительно получится оплатить различные услуги. От использования сервиса вас ожидают только достоинства. К тому же, вся информация обрабатывается максимально оперативно.
На сайте https://t.me/bk1win_ru вы найдете огромное количество полезной, важной информации, которая касается конторы «1WIN». Важным моментом является то, что она работает исключительно на прозрачных, честных условиях, а потому точно заслуживает вашего внимания. Все средства будут выплачены в полном объеме. На этом официальном канале вы найдете огромное количество бонусов, промокоды. А для того, чтобы первым узнавать о последних событиях, подписывайтесь на канал. Регулярно добавляются новые публикации, количество подписчиков растет.
Посетите страницу Валентины Паевской – https://paevskaya.ru/ – это известный детский практикующий нейропсихолог, перинатальный психолог, клинический психолог, с практикой более 19 лет. Индивидуальная работа с детьми раннего возраста. Вы сможете получить различные услуги от профессионала! Ознакомьтесь со всеми услугами и их стоимостью на сайте.
Посетите сайт https://ultrasave.ge/ – это клиника UltraSave в Тбилиси – ваш путь к здоровью, красоте и молодости! Ознакомьтесь с нашими услугами: аппаратная и эстетическая косметология, массаж и пилатес, трихология, гинекология и другие профессиональные услуги. Наши специалисты имеют большой опыт. Выбирая UltraSave, вы получаете максимальный комфорт и информацию, экономя драгоценное время
Интернет-магазин «Аврора Агро Партс» предлагает своим клиентам большой ассортимент запчастей для сельхозтехники. Качество их на высшем уровне. Мы обеспечиваем хорошие цены на детали известных брендов. Открыты для плодотворного сотрудничества всегда! Ищете в этой? Aa-p.ru – тут есть возможность с условиями оплаты запчастей в любое время ознакомиться. Доставка организована четко и бесперебойно. При необходимости можете связаться с нами напрямую и уточнить интересующие вас вопросы. Это можно сделать по электронной почте либо по номеру телефона.
На сайте https://ldv-case.shop изучите внушительный каталог готовых чехлов, предназначенных для смартфонов. Вы можете отсортировать все имеющиеся варианты по моделям, коже, форме чехлов. Обязательно изучите перечень самых популярных товаров. Такие чехлы выполнены из натуральной кожи. По этой причине устойчивы к износу, практичны, прослужат очень долго без потери свойств. Они не изменят своего внешнего вида и украсят любой телефон. Регулярно действуют выгодные предложения, устанавливаются акции на определенные товары.
ეწვიეთ ვებგვერდს https://ultrasave.ge/ – ეს არის UltraSave კლინიკა თბილისში – თქვენი გზა ჯანმრთელობის, სილამაზისა და ახალგაზრდობისკენ! შეამოწმეთ ჩვენი სერვისები: აპარატურა და ესთეტიკური კოსმეტოლოგია, მასაჟი და პილატესი, ტრიქოლოგია, გინეკოლოგია და სხვა პროფესიული მომსახურება. ჩვენს სპეციალისტებს აქვთ დიდი გამოცდილება. UltraSave-ის არჩევით თქვენ იღებთ მაქსიმალურ კომფორტს და ინფორმაციას, დაზოგავთ ძვირფას დროს
На сайте https://joinwork.ru/ вы сможете воспользоваться услугами опытных, компетентных и талантливых фрилансеров. Они выполнят работы на высоком уровне и любой сложности. А если вы ищете определенного специалиста, то воспользуйтесь специальным поиском, который облегчит выбор. Вы без труда найдете специалиста, который выполнит работы, связанные с разработкой, созданием сайтов, дизайном, СЕО. Также есть мастера, которые окажут услуги в области SEO. Если вы сами являетесь специалистом в перечисленных областях, то можете подать объявление о предложении услуг.
Auto GM/GN/GE/GA and AI Extensions
Несомненно поможем раскрыть ИП в Грузии. https://eservices.ge Формирование ВНЖ в Грузии по ИП. Регистрация бизнеса в Грузии – раскроем ИП Грузии под ключ. Поможем заполучить ВНЖ Грузии по ИП.
На сайте https://press-forma.by/ закажите бесплатный расчет на производство пресс-форм, а также различных пластиковых конструкций. Весь заказ будет выполнен точно в обозначенные сроки. Специалисты предприятия работают исключительно на результат, чтобы ваш бизнес только процветал и становился рентабельным. Предприятие находится на рынке более 10 лет, за которые заполучило огромное количество положительных отзывов. В арсенале около 30 единиц техники, чтобы создать для вас продукцию эталонного качества.
Интернет-магазин запчастей для сельхозтехники https://aa-p.ru/ – это широкий выбор запчастей для сельхозтехники, зерноуборочной техники, комбайнов и прочих агрегатов оптом и в розницу. Аврора Агро Партс – это широкий ассортимент, качество, большой склад в наличии и быстрая поставка. Скачайте прайс лист с сайта или ознакомьтесь с товарами на портале.
На сайте https://t.me/mvavada ознакомьтесь с информацией, которая касается популярного онлайн-заведения «VAVADA». Все самое интересное, актуальное находится на этом канале. Здесь публикуются свежие новости, ценная информация из жизни игорного заведения. На страницах вы найдете увлекательную, ценную информацию, которая будет полезна всем, кто живет жизнью клуба и регулярно играет в слоты, выбирает и другие интересные развлечения. Здесь же публикуются различные акции, промокоды. Это позволит существенно сэкономить и попробовать свои силы на различных автоматах.
Script-roblox.ru предлагает информацию о том, как играть начать, решать технические проблемы, зарабатывать Robux и создавать свои игры. На портале имеется удобный поиск, примените его. Ищете скачать роблокс на андроид? Script-roblox.ru – здесь найдете исчерпывающие ответы на частые вопросы новичков. Наш FAQ постоянно обновляется, содержит пошаговые инструкции, ценные советы и рекомендации от опытных игроков. Мы расскажем, как и где скрипты в Dead Rails загружать. Разъясним, как приложения из неизвестных источников на iOS и Android установить.
На сайте https://t.me/bk_1win_1win изучите самые последние, любопытные новости, которые касаются известной БК «1WIN», заслужившей доверие. Только на этом канале всегда самые последние, полезные, свежие новости, которые вы узнаете первым. Также вы сможете воспользоваться акциями, промокодами, которые помогут значительно сэкономить. Для того чтобы всегда быть в курсе актуальных данных, нужно подписаться на канал. Заходите сюда со своего мобильного телефона либо компьютера и в наиболее комфортное для себя время.
Если вы хотите выгодно сдать в аренду или продать жилье, обращайтесь смело к нам. Мы обладаем приличным опытом. Делаем недвижимость вашу для арендаторов и покупателей привлекательной. С информацией о тарифах можете ознакомиться на нашем сайте. https://homestaging.moscow/ – здесь представлены примеры удачного воссоздания пространства для продажи и аренды. Мы все знаем о создании удобной в доме атмосферы. Доверие наших клиентов для нас на первом месте. Позвоните нам и грамотную консультацию по хоумстейджингу получите.
На сайте https://farmicebox.ru выберете и приобретите любое необходимое фармацевтическое оборудование. Здесь вы найдете товары, оборудование, которое предназначено для того, чтобы хранить отходы, фармацевтические холодильники, компактные, небольшие холодильники, термометры, гигрометры. Регулярно компания проводит акции, устанавливает специальные цены на определенные товары, всегда есть спецпредложения, что позволяет приобрести продукцию по приятным ценам. В каталоге постоянно появляются новинки, которые необходимо рассмотреть и вам.
?????? ????????? https://ultrasave.ge/ – ?? ???? UltraSave ??????? ???????? – ?????? ??? ????????????, ?????????? ?? ????????????????! ????????? ????? ?????????: ????????? ?? ?????????? ????????????, ?????? ?? ????????, ??????????, ??????????? ?? ???? ?????????? ???????????. ????? ????????????? ???? ???? ???????????. UltraSave-?? ??????? ????? ????? ?????????? ???????? ?? ???????????, ???????? ??????? ????
В питомнике «go Mikheeva Elena» есть возможность купить щенка, который станет для вас верным другом. Наш сайт специально создан, чтобы помочь людям найти своего идеального сиба-ину. С этой породой собак у нас имеется приличный опыт. Ищете сиба ину питомник? Shibainu-japan.ru – тут отзывы владельцев представлены, посмотрите их уже сейчас. Искренне влюблены в сиба-ину и относимся со всей ответственностью к своему делу. Мы на связи всегда и с радостью на все вопросы ответим. Обращайтесь к нам в любое время!
Trusted Computer Wholesaler in Dubai – Bulk IT Equipment from FST https://fstrading.co/ – Futuretech Solutions Trading (FST) is your reliable partner for wholesale computer components and cutting-edge IT solutions delivered globally from Dubai. With a massive inventory of wholesale computer parts, we cater to system integrators, resellers, and IT retailers across the Middle East, Africa, and Asia. We ensure fast international shipping and reliable customer support every step of the way. Premium Quality at Wholesale Prices!
На сайте https://rusakovteam.ru/ вы сможете рассчитать стоимость вашего яркого, незабываемого и интересного мероприятия. Компания занимается профессиональной подготовкой торжеств самого разного уровня сложности. Она предпринимает все возможное для того, чтобы мероприятие прошло именно так, как и запланировано. Вы получите только положительные эмоции, яркие впечатления от праздника, о котором вы так мечтали! При этом вас обрадуют привлекательные и доступные расценки. Каждый клиент сможет рассчитывать на индивидуальный подход.
Пиломатериалы онлайн – компания, которая широкий ассортимент продукции предлагает, она отменным качеством обладает. Своей репутацией мы дорожим, стараемся высокий уровень сервисного обслуживания поддерживать, уделяя больше внимания потребностям заказчика. https://www.pilomaterialy.online – здесь можно купить пиломатериалы от производителя без переплат. Быструю доставку гарантируем. Стремимся наши расценки приемлемыми для клиентов сделать. Всегда готовы помочь и подсказать в выборе материалов. Обращайтесь скорее к нам!
На сайте https://t.me/win1_russia_1win изучите всю необходимую, актуальную информацию, которая касается популярной БК «1WIN». Здесь вы найдете самые точные прогнозы, а также содержательные новости, различную аналитику. Эта компания считается одной из самых прогрессивных и надежных, а потому ей точно можно доверять, ведь она гарантированно выплачивает выигрыш в полном размере и уважает своих клиентов. На этом канале публикуются самые последние новости, с которыми необходимо ознакомиться и вам.
Пиломатериалы онлайн – компания, которая широкий ассортимент продукции предлагает, она отменным качеством обладает. Своей репутацией мы дорожим, стараемся высокий уровень сервисного обслуживания поддерживать, уделяя больше внимания потребностям заказчика. https://www.pilomaterialy.online – тут можно приобрести от изготовителя без переплат пиломатериалы. Гарантируем оперативную доставку. Стремимся наши расценки приемлемыми для клиентов сделать. Всегда готовы помочь и подсказать в выборе материалов. Обращайтесь скорее к нам!
Looking for where to boost your account in games from professionals? Visit https://dving.net/ and check out the games in which we boost accounts. More than 8 years of experience! We provide your account with achievements of any complexity. We are your best assistant in boosting for top online games. New heights in WoW, Destiny 2, Diablo 4 and Division 2 and other games. The prices will pleasantly surprise you. More details on the website.
Looking for tan-through swimwear? rodasoleil.shop – this is a swimsuit that guarantees an even and excellent tan without white stripes. The fabric is breathable, lets in sunlight, dries quickly and is light as a feather. Our swimsuits are smart in themselves, combine efficiency and elegance, while providing an ideal golden glow. Tan-Through swimsuits are designed for a chic beach look and uncompromising comfort, enjoy freedom of movement. Perfect for pool parties, surfing sessions, and yacht retreats.
На t.me/mvavada вас ждет множество интересной информации. Официальный канал проекта Вавада приглашает окунуться в атмосферу настоящего казино. В VAVADA всегда что-то новенькое есть. Присоединяйтесь скорее к нам. За обновлениями следите. https://t.me/mvavada – тут подробно рассказываем об основных аспектах, которые популярным местом для онлайн-развлечений делают Вавада. Узнаете, как отличить оригинальный сайт Vavada от мошеннических копий. Играйте в слоты и наслаждайтесь яркими эмоциями. Пусть удача вам улыбнется!
Продвинуть свой сайт в ТОП поисковых систем от профессионалов легко. Посетите https://stavropol.seo.democrat/ где мы предложим вам целый комплекс услуг, направленный на вывод в ТОП. Мы работаем под ключ – разрабатываем, оптимизируем и продвигаем. Узнайте обо всех наших услугах на сайте или получите бесплатный SEO-аудит! SEO-студия из Ставрополя качественные услуги, которые обеспечат стабильный рост трафика и продаж.
W dobie dynamicznego rozwoju kasyn internetowych, Vavada Casino wylania sie jako platforma, ktora oferuje nie tylko rozrywke na najwyzszym poziomie, ale rowniez bezpieczne srodowisko do gry online https://vavadas.pl/ . Serwis jest dostosowany do potrzeb polskich graczy, oferujac korzystne warunki, szeroka game gier i atrakcyjne bonusy.
На сайте https://feringer.shop/ в огромном количестве находятся печи для саун и бань. Этот магазин является специализированным интернет-бутиком, который реализует сертифицированную, оригинальную продукцию по лучшей стоимости. В разделе вы найдете порталы ламель, дымоходы ламель, отопительные печи, а также паровые, печи-казаны и многое другое. Вся продукция высокого качества, создана в соответствии с самыми высокими технологиями и только из лучших материалов. Постоянно появляются новинки, которые необходимо рассмотреть и вам.
На сайте https://my-miele-shop.ru/ представлена продукция известной марки Miele, которая особенно пользуется популярностью среди тех, кто ценит функциональность, надежность и практичность. В разделе вы найдете встраиваемые холодильники, стиральные, сушильные машины, кофемашины, пароварки, выполненные из нержавеющей стали, духовые шкафы и многое другое для того, чтобы организовать комфортное пространство. Ознакомьтесь с теми товарами, которые находятся в тренде, и их покупает большинство.
Visit the website https://aivengo.media/ where interesting news, reviews, videos about artificial intelligence are published daily and you can be aware of all important events and learn how all this can be applied in life. Join AIvengo – it’s really interesting!
На сайте https://parkmotors.ru/ в огромном многообразии находятся шины и диски, двигатель, трансмиссия на Газель. Также представлено и рулевое управление, различные комплектующие на такую технику. Для того чтобы совершить приобретение, необходимо изучить все технические характеристики, особенности выбранного товара, чтобы купить именно то, что нужно. Есть обзоры на определенные товары. Для того чтобы найти что-то определенное, воспользуйтесь специальным поиском. Он значительно облегчит вам задачу.
На сайте https://svaib.ru/ закажите профессиональный, качественный монтаж прочных, крепких КЖБИ свай. Услуга оказывается по Ленинградской области. А самое главное, что отсутствуют трещины, сколы, любые деформации, поэтому вы можете быть уверены в высоком качестве работ. Уникальность таких свай в том, что они разрабатываются по уникальной технологии. За счет этого они намного крепче бетона. Стоимость услуги будет невысокой. Для того чтобы больше узнать о технологии, изучите видео. Эти сваи не имеют аналогов.
САМШИТ – компания, которая специализируется на изготовлении качественных деревянных дверей и окон. Осуществляем бережную доставку изделий. Уделяем монтажным работам особое внимание, при этом используя лучшие профессиональные инструменты и материалы. Ищете окна исторических зданий? Samshitokno.ru – здесь представлены отзывы наших клиентов, ознакомиться с ними можете прямо сейчас. Предлагаем широкий выбор моделей, которые для любого интерьера подойдут. На портале можно форму заполнить, после чего мы в ближайшее время вам для уточнения деталей проекта перезвоним.
Желаете продвинуть свой сайт в ТОП поисковых систем в Брянске? Посетите https://bryansk.seo.democrat/ где мы предложим вам целый комплекс услуг, направленный на вывод в ТОП. Мы работаем под ключ – разрабатываем, оптимизируем и продвигаем. Узнайте обо всех наших услугах на сайте или получите бесплатный SEO-аудит! Мы создали два эффективных тарифных плана SEO-продвижения – подробнее на сайте.
На сайте https://svaib.ru/ уточните расценки на КЖБИ сваи. Это предприятие предлагает качественную и надежную установку практичных, прочных свай КЖБИ. Все работы выполняются без минимальных деформаций, разрушений, спилов, чтобы вы смогли получить безупречный, эталонный результат. Сваи имеют такую важную особенность, что разрабатываются из виброуплотненного бетона, а также прочного армокаркаса. Именно по этой причине сваи будут намного прочнее бетона. На этом же сайте ознакомьтесь с благодарственными письмами от тех компаний, которые уже воспользовались услугами предприятия.
На сайте https://bort3302.ru/ в большом ассортименте представлены качественные, сертифицированные комплектующие на Газель Некст. В этой компании вы сможете заказать двигатель, трансмиссии, различные запчасти, а также шины, диски и многое другое. Вся продукция, которая здесь реализуется, качественная и идеально подходит на автомобиль этой марки. Даже учитывая то, что Газель считается надежной, функциональной машиной, ее необходимо регулярно обслуживать. А для этого обращаться за помощью в проверенную и надежную компанию.
На сайте https://mvpol.ru вы сможете заказать сметный расчет для того, чтобы узнать, во сколько вам обойдутся промышленные полы определенного типа. В этой компании получится приобрести полимерные наливные полы, а также бетонные полы, которые отличаются упрочненным верхним покрытием. Также есть возможность заказать и ремонт такого покрытия. Сотрудничество предполагает составление договора, а на работы предоставляются гарантии. Вся запрашиваемая информация предоставляется очень быстро. Есть возможность воспользоваться консультацией.
Смотри любимые фильмы и сериалы онлайн в отличном качестве на https://kinogo.team/ – огромный выбор новинок и классики кино, ежедневные обновления, удобный поиск и полностью бесплатный доступ — всё для твоего комфортного просмотра. Присоединяйся и наслаждайся кино без ограничений прямо сейчас!
На сайте https://belpapa.ru/ в огромном ассортименте представлен сайдинг самых разных оттенков, вариантов исполнения. Вся продукция качественная, надежная, на нее имеются сертификаты, вся необходимая сопроводительная документация. В разделе находится: виниловый, акриловый сайдинг, а также формованный, различные сопутствующие товары, которые пригодятся в процессе его укладки. А если вы ищете что-то определенное, то воспользуйтесь специальным фильтром. Заказы принимаются в круглосуточном режиме.
К-ЖБИ – компания, которая отменное качество продукции обеспечивает и соблюдение сроков неукоснительное. Мы предлагаем доступные цены и профессиональный подход к каждому клиенту. Вы можете рассчитывать на консультацию от специалистов по возникающим вопросам. Ищете лестничные марши и бетонные площадки серии л, лм, лз и лп? Gbisp.ru – тут можно заявку оставить. К-ЖБИ внедряет и применяет в производстве передовые технологии. Все готовые изделия, сырье и материалы сертификацию и тщательные испытания в оснащенной лаборатории проходят. Обращайтесь к нам, гарантируем оперативную доставку.
Конвейерные системы https://euroconveyor-st.ru/ – неотъемлемая часть современных предприятий. От легкой промышленности и логистических центов до энергетики и тяжелого машиностроения: конвейерные линии обеспечивают функционирование фабрик и заводов в автоматическом режиме круглый год. Ленточные и роликовые, мобильные и стационарные, компактные и масштабные – многообразные конвейерные системы решают самые разные задачи, обеспечивая минимизацию ручного труда, снижение затрат и оптимизацию рабочих процессов.
Блог сайту “Українська хата” – джерело з цікавими темами і корисними темами про будівництво і ремонт, домашній затишок і комфорт для сім’ї. У блозі https://xata.od.ua/category/blog/ щодня публікуємо актуальні огляди і поради від експертів.
Скай Пост рассказывает не только новости Одессы. В нашем блоге https://sky-post.odesa.ua/category/blog/ каждый день публикуем полезные советы, интересные факты, лайфхаки и многое другое, что вам понравится. Читайте одесские новости, а также интересный блог.
Энергобум – интернет магазин электроники и бытовой техники. Мы большой выбор продукции по приемлемым ценам предлагаем. Клиентам гарантируем внимательное и вежливое отношение. Ассортимент постоянно пополняется, поэтому вы точно сможете на портале найти нужный товар. https://energoboom.ru/ – здесь можно в любое время ознакомиться с условиями оплаты и доставки. Мы качественно работаем. На нас можно положиться. Найти нужную технику легко. Используйте удобный каталог или строку поиска. Ждем в Энергобум вас. Удачных вам приобретений!
Кит-НН предлагает приобрести рабочую одежду по заманчивым ценам. Гарантируем приличный выбор моделей, отличное качество и ответственность на любом этапе сотрудничества. Ищете спецодежда? Kitt-nn.ru – тут представлены отзывы радостных клиентов, посмотрите их в любое время. Стараемся ваши потребности максимально удовлетворить. Подходящую экипировку подберем. Нанесем на нее шевроны с названием вашей компании и логотипом. Предоставляем услуги оперативной доставки. Оставьте на портале номер, и мы вам в ближайшее время перезвоним!
На сайте https://feringer.shop/ есть возможность приобрести печи для бань, саун. В компании постоянно устраиваются акции для того, чтобы ваша покупка была более выгодной. Также возможна бесплатная доставка как по Москве, так и области. Печи FERINGER зарекомендовали себя с положительной стороны, радуют своей бесперебойной работой, эталонным качеством, надежностью, долгим сроком эксплуатации. Регулярно в каталоге появляются новинки, с которыми необходимо ознакомиться и вам. Уникальностью печей является и невероятно роскошная облицовка.
Ищете SEO продвижение сайтов в Волгограде? Посетите сайт https://volgograd.seo.democrat/ где вы найдете лучшие стратегии продвижения, а также мы проведем бесплатный SEO аудит сайта. Ознакомьтесь с нашими услугами: техническое SEO, контент-оптимизация, подбор и анализ ключевых слов, настройка Яндекс.Метрики, Google Analytics и многое другое. Мы специализируемся на комплексной раскрутке, оптимизации и создании сайтов, которые стабильно занимают ТОП позиции в Яндекс и других поисковых систем.
На сайте https://hmanga.today/ представлена манга в огромном количестве и самого разнообразного жанра. Манга поможет разнообразить досуг, сделать его ярким и незабываемым. Вы сможете выбрать любой вариант из предложенных на сайте. И самое главное, что манга подарит только приятные и положительные впечатления, радость от просмотра. Все серии представлены в отменном качестве, а просматривать можно как на компьютере, так и смартфоне, телефоне. Манга в эротическом стиле поможет удовлетворить ваши желания.
Посетите сайт Роспромфильтр https://rospromfilter.ru/ который является прoизвoдитeлeм выcoкoкaчecтвeнных фильтрующих элeмeнтoв и aнaлoгoв вceмирнo извecтных прoизвoдитeлeй. Посмотрите на сайте каталог с выгодными ценами на воздушные фильтры, гидравлические фильтры, масляные фильтры, топливные фильтры, аналоги фильтров и многое другое. Также изготавливаем промышленные фильтры под заказ. Подробнее на сайте.
Посетите сайт Компании ЛиСтрой https://listroi.ru/ и вы сможете купить или заказать сварные, кованые, дутые решетки на окна в Москве. Наш завод металлических изделий – занимается изготовлением, доставкой и монтажом с гарантией. Посмотрите наш каталог с отличными ценами и ассортимент, который обязательно вам подойдет, а неоспоримые преимущества решеток для окон позволят защитить ваш дом в Москве.
Teleflora Belarus Unit https://flower-shop.by/ is pleased to offer flower delivery services. The company is an online florist, delivering flowers across Minsk, Belarus. We would be delighted to assist you in sending flowers to Minsk, Belarus, and other regional Belarus towns including Mogilev, Vitebsk, Brest, Grodno, and Gomel, as well as worldwide destinations. We’re more than happy to take care of all your Belarus flower delivery orders. We’ve got a whole network of florists and flower shops who can deliver flowers for our customers whenever they need.
Прометалл готов оказать помощь во всем, касаемо обеспечения теплом. Мы занимаемся обслуживанием чугунных печей, реализацией и установкой. Постоянно акции устраиваем. Вы можете на выгодные условия приобретения печного оборудования рассчитывать. Быстро покупку доставим. Ищете печь для бани атмосфера? Prometall.shop – тут имеются варианты на различный бюджет и вкус. Продукция высоким международным стандартам соответствует, сопровождается паспортами и сертификатами качества. Скорее к нам обращайтесь, на все вопросы ответим и с оформлением гарантии поможем.
Serialexpress увлекательные сериалы на DVD предлагает приобрести. Посмотреть ассортимент у вас есть возможность в любое время. Уверены, вы от покупки останетесь в восторге. Товары доступны по приятной цене и хорошо упакованы. https://serialexpress.ru – тут найдете уникальные диски. На портале прочтите о нас отзывы, а также узнайте об условиях доставки и оплаты. У нас действует накопительная система скидок. Если у вас появились вопросы, смело обращайтесь к нашим менеджерам. Мы работаем быстро и качественно. Рады вам помочь!
На сайте https://svaib.ru/ уточните расценки на КЖБИ сваи. Это предприятие предлагает качественную и надежную установку практичных, прочных свай КЖБИ. Все работы выполняются без минимальных деформаций, разрушений, спилов, чтобы вы смогли получить безупречный, эталонный результат. Сваи имеют такую важную особенность, что разрабатываются из виброуплотненного бетона, а также прочного армокаркаса. Именно по этой причине сваи будут намного прочнее бетона. На этом же сайте ознакомьтесь с благодарственными письмами от тех компаний, которые уже воспользовались услугами предприятия.
Туристическая компания ГРУПСПБ организует информативные и интересные экскурсии по Санкт-Петербургу с выездом в пригороды и другие города России. В маршрутах — знаковые достопримечательности, музеи, культурные объекты и скрытые уголки города. Опытные гиды подают информацию увлекательно, с “изюминкой”, поэтому взрослые и дети останутся в восторге. Экскурсии по Петербургу проводятся на современных автобусах. Экскурсии с https://www.groupspb.ru/ – идеальный способ узнать город с новой стороны.
На сайте https://bzdostup.ru/ оформите онлайн-заявку и получите скидку 3% на бетон, растворы. Предприятие в течение длительного времени занимается производством, а также оперативной доставкой продукции. Но также можно воспользоваться и самовывозом. А если вы произведете оплату наличными, то можете рассчитывать на хорошую скидку. Прямо сейчас ознакомьтесь с прайс-листом, чтобы узнать стоимость и заказать товары в требующемся количестве. Бетон отличается всеми важными техническими характеристиками, наделен эталонным качеством.
Discover what’s really happening in the cities of the world — from Hanoi to Hamburg, Jakarta to Jeddah. This multilingual platform shares real local news, not just global headlines. Stay connected with everyday life in places you care about – https://asiacity.news/
На сайте https://press-forma.by/ закажите бесплатный расчет на производство пресс-форм, а также различных пластиковых конструкций. Весь заказ будет выполнен точно в обозначенные сроки. Специалисты предприятия работают исключительно на результат, чтобы ваш бизнес только процветал и становился рентабельным. Предприятие находится на рынке более 10 лет, за которые заполучило огромное количество положительных отзывов. В арсенале около 30 единиц техники, чтобы создать для вас продукцию эталонного качества.
ТД «Авангард» предлагает покупателям большой ассортимент продукции. Мы поставляем силовые кабели с оперативной доставкой по Москве и области. Товары высокой надежностью отличаются. Используем индивидуальный подход в работе. Принимаем разные формы оплаты. Готовы время для консультирования уделить. Ищете кабель ввгнг? Kabel-silovoj.ru – тут есть возможность кабель силовой заказать. Работаем как с физическими, так и с юридическими лицами. Выстраиваем долгосрочные отношения со своими клиентами. Звоните, с радостью выслушаем ваши пожелания и предложения.
Artwing – студия графического дизайна. Свое дело мы любим и ради превосходного результата готовы сворачивать горы. Выполняем по дизайну логотипа качественные услуги. Строго выдерживаем установленные сроки. Ищете услуги графического дизайнера? Artwing.ru – ресурс, который дает возможность детально размещать информацию об услугах. Наши цены в рамках приличия держатся. Беремся за проекты любой сложности и масштаба. Составим плакатное креативное решение наружной рекламы, которое увеличит продажи и потенциальных клиентов привлечет. Обращайтесь к нам!
Антикор – компания, которая широкий спектр услуг по антикоррозийной обработке транспортных средств предоставляет. Сотрудничаем как с физическими, так и с юридическими лицами. Используем только качественные материалы. Доверьтесь настоящим профессионалам! https://antikor-kirov.ru – тут наши работы представлены, посмотрите их уже сейчас. У нас тысячи довольных клиентов. Гарантируем вам индивидуальный подход. Позвоните и мы с радостью проконсультируем по интересующим вас вопросам. Защитите ваш автомобиль от ржавчины и коррозии!
На сайте https://z-news.link/ изучите увлекательные и информативные новости, которые представлены здесь со всего мира. Они на самую разную тематику и, как правило, касаются экономики, политики, бизнеса, авто, моды, есть забавные новости, те, что касаются игр, медицины, развлечений и многого другого. Здесь вы обязательно найдете такую информацию, которая обязательно вам пригодится для расширения кругозора. Есть информация как на русском языке, так и английском. Вы точно ничего не пропустите, если будете регулярно посещать этот портал, на котором публикуются самые последние новости из разных стран.
Посетите интернет магазин FurnituraPRO https://furniturapro.ru/ и вы найдете дверную фурнитуру, по выгодным ценам, для межкомнатных и входных дверей в Москве с доставкой по Московской области, России, Казахстану и Беларуси. Ознакомьтесь с широким ассортиментом товаров, который постоянно обновляется. У нас вы можете купить замок, ручку, фиксатор и другую дверную фурнитуру от большого количества брендов. Подробнее на сайте.
База цветов https://rynokcvetov.ru/ – ваш надежный поставщик свежих цветов в Санкт-Петербурге. Предлагаем широкий ассортимент роз, хризантем, тюльпанов и сезонных цветов по оптовым ценам. Прямые поставки, удобный самовывоз и быстрая доставка по городу. Работаем с флористами, салонами и магазинами.
На сайте https://my-miele-shop.ru/ представлена продукция известной марки Miele, которая особенно пользуется популярностью среди тех, кто ценит функциональность, надежность и практичность. В разделе вы найдете встраиваемые холодильники, стиральные, сушильные машины, кофемашины, пароварки, выполненные из нержавеющей стали, духовые шкафы и многое другое для того, чтобы организовать комфортное пространство. Ознакомьтесь с теми товарами, которые находятся в тренде, и их покупает большинство.
Ищете выгодные ставки на различные виды спорта? Посетите https://luckypari-17uz.online/ и вы найдете отличные коэффициенты. Официальный сайт букмекерской конторы LuckyPari дает приветственный бонус. Посмотрите подробнее на сайте какие есть ставки игры. Вы также, для удобства, сможете скачать мобильное приложение.
На сайте https://press-forma.by/ закажите бесплатный расчет на производство пресс-форм, а также различных пластиковых конструкций. Весь заказ будет выполнен точно в обозначенные сроки. Специалисты предприятия работают исключительно на результат, чтобы ваш бизнес только процветал и становился рентабельным. Предприятие находится на рынке более 10 лет, за которые заполучило огромное количество положительных отзывов. В арсенале около 30 единиц техники, чтобы создать для вас продукцию эталонного качества.
Сайт na-more-v-crimea.ru был создан для путешественников и просто любознательных людей. Наша главная цель – популяризация отдыха в Крыму. Мы публикуем полезную информацию, фотографии о достопримечательностях и интересных местах совершено бесплатно. Ищете на море в крым? Na-more-v-crimea.ru – тут статьи представлены, прочтите их скорее. Будем постоянно коллекцию для путешествий обновлять, делиться ценными рекомендациями для тех, кто в поездку отправляется, также об особенностях Крыма и возможных сложностях, с которыми туристы могут столкнуться, рассказывать.
Моряки смогут изучить большое количество перспективных должностей, которые оплачиваются в соответствии с вашими потребностями, а потому удастся отыскать подходящую по зарплате, условиям деятельности должность. Для начала необходимо выбрать должность, а также то, на каком флоте хотели бы трудиться. Можно найти работу на оффшорном, танкерном и других флотах. https://crewings.me – на сайте вы отыщете все важные данные крюингов и других. Для того чтобы найти то, что нужно, следует указать должность, а также тип флота. В базе всегда только актуальная, свежая информация.
Посетите сайт https://catcas.pro/ – это официальный сайт с лицензией Кэт казино и вы найдете игры от известных провайдеров, среди которых NetEnt, Microgaming и Pragmatic Play с поддержкой 24/7, многоязычным интерфейсом. Оцените удобство интерфейса и преимущества использования официального сайта о которых подробно рассказано на странице.
На сайте https://svaib.ru/ закажите профессиональный, качественный монтаж прочных, крепких КЖБИ свай. Услуга оказывается по Ленинградской области. А самое главное, что отсутствуют трещины, сколы, любые деформации, поэтому вы можете быть уверены в высоком качестве работ. Уникальность таких свай в том, что они разрабатываются по уникальной технологии. За счет этого они намного крепче бетона. Стоимость услуги будет невысокой. Для того чтобы больше узнать о технологии, изучите видео. Эти сваи не имеют аналогов.
Калипсо – компания, которая развивается динамично. Предлагаем арендовать комфортабельные катера, яхты и парусники. Гарантируем персональный подход к каждому клиенту и доступные цены. Отдых ваш будет неповторимым. Ищете аренда яхты Адлер? Adler.calypso.ooo – здесь разместили информацию о преимуществах сотрудничества с нами. Аренда яхт теперь намного проще, чем раньше было. Мы смогли построить свою стратегию предоставления качественных услуг. Вы можете нам доверять. С удовольствием на все вопросы по телефону ответим. Ваше приключение ждет!
Посетите сайт Котлы и горелки https://kotel-54.ru/ и вы найдете на складе в наличии готовые котельные, электрические котельные, котлы, горелки по низким ценам. Ознакомьтесь с нашим огромным ассортиментом, а доставка осуществляется как по Новосибирску, так и по всей России. У нас можно купить качественные и доступные запчасти для котлов и горелок. Подробнее на сайте.
На сайте https://shemi-otopleniya.ru/ ознакомьтесь с полным ассортиментом товаров, которые выполнены из качественной нержавеющей стали. В ассортименте компании находится гибкая подводка, РВД, подводка для смесителя и многое другое различных размеров, модификации и конфигурации. Именно поэтому вы обязательно приобретете то, что нужно для выполнения определенных работ, ремонта. В разделе можно ознакомиться и с особенностями, техническими характеристиками трехходового крана, медных труб. Вся продукция является сертифицированной, высокого качества.
На сайте https://svaib.ru/ уточните расценки на КЖБИ сваи. Это предприятие предлагает качественную и надежную установку практичных, прочных свай КЖБИ. Все работы выполняются без минимальных деформаций, разрушений, спилов, чтобы вы смогли получить безупречный, эталонный результат. Сваи имеют такую важную особенность, что разрабатываются из виброуплотненного бетона, а также прочного армокаркаса. Именно по этой причине сваи будут намного прочнее бетона. На этом же сайте ознакомьтесь с благодарственными письмами от тех компаний, которые уже воспользовались услугами предприятия.
На сайте https://villaprestige.ru уточните расписание, когда вы сможете снять виллу «Престиж». Для того чтобы забронировать этот вариант, необходимо обозначить дату заезда и выезда, количество гостей. Уточните и расписание электричек, на которых вы сможете добраться до места. Этот отдых обязательно вдохновит вас на нечто большее. Сделать правильный выбор помогут фотографии этого завораживающего места. Вас ожидает бесплатный Интернет, лаунж-зона, бесплатная парковка. К каждому клиенту индивидуальный подход.
На сайте https://mirtash.ru/ изучите каталог натурального камня, который подходит для декорирования приусадебной территории. Но им украшают и дом внутри. Важным преимуществом покупки камня в этой компании является то, что его добывают напрямую из проверенных месторождений России. Работы мастеров этой компании вызывают неподдельный восторг, восхищение. На ваше усмотрение можно выбрать самую разную цветовую палитру, а также фактуру. Все природные камни отличаются высокой прочностью, надежностью, экологичностью.
На сайте https://parkmotors.ru/ в огромном многообразии находятся шины и диски, двигатель, трансмиссия на Газель. Также представлено и рулевое управление, различные комплектующие на такую технику. Для того чтобы совершить приобретение, необходимо изучить все технические характеристики, особенности выбранного товара, чтобы купить именно то, что нужно. Есть обзоры на определенные товары. Для того чтобы найти что-то определенное, воспользуйтесь специальным поиском. Он значительно облегчит вам задачу.
Туристическая компания Алые Паруса предлагает увлекательные водные экскурсии на теплоходах https://city-tours-spb.ru/vodnyye-ekskursii/ по рекам и каналам Санкт-Петербурга с выходом в Финский залив. Маршруты теплоходных экскурсий проходят мимо основных исторических мест. На борту работает экскурсовод или аудиогид. Есть собственный причал в центре Петербурга, откуда регулярно и без очередей отправляются теплоходы. Все теплоходы комфортные и безопасные. Отправляйтесь в водное путешествие и получите свежие эмоции и хорошее настроение!
На сайте https://lazrko.ru ознакомьтесь с Лазаревским казачьим районным обществом. Перед вами те атаманы, которые заслужили огромное уважение. Также на этом портале вы найдете и полезные, содержательные материалы на данную тему, включая, структуру, историю, а также современную деятельность. Казачье общество начало особенно активно развиваться весной 2012 года. Одной из основных сфер деятельности является несение службы на государственном уровне. Под началом РКО работают детские садики, а также школы, в которых казачьи группы.
Teleflora Belarus Unit https://flower-shop.by/ is pleased to offer flower delivery services. The company is an online florist, delivering flowers across Minsk, Belarus. We would be delighted to assist you in sending flowers to Minsk, Belarus, and other regional Belarus towns including Mogilev, Vitebsk, Brest, Grodno, and Gomel, as well as worldwide destinations. We’re more than happy to take care of all your Belarus flower delivery orders. We’ve got a whole network of florists and flower shops who can deliver flowers for our customers whenever they need.
Обратившись в «LEMON CAR», вы останетесь довольны качеством обслуживания. В автосервисе профессионалы своего дела трудятся. Мы весь спектр услуг СТО оказываем. Благодаря нам ваш автомобиль будет работать надежно в течение всего срока эксплуатации и ухоженно выглядеть. Ищете авторемонт анапа? Lemon-car.ru – здесь представлена основная информация об автосервисе. Также на сайте найдете отзывы. Предоставляем услуги по выявлению неполадок вашей машины. Можем предложить наилучшие условия по цене и покупке запчастей. Удостоверьтесь в достоинствах работы с нами лично!
На сайте https://technolit.shop/ вы сможете выбрать и приобрести печи в облицовке, сетке, есть печи, которые подходят под укладку. Возможно, вам приглянутся варианты под обкладку, облицовки на трубу, отопительные печи и многое другое. Обязательно изучите избранные категории, которые выполнены из высокотехнологичных, инновационных материалов. Именно поэтому они прослужат долгое время, не утратят внешнего вида. Есть раздел с рекомендуемыми товарами. Вся продукция доставляется в минимальные сроки и обойдется по разумной цене.
Klub hazardowy Gonzo Casino rozpoczal swoja dzialalnosc w 2023 roku. Obecnie to miejsce oferuje swoje uslugi tysiacom graczy z roznych krajow swiata. Strona https://gonzo-casino.pl/ jest dostepna w jezykach rosyjskim, polskim, ukrainskim i angielskim. Tematyka portalu jest oczywista z nazwy – glownym bohaterem jest slynny Gonzo, a program bonusowy w duzej mierze odzwierciedla morskie motywy.
На сайте https://ekskursii.open-anapa.ru/ есть возможность заказать индивидуальные экскурсии, которые организуются по Анапе. Также можно выбрать и трансфер на любой экскурсионный объект. Для этих целей необходимо подобрать наиболее подходящую дату, количество билетов, а также автомобиль. В этой компании вам предложат увлекательные, интересные экскурсии, которые никого не оставят равнодушным. У вас получится посетить самые популярные достопримечательности, услышать легенды о них. Экскурсии гарантированно подарят отличное настроение и зарядят позитивом.
Транспортная компания SPB-BUS https://www.spb-bus.ru/avtomobili предлагает аренду автомобилей с водителем в Санкт-Петербурге. В автопарке современные автомобили vip-, бизнес- и эконом-класса для свадеб, деловых поездок и других мероприятий. В штате профессиональные и интеллигентные водители. Менеджеры на связи круглосуточно.
На сайте https://mvpol.ru вы сможете заказать сметный расчет для того, чтобы узнать, во сколько вам обойдутся промышленные полы определенного типа. В этой компании получится приобрести полимерные наливные полы, а также бетонные полы, которые отличаются упрочненным верхним покрытием. Также есть возможность заказать и ремонт такого покрытия. Сотрудничество предполагает составление договора, а на работы предоставляются гарантии. Вся запрашиваемая информация предоставляется очень быстро. Есть возможность воспользоваться консультацией.
На сайте https://www.techno-svyaz.ru/ уточните телефон компании, которая является производителем печатных плат. Предприятие всегда радо новым заказчикам, контрактам, которые исполняет быстро, качественно, в соответствии с требованиями. Именно поэтому клиент получит то, на что рассчитывал и в обозначенном количестве. Хотя предприятие и является известным, оно заполучило огромное количество клиентов, постоянно и стремительно развивается, чтобы предложить инновационные разработки в данной области.
На сайте https://iz-nerzhaveyki.ru/ ознакомьтесь с большим выбором продукции, которая выполнена из нержавеющей стали. В компании вы сможете заказать следующую продукцию: РВД, рукава высокого давления, а также гибкую подводку, обратные клапаны, фильтры, муфты, фланцы и многое другое. Все товары разработаны в соответствии с ГОСТом, по нормативам и с учетом высоких требований. Напротив каждого товара указаны технические характеристики, размеры и другая важная информация, которая является ключевой при покупке.
На сайте https://foto-a4.ru/ уточните телефон фотосалона, который находится в Митино. Каждый желающий получает возможность воспользоваться полным спектром услуг, включая печать фото на различные документы, плоттерную резку, широкоформатную печать и многое другое. На изготовление заказа уходят несколько минут, но может потребоваться и больше времени в зависимости от сложности заказа, его объема. При необходимости компетентные и опытные сотрудники проконсультируют по всем интересующим вопросам.
Wszyscy nowi uzytkownicy, ktorzy po raz pierwszy tworza konto w kasynie Fontan, moga skorzystac z bonusu bez depozytu w wysokosci 100 zlotych. Wszystko, co musisz zrobic, to zarejestrowac sie https://fontan-casino.pl/ – potwierdzic swoj adres e-mail i wypelnic profil w swoim panelu uzytkownika, podajac wymagana informacje. Aktywacja bonusu odbywa sie w panelu uzytkownika.
На сайте https://mirtash.ru/ изучите каталог натурального камня, который подходит для декорирования приусадебной территории. Но им украшают и дом внутри. Важным преимуществом покупки камня в этой компании является то, что его добывают напрямую из проверенных месторождений России. Работы мастеров этой компании вызывают неподдельный восторг, восхищение. На ваше усмотрение можно выбрать самую разную цветовую палитру, а также фактуру. Все природные камни отличаются высокой прочностью, надежностью, экологичностью.
На сайте https://superfsy.ru/ ознакомьтесь с интересной, полезной, актуальной информацией, которая касается финансов. Вы узнаете о том, как сэкономить собственные сбережения. Также представлены финансовые рекомендации, которые понадобятся как самозанятым, так и фрилансерам. Здесь вы найдете ценные, полезные рекомендации на тему автомобилей, детей, дачи, здоровья, домашних животных. Есть и рецепты, практические советы на тему ремонта. Статьи обязательно помогут вам в решении перечисленных вопросов.
На сайте https://xmas-studio.ru/ посмотрите то, как студия сможет украсить любое помещение к одному из самых любимых семейных праздников – Новому году. Есть возможность воспользоваться услугами «под ключ». Каждого клиента ожидает роскошный, особенный дизайн, оперативное выполнение проекта, а также экономия времени, чтобы вы насладились более приятными хлопотами, в том числе, подготовкой подарков. Прямо сейчас вы сможете выбрать одну из предложенных елок в дизайнерском исполнении. Она станет ярким пятном на любой фотографии.
На сайте https://mmu-online.ru/ запросите консультацию для того, чтобы воспользоваться помощью, которая оказывается студентам, включая абитуриентов, выпускников. Если у вас совсем нет времени или вы не понимаете в определенном предмете, то специалисты сервиса окажут вам помощь, ответят на вопросы тестирования, сформируют отчет, выполнят практические задания, а также составят дипломную работу. Вы сможете обратиться сюда для того, чтобы решить определенные задачи. Для того чтобы вы получили предложение, нужно указать электронную почту.
На сайте https://ekskursii.open-anapa.ru/ есть возможность заказать индивидуальные экскурсии, которые организуются по Анапе. Также можно выбрать и трансфер на любой экскурсионный объект. Для этих целей необходимо подобрать наиболее подходящую дату, количество билетов, а также автомобиль. В этой компании вам предложат увлекательные, интересные экскурсии, которые никого не оставят равнодушным. У вас получится посетить самые популярные достопримечательности, услышать легенды о них. Экскурсии гарантированно подарят отличное настроение и зарядят позитивом.
W dobie dynamicznego rozwoju kasyn internetowych, Vavada Casino wylania sie jako platforma, ktora oferuje nie tylko rozrywke na najwyzszym poziomie, ale rowniez bezpieczne srodowisko do gry online https://vavadas.pl/ . Serwis jest dostosowany do potrzeb polskich graczy, oferujac korzystne warunki, szeroka game gier i atrakcyjne bonusy.
На сайте https://technolit.shop/ вы сможете выбрать и приобрести печи в облицовке, сетке, есть печи, которые подходят под укладку. Возможно, вам приглянутся варианты под обкладку, облицовки на трубу, отопительные печи и многое другое. Обязательно изучите избранные категории, которые выполнены из высокотехнологичных, инновационных материалов. Именно поэтому они прослужат долгое время, не утратят внешнего вида. Есть раздел с рекомендуемыми товарами. Вся продукция доставляется в минимальные сроки и обойдется по разумной цене.
На сайте https://www.techno-svyaz.ru/ уточните телефон компании, которая является производителем печатных плат. Предприятие всегда радо новым заказчикам, контрактам, которые исполняет быстро, качественно, в соответствии с требованиями. Именно поэтому клиент получит то, на что рассчитывал и в обозначенном количестве. Хотя предприятие и является известным, оно заполучило огромное количество клиентов, постоянно и стремительно развивается, чтобы предложить инновационные разработки в данной области.
Russkie-serial.net – ресурс, где у вас есть возможность с удовольствием смотреть любимые сериалы. Рады предложить для вас разные жанры: триллер, фантастика, детектив, мистика и другое. Даем гарантию, что вас ждет множество интересных историй и невероятных эмоций. Ищете онлайн сериалы смотреть? Russkie-serial.net – здесь представлены самые лучшие русские фильмы. Обновляем коллекцию, чтобы удовлетворить ваши запросы. Зарегистрировавшись на ресурсе, вы доступ к дополнительным функциям получите. Предлагаем возможность комментировать сериалы и общаться с другими зрителями нашего ресурса.
Klub hazardowy KakTuz Casino otworzyl swoje wirtualne drzwi dla fanow rozrywek hazardowych w 2023 roku. Strona https://kaktuz-casino.pl/ internetowa zostala pierwotnie stworzona dla widowni z Europy Wschodniej, o czym swiadczy tlumaczenie stron portalu na jezyki ukrainski, rosyjski i polski. Jednak klienci z calego swiata sa przyjmowani, dlatego istnieje rowniez wersja angielska.
Trusted Computer Wholesaler in Dubai – Bulk IT Equipment from FST https://fstrading.co/ – Futuretech Solutions Trading (FST) is your reliable partner for wholesale computer components and cutting-edge IT solutions delivered globally from Dubai. With a massive inventory of wholesale computer parts, we cater to system integrators, resellers, and IT retailers across the Middle East, Africa, and Asia. We ensure fast international shipping and reliable customer support every step of the way. Premium Quality at Wholesale Prices!
На сайте https://remontteplo.ru/ уточните всю полезную информацию, которая касается ремонта теплового оборудования. Если вы находитесь в поисках чего-то определенного, то используйте специальный поиск. На предприятии выполняют максимально оперативный ремонт, на который предоставляются гарантии. При необходимости будет обучен персонал, который сможет браться за самые сложные задачи. На все услуги установлены разумные расценки. Все работы выполняются в минимальные сроки. Для заказа услуги нужно позвонить по указанному телефону.
На сайте https://mirtash.ru/ изучите каталог натурального камня, который подходит для декорирования приусадебной территории. Но им украшают и дом внутри. Важным преимуществом покупки камня в этой компании является то, что его добывают напрямую из проверенных месторождений России. Работы мастеров этой компании вызывают неподдельный восторг, восхищение. На ваше усмотрение можно выбрать самую разную цветовую палитру, а также фактуру. Все природные камни отличаются высокой прочностью, надежностью, экологичностью.
На сайте https://z-news.link/ изучите увлекательные и информативные новости, которые представлены здесь со всего мира. Они на самую разную тематику и, как правило, касаются экономики, политики, бизнеса, авто, моды, есть забавные новости, те, что касаются игр, медицины, развлечений и многого другого. Здесь вы обязательно найдете такую информацию, которая обязательно вам пригодится для расширения кругозора. Есть информация как на русском языке, так и английском. Вы точно ничего не пропустите, если будете регулярно посещать этот портал, на котором публикуются самые последние новости из разных стран.
На сайте https://foto-a4.ru/ уточните телефон фотосалона, который находится в Митино. Каждый желающий получает возможность воспользоваться полным спектром услуг, включая печать фото на различные документы, плоттерную резку, широкоформатную печать и многое другое. На изготовление заказа уходят несколько минут, но может потребоваться и больше времени в зависимости от сложности заказа, его объема. При необходимости компетентные и опытные сотрудники проконсультируют по всем интересующим вопросам.
Посетите интернет магазин FurnituraPRO https://furniturapro.ru/ и вы найдете дверную фурнитуру, по выгодным ценам, для межкомнатных и входных дверей в Москве с доставкой по Московской области, России, Казахстану и Беларуси. Ознакомьтесь с широким ассортиментом товаров, который постоянно обновляется. У нас вы можете купить замок, ручку, фиксатор и другую дверную фурнитуру от большого количества брендов. Подробнее на сайте.
На сайте https://press-forma.by/ закажите бесплатный расчет на производство пресс-форм, а также различных пластиковых конструкций. Весь заказ будет выполнен точно в обозначенные сроки. Специалисты предприятия работают исключительно на результат, чтобы ваш бизнес только процветал и становился рентабельным. Предприятие находится на рынке более 10 лет, за которые заполучило огромное количество положительных отзывов. В арсенале около 30 единиц техники, чтобы создать для вас продукцию эталонного качества.
На сайте https://ekskursii.open-anapa.ru/ есть возможность заказать индивидуальные экскурсии, которые организуются по Анапе. Также можно выбрать и трансфер на любой экскурсионный объект. Для этих целей необходимо подобрать наиболее подходящую дату, количество билетов, а также автомобиль. В этой компании вам предложат увлекательные, интересные экскурсии, которые никого не оставят равнодушным. У вас получится посетить самые популярные достопримечательности, услышать легенды о них. Экскурсии гарантированно подарят отличное настроение и зарядят позитивом.
С t.me/mvavada вам скучно точно не будет. Официальный канал проекта Вавада предлагает погрузиться в мир выигрышей. В VAVADA вас ждут невероятные слоты. Не упустите на удачу шанс, уже сегодня к нам присоединяйтесь и начинайте сейчас выигрывать. Меняйте свою жизнь к лучшему! Ищете установить vavada? T.me/mvavada – здесь всегда есть что-то интересное. За нашими обновлениями следите. Мы каждого игрока ценим. Стараемся радовать вас новыми предложениями и акциями ежедневно. Готовы помочь вам в любое время суток. Откройте для себя яркие эмоции с Вавада!
Cactus Casino – miejscu, gdzie emocje siegaja zenitu, a nagrody przekraczaja najsmielsze oczekiwania! Jesli szukasz kaktus kasyno, ktore laczy w sobie bogata oferte gier, hojne bonusy i wygode gry na urzadzeniach mobilnych, trafiles idealnie. https://cactuscasino.pl/ to nowoczesna platforma, ktora od 2024 roku podbija serca graczy na calym swiecie.
На сайте https://superfsy.ru/ ознакомьтесь с интересной, полезной, актуальной информацией, которая касается финансов. Вы узнаете о том, как сэкономить собственные сбережения. Также представлены финансовые рекомендации, которые понадобятся как самозанятым, так и фрилансерам. Здесь вы найдете ценные, полезные рекомендации на тему автомобилей, детей, дачи, здоровья, домашних животных. Есть и рецепты, практические советы на тему ремонта. Статьи обязательно помогут вам в решении перечисленных вопросов.
Ищете выгодные ставки на различные виды спорта? Посетите https://luckypari-17uz.online/ и вы найдете отличные коэффициенты. Официальный сайт букмекерской конторы LuckyPari дает приветственный бонус. Посмотрите подробнее на сайте какие есть ставки игры. Вы также, для удобства, сможете скачать мобильное приложение.
На сайте https://villaprestige.ru уточните информацию, которая касается заселения в роскошную и комфортную виллу «Престиж». Такой отдых точно вдохновит вас на большее. А для того, чтобы ознакомиться с тем, в каких условиях вы будете проживать, изучите галерею с фото. Вы сможете просыпаться и начинать каждое утро с чашки бодрящего кофе на обустроенной террасе. Весь периметр охраняется, вы сможете с комфортом устроиться на лаунж-зоне. Вас ожидает бесплатная комфортная парковка, а также высокоскоростной Интернет.
На сайте https://dmshglinki.ru/ вы найдете полезные статьи, материалы, которые касаются занятий, а также досуговых мероприятий, которые проводятся в детском саду. Здесь представлены различные любопытные сценарии на самые разные праздники, в том числе, 8 марта. Почитав материалы, вы сможете своими руками красиво оформить торт, предназначенный для девочки. Обязательно ознакомьтесь со сценарием, который посвящен организации экологического праздника. Есть познавательный материал, который научит готовить роллы, суши в домашних условиях и вместе с детьми.
На сайте https://www.techno-svyaz.ru/ уточните телефон компании, которая является производителем печатных плат. Предприятие всегда радо новым заказчикам, контрактам, которые исполняет быстро, качественно, в соответствии с требованиями. Именно поэтому клиент получит то, на что рассчитывал и в обозначенном количестве. Хотя предприятие и является известным, оно заполучило огромное количество клиентов, постоянно и стремительно развивается, чтобы предложить инновационные разработки в данной области.
На сайте https://mmu-online.ru/ запросите консультацию для того, чтобы воспользоваться помощью, которая оказывается студентам, включая абитуриентов, выпускников. Если у вас совсем нет времени или вы не понимаете в определенном предмете, то специалисты сервиса окажут вам помощь, ответят на вопросы тестирования, сформируют отчет, выполнят практические задания, а также составят дипломную работу. Вы сможете обратиться сюда для того, чтобы решить определенные задачи. Для того чтобы вы получили предложение, нужно указать электронную почту.
На сайте https://himekss.ru уточните то, какую продукцию предлагает приобрести популярная компания «ХИМИЯ-ЭКСПРЕСС». Она находится на рынке длительное время, потому знает то, что предложить клиенту. Предприятие считается проверенным поставщиком сырья для фармацевтической, пищевой промышленности от лучших производителей. На предприятии работают лучшие специалисты с большим опытом и стремлением развиваться. Практически вся продукция в наличии. Этот момент дает возможность осуществить поставку в день оформления заявки.
Посетите сайт Котлы и горелки https://kotel-54.ru/ и вы найдете на складе в наличии готовые котельные, электрические котельные, котлы, горелки по низким ценам. Ознакомьтесь с нашим огромным ассортиментом, а доставка осуществляется как по Новосибирску, так и по всей России. У нас можно купить качественные и доступные запчасти для котлов и горелок. Подробнее на сайте.
Klub hazardowy Gonzo Casino rozpoczal swoja dzialalnosc w 2023 roku. Obecnie to miejsce oferuje swoje uslugi tysiacom graczy z roznych krajow swiata. Strona https://gonzo-casino.pl/ jest dostepna w jezykach rosyjskim, polskim, ukrainskim i angielskim. Tematyka portalu jest oczywista z nazwy – glownym bohaterem jest slynny Gonzo, a program bonusowy w duzej mierze odzwierciedla morskie motywy.
На сайте https://shemi-otopleniya.ru/ ознакомьтесь с полным ассортиментом товаров, которые выполнены из качественной нержавеющей стали. В ассортименте компании находится гибкая подводка, РВД, подводка для смесителя и многое другое различных размеров, модификации и конфигурации. Именно поэтому вы обязательно приобретете то, что нужно для выполнения определенных работ, ремонта. В разделе можно ознакомиться и с особенностями, техническими характеристиками трехходового крана, медных труб. Вся продукция является сертифицированной, высокого качества.
На сайте https://villaprestige.ru уточните расписание, когда вы сможете снять виллу «Престиж». Для того чтобы забронировать этот вариант, необходимо обозначить дату заезда и выезда, количество гостей. Уточните и расписание электричек, на которых вы сможете добраться до места. Этот отдых обязательно вдохновит вас на нечто большее. Сделать правильный выбор помогут фотографии этого завораживающего места. Вас ожидает бесплатный Интернет, лаунж-зона, бесплатная парковка. К каждому клиенту индивидуальный подход.
Обратившись в «LEMON CAR», вы качеством обслуживания точно останетесь довольны. В автосервисе трудятся профессионалы. Мы весь спектр услуг СТО оказываем. С нашей помощью ваше авто будет ухоженно выглядеть и работать надежно в течение всего срока эксплуатации. Ищете сто анапа адреса? Lemon-car.ru – здесь представлена основная информация об автосервисе. Также на портале отзывы отыщите. Предоставляем услуги по выявлению неполадок вашей машины. Можем предложить наилучшие условия по цене и покупке запчастей. Убедитесь лично в преимуществах работы с нами!
Ищете объявления Израиля? 4israel.co.il – ваш идеальный выбор! Простая регистрация, автоматический перевод на популярные языки, удобные фильтры и широкая аудитория. Разместите своё объявление уже сегодня и привлеките больше клиентов!
На сайте https://parkmotors.ru/ в огромном многообразии находятся шины и диски, двигатель, трансмиссия на Газель. Также представлено и рулевое управление, различные комплектующие на такую технику. Для того чтобы совершить приобретение, необходимо изучить все технические характеристики, особенности выбранного товара, чтобы купить именно то, что нужно. Есть обзоры на определенные товары. Для того чтобы найти что-то определенное, воспользуйтесь специальным поиском. Он значительно облегчит вам задачу.
I loved this guide on setting up retro games in Kodi! The detailed steps for each emulator were super helpful, and I appreciate the ROM recommendations. Can’t wait to dive into my favorite classics! Thanks for putting this together!
Туристическая компания Алые Паруса предлагает увлекательные водные экскурсии на теплоходах https://city-tours-spb.ru/vodnyye-ekskursii/ по рекам и каналам Санкт-Петербурга с выходом в Финский залив. Маршруты теплоходных экскурсий проходят мимо основных исторических мест. На борту работает экскурсовод или аудиогид. Есть собственный причал в центре Петербурга, откуда регулярно и без очередей отправляются теплоходы. Все теплоходы комфортные и безопасные. Отправляйтесь в водное путешествие и получите свежие эмоции и хорошее настроение!
ЭкспортБейз – сервис, который дает возможность без труда выполнить подбор, выгрузку базы организаций и предприятий по странам СНГ и России. Данные у нас могут быть применены для настройки таргетинга интернет-рекламы, конкурентного анализа рынка или же приобретения первичной клиентской базы, а также решения большого спектра иных задач. https://export-base.ru/ – здесь можно узнать о главных преимуществах нашего сервиса. Базы отличные, поддержка всегда работает слаженно и быстро. Цены вполне демократичные и соответствуют качеству.
1000topbonus.website вопросам азартных игр посвящен. Мы рассмотрим главные плюсы интернет-казино. Рассказываем, что такое бонусы в игровых автоматах. https://1000topbonus.website – тут для вас самое интересное собрали. Постоянно на честность проверяем виртуальные клубы. Считаем, что азартные игры должны быть безопасными. Публикуем исключительно качественный контент. Можете сами в этом убедиться. Объясним, как с игровых автоматов вывод осуществить. Наслаждайтесь атмосферой настоящего казино, не выходя из своего дома.
Компания «Агрогрунт» предоставляет возможность приобрести гербициды, песок, семена газона, удобрения, фунгициды. Продукция имеет сертификаты и прошла экологический контроль. Предоставляем совершенно бесплатно квалифицированную помощь. Всегда рады вам помочь, обращайтесь. Ищете чернозем в мешках? Agrogrunt.ru – тут цены указаны, посмотрите их уже сегодня. Продукция наша невероятным спросом пользуется. Гарантируем отменное качество предлагаемых материалов и оперативную доставку. Поставки осуществляются – без выходных!
Сайт рекомендует изучить содержательные, свежие новости о Кривом Роге, которые позволят узнать собственный город с другой стороны. Если произошло событие, на ваших глазах что-то случилось, то необходимо сразу же связаться с администрацией с той целью, чтобы новость оказалась в СМИ. На портале исключительно проверенные, содержательные материалы, которые важны всем, кто живет в этом городе. https://100.kr.ua/ – на портале вы найдете всю важную и ценную информацию, последние события, которые произошли недавно. Регулярно здесь публикуются свежие новости, которые помогут разобраться в настоящем.
Ищете осаго онлайн купить? Сarbox30.ru, тут все для вашего автомобиля: автоэлектроника и установка сигнализаций в Астрахани, страхование, кредиты. Познакомьтесь с нашими новостями из мира авто, или рассчитайте страховку Каско и ОСАГО – мы собрали все про полисы ОСАГО и страхование автомобиля, ознакомьтесь с распродажами в автосалонах Астрахани. Любому автолюбителю будет интересен наш портал!
Fullinvest.ru – интуитивно понятный сайт. Мы постарались наполнить его интересными и не менее познавательными статьями. От вас только желание потребуется изучить уникальные возможности и особенности торговли. Рассмотрим детальнее, как вернуть деньги от брокера, который оказался мошенником. Ищете заработок на бирже? Fullinvest.ru – здесь будет интересно как новичкам, так и опытным трейдерам. Вы можете прямо сейчас посмотреть новости. Делимся интересными материалами. Рассказываем, какими стратегии трейдинга бывают, и где учат им. Скорее к нам присоединяйтесь!
Компания «Полиметалл» занимается производством прессов и оборудования. Уделяем большое внимание качеству продукции. При этом цены остаются оптимальными. С радостью необходимую модель поможем подобрать. Наши основные ценности – надежность, инновации и забота о каждом клиенте. Ищете валковый пресс для вырубки картона? Tecamet.ru/pressy/pressy-valkovye – тут есть возможность прессы валковые купить. Покупая нашу продукцию, можете быть уверены в ее работоспособности и долгом сроке эксплуатации. Созвонитесь с нами, и мы вас грамотно проконсультируем.
На сайте https://iz-medi.ru/ изучите весь каталог продукции, в котором находятся: рукава высокого давления, металлорукава, подводки, шаровые краны и многое другое. Есть категории товаров, выполненных из нержавейки. Вся продукция выполнена из высокотехнологичных материалов, которым не страшны перепады температур, воздействие агрессивных веществ. Каталог регулярно пополняется любопытными новинками, которые используются в самых разных сферах промышленности. А если вы ищете что-то определенное, то воспользуйтесь специальным поиском.
Завод СХТ производит автомобильные весы, без которых нельзя представить действенную работу, ни одного развивающегося предприятия. Кроме высокого качества нашей продукции, предлагаем ее по выгодной цене. Готовы по всем вопросам вас компетентно проконсультировать. https://xn--q1aci.xn--p1ai/ – тут разузнаете, каким должен быть новейший весоизмерительный комплекс. Кроме этого на сайте отзывы наших клиентов предоставлены. Готовы с партнерами к диалогу. Обращайтесь к нам, мы оперативно реагируем на заявки.
Ищите каталог кухонь спб? Gloriakuhni.ru – работаем в СПб и ЛО. У нас огромный выбор фурнитуры, 800+вариантов отделки, гарантия – 3 года. 3D-проект — в подарок каждому. Простой онлайн-калькулятор. 5 звёзд на Яндексе и Авито. Дарим столешницу и стеновую панель каждому клиенту. Создадим качественно кухню под любой бюджет и в срок.
Для того чтобы правильно вести бизнес, важно сотрудничать только с лучшими, зарекомендовавшими себя партнерами, которые помогут прийти к цели. Именно таким является предприятие «LowCostCargo», которое длительное время специализируется на выкупе, доставке товаров из Китая. https://lowcostcargo.ru/ – на сайте ознакомьтесь с подробностями, которые помогут в том, чтобы правильно организовать бизнес. За работу не придется переплачивать, она осуществляется на выгодных условиях, обойдется недорого. Подписывается договор, имеются гарантии на то, что груз приедет в целости.
Цветы из полимерной глины https://flowers2025.ru – это реалистичный и долговечный декор, аксессуар или подарок. Используйте качественную глину, инструменты и текстурные формы. Вдохновляйтесь природой, создавайте уникальные лепестки и листья. Запекайте по инструкции – и наслаждайтесь результатом!
Если вам необходимо приобрести бетон в Краснодаре, либо крае, BZDOSTUP будет вашим проверенным помощником. Продукция подтверждается сертификатами. Мы готовы предложить лояльные условия для сотрудничества. Всегда соблюдаем сроки, и точность поставок гарантируем. https://bzdostup.ru – здесь можете ознакомиться с нашими услугами и ценами. Предлагаем растворы и бетоны различных марок. Работаем как с частными клиентами, юридическими лицами, так и с бюджетными учреждениями. Вы можете в любое время товар получить. Обращайтесь к нам и не пожалеете!
Завод «СХТ» использует новейшие технологии производства. Главным видом нашей продукции являются автомобильные весы. Свою надежность мы доказали, а также способность оперативно поставленные задачи решать. Получили много хороших отзывов. Нам важно, чтобы вы остались довольны сроками и ценой. https://cxt.su – тут представлена о нашей компании видео-презентация. Обеспечить вас качественным весоизмерительным оборудованием – это наша главная задача. Нам имидж выгодного и порядочного партнера дорог. Обращайтесь к нам и точно не пожалеете об этом!
Website usiic.co provides up-to-date information. You will learn how to make the most effective use of the monetization program. usiic.co in 2025. The author at the beginning of the article talks about how he earned $ 1,000. Looking for how to make the most of usiic.co monetization program in 2025 Usiic.co/finance/how-to-make-the-most-of-usiic-co-monetization-program-in-2025 – here is a detailed breakdown of fines and rewards on the platform. Do you want to start your journey? Rather, follow the referral link to register, post your first article and start earning today!
Научиться зарабатывать на инвестициях не сложно – необходимо лишь вооружиться актуальной и содержательной информацией, которая поможет вам в выборе правильной стратегии. На этом портале вы сможете начать развиваться, зарабатывать вместе с экспертами в данной сфере. https://fullinvest.ru/ – сайт, который ознакомит вас с важной информацией, терминами и тем, что такое трейдинг, почему он поможет вам. Вы получите ответы на вопросы относительно того, с чего начать торговлю, есть огромное количество рекомендаций для начинающих.
На сайте https://iq-kredit.ru/ воспользуйтесь поиском по кредитной программе банка. Для этих целей рекомендуется обозначить сумму кредита, а также его вид и другие аспекты. Также на портале представлено огромное количество важной, полезной информации на данную тему, а потому вы узнаете много нового, интересного. Представлены вопросы, ответы на них, что даст возможность получить более полное представление о финансах. Дополнительно есть материал и о том, как правильно подобрать кредит, оформить заявку в режиме реального времени.
Serialexpress предлагает купить увлекательные сериалы на DVD. Посмотреть ассортимент у вас есть возможность в любое время. Уверены, вы от покупки останетесь в восторге. Товары доступны по приятной цене и хорошо упакованы. https://serialexpress.ru – здесь уникальные диски отыщите. На портале прочтите о нас отзывы, а также узнайте об условиях доставки и оплаты. У нас накопительная система скидок действует. При появлении вопросов, звоните нашим менеджерам. Мы качественно и оперативно работаем. Рады вам помочь!
Ищете объявления Израиля? 4israel.co.il – ваш идеальный выбор! Широкая аудитория, простая регистрация, автоматический перевод на известные языки, удобные фильтры вас ждут. Опубликуйте уже сейчас объявление свое и больше клиентов привлеките!
Завод СХТ изготовляет автомобильные весы, без которых невозможно представить работу любого предприятия, которое развивается. Кроме высокого качества нашей продукции, предлагаем ее по выгодной цене. Готовы проконсультировать вас по телефону по любым вопросам. https://xn--q1aci.xn--p1ai/ – тут разузнаете, каким должен быть новейший весоизмерительный комплекс. Также на ресурсе представлены отзывы наших клиентов. Готовы с партнерами к диалогу. Обращайтесь к нам, мы оперативно реагируем на заявки.
На сайте https://www.techno-svyaz.ru/ уточните телефон компании, которая является производителем печатных плат. Предприятие всегда радо новым заказчикам, контрактам, которые исполняет быстро, качественно, в соответствии с требованиями. Именно поэтому клиент получит то, на что рассчитывал и в обозначенном количестве. Хотя предприятие и является известным, оно заполучило огромное количество клиентов, постоянно и стремительно развивается, чтобы предложить инновационные разработки в данной области.
Автор дзен-канала «Connect Internet» делится новостями и рекомендациями по использованию интернет ресурсов. Публикует уникальные и качественные материалы. Рассказывает, почему постоянно отключаются известные VPN-сервисы. Вы сможете узнать, как в России смотреть «заторможенный» YouTube. Ищете бесплатные vpn проблемы 2025? Dzen.ru/id/67f248b3c702a272997f30c7 – тут найдете нужную информацию о способах доступа к интересным сайтам, онлайн-сервисам и ресурсам. Автор контент создает, который прочтения достоин. Рады видеть вас на «Connect Internet»!
ЭкспортБейз – сервис, который дает возможность без труда выполнить подбор, выгрузку базы организаций и предприятий по странам СНГ и России. Данные у нас могут быть применены для настройки таргетинга интернет-рекламы, конкурентного анализа рынка или же приобретения первичной клиентской базы, а также решения большого спектра иных задач. https://export-base.ru/ – тут можно об основных достоинствах нашего сервиса узнать. Базы отличные, поддержка всегда работает слаженно и быстро. Цены вполне демократичные и соответствуют качеству.
На сайте https://kamillabahus.ru/ запишитесь на консультацию, чтобы узнать то, как пройдет ваша свадьба, организованная Камиллой Бахус. Она оказывает услуги в данной сфере более 5 лет. Поэтому уверена, что справится с организацией события, независимо от уровня сложности, а также запланированного бюджета. Организатор возьмет на себя все хлопоты по подготовке к свадьбе, чтобы вы насладились обществом друг друга. В обязательном порядке подчеркивается индивидуальность пары. С Камиллой ваша подготовка к свадьбе пройдет особенно комфортно!
Типография Печатных дел мастер https://pd-master.ru/ – это возможность воспользоваться калькулятором офсетной печати на сайте, а также заказать полиграфическую продукцию по доступным ценам. Мы специализируемся на печати цветных многостраничных изданий, коротких и средних тиражей. Онлайн утверждение макета и гарантия точного попадания в цвет. Ознакомьтесь на сайте со всеми нашими услугами, портфолио и то что мы выпускаем от буклетов и календарей, до журналов и книг.
На сайте https://kinotac.life/ в огромном количестве представлены фильмы, а также интересные и любопытные сериалы, мультфильмы, которые порадуют своим незаурядным сюжетом, высоким качеством картинки. Вы сможете выбрать любой жанр: триллер, драму, криминал, фэнтези или что-то другое, что скрасит ваш вечер или выходной день. Огромное количество вариантов, которые были созданы несколько лет назад и заполучили огромную популярность. Есть и новинки, которые с особым трепетом ожидали многие. Пройдите регистрацию для того, чтобы воспользоваться всеми функциями.
Компания «Агрогрунт» предлагает купить удобрения, фунгициды, гербициды, песок, семена газона. Продукция имеет сертификаты и прошла экологический контроль. Мы предлагаем профессиональную консультацию абсолютно бесплатно. Всегда рады вам помочь, обращайтесь. Ищете грунт для газона? Agrogrunt.ru – тут цены указаны, посмотрите их уже сегодня. Наша продукция пользуется невероятным спросом. Гарантируем быструю доставку и качество предлагаемых материалов. Поставки осуществляются – без выходных!
Ищете интерактивное оборудование для учебных заведений или бизнеса? Посмотрите наш каталог на сайте https://interaktivnoe-oborudovanie.ru/ – существенный ассортимент удовлетворит каждого заказчика. Мы являемся официальным дилером ведущих мировых брендов в области сенсорного и проекционного оборудования. Ознакомьтесь с брендами на сайте с гарантией производителя, а мы готовы предложить лучшие цены.
1000topbonus.website посвящен вопросам азартных игр. Мы главные плюсы интернет-казино рассмотрим. Рассказываем, что такое бонусы в игровых автоматах. https://1000topbonus.website – здесь собрали для вас все самое интересное. Постоянно на честность проверяем виртуальные клубы. Считаем, что азартные игры должны быть безопасными. Размещаем только контент высочайшего качества. Удостоверьтесь в этом лично. Объясним, как делать вывод с игровых автоматов. Наслаждайтесь атмосферой настоящего казино, не выходя из своего дома.
EXEED ЦЕНТР АВТОРУСЬ https://avtoruss-exeed.ru/ – это официальный дилер EXEED. Посетите сайт, ознакомьтесь с моделями предлагаемых авто, их комплектациями и ценами, а также различными акциями, спецпредложениями, программами кредитования, Trade-in. Запишитесь на тест-драйв. Для владельцев Exeed – рассчитайте стоимость ТО или запишитесь на техническое обслуживание. Подробнее на сайте.
Teleflora Belarus Unit https://flower-shop.by/ is pleased to offer flower delivery services. The company is an online florist, delivering flowers across Minsk, Belarus. We would be delighted to assist you in sending flowers to Minsk, Belarus, and other regional Belarus towns including Mogilev, Vitebsk, Brest, Grodno, and Gomel, as well as worldwide destinations. We’re more than happy to take care of all your Belarus flower delivery orders. We’ve got a whole network of florists and flower shops who can deliver flowers for our customers whenever they need.
На сайте https://ekskursii.open-anapa.ru/ есть возможность заказать индивидуальные экскурсии, которые организуются по Анапе. Также можно выбрать и трансфер на любой экскурсионный объект. Для этих целей необходимо подобрать наиболее подходящую дату, количество билетов, а также автомобиль. В этой компании вам предложат увлекательные, интересные экскурсии, которые никого не оставят равнодушным. У вас получится посетить самые популярные достопримечательности, услышать легенды о них. Экскурсии гарантированно подарят отличное настроение и зарядят позитивом.
Russkie-serial.net – портал, где сможете наслаждаться любимыми сериалами. Мы рады представить вам множество жанров – детектив, триллер, мистика, фантастика и др. Даем гарантию, что вас ждет множество интересных историй и невероятных эмоций. Ищете штрафбат? Russkie-serial.net – тут представлены наилучшие русские фильмы. Обновляем коллекцию, чтобы удовлетворить ваши запросы. Зарегистрировавшись на сайте, вы получите доступ к дополнительным функциям. Предлагаем возможность комментировать сериалы и общаться с другими зрителями нашего ресурса.
Fullinvest.ru – интуитивно понятный ресурс. Мы постарались наполнить его интересными и не менее познавательными статьями. От вас требуется только желание изучить уникальные особенности и возможности торговли. Подробнее рассмотрим, как от брокера, оказавшимся мошенником, вернуть деньги. Ищете регистрация у брокера бкс? Fullinvest.ru – здесь будет интересно как новичкам, так и опытным трейдерам. Вы можете уже сейчас новости посмотреть. Делимся интересными материалами. Рассказываем, какими стратегии трейдинга бывают, и где учат им. Присоединяйтесь к нам!
Прогнозы предоставляет xGbet сайт https://xgbet.ru/ на футбол, аналитику построения на экспертном мнении, а также работе своего каперского программного обеспечения (ПО) на основе искусственного интеллекта (ИИ), учитывающего больше 100 показателей перед матчами футбола, также ставки от xGbet на футбол. Вы узнаете ставки и прогнозы на матчи чемпионатов по футболу Бундеслига (Германия), Серия А (Италия) и Лига 1 (Франция), АПЛ (Англия), Ла Лига (Испания). Статистика правильности ставок на событий исход в матче дает возможность нам сказать, что на футбол прогнозы от xGbet поистине умные, а для посетителей и подписчиков официального сайта совершенно бесплатные.
Ищете полис осаго? Сarbox30.ru, тут все для вашего автомобиля: автоэлектроника и установка сигнализаций в Астрахани, страхование, кредиты. Познакомьтесь с нашими новостями из мира авто, или рассчитайте страховку Каско и ОСАГО – мы собрали все про полисы ОСАГО и страхование автомобиля, ознакомьтесь с распродажами в автосалонах Астрахани. Наш портал будет интересен любому автолюбителю!
Скай Пост рассказывает не только новости Одессы. В нашем блоге https://sky-post.odesa.ua/category/blog/ каждый день публикуем полезные советы, интересные факты, лайфхаки и многое другое, что вам понравится. Читайте одесские новости, а также интересный блог.
Посетите сайт https://interaktivnoe-oborudovanie.ru/ и вы сможете купить интерактивное оборудование. Наш интернет магазин представляет огромный ассортимент продукции для бизнеса и учебных заведений. Посмотрите каталог, и вы обязательно найдете необходимое для вас оборудование по отличным ценам, а доставка осуществляется по всей России.
Отправляйте красивые цветы и подарки с доставкой по Минску, Беларуси вместе с https://sendflowers.by/ ! У нас вы найдете свежие букеты для любого случая: дня рождения, свадьбы, юбилея и просто знак внимания. Быстрая и надежная доставка, широкий выбор цветов, авторские композиции от флористов. Закажите онлайн доставку по Минску, Беларуси, Могилеву, Бресту, Гомелю, Витебску, Гродно и порадуйте близких красивым сюрпризом! Мы гарантируем качество и свежесть каждого букета.
На сайте https://abc-okno.ru/ уточните телефон сервисного центра «АБСОЛЮТ». Популярная компания специализируется на производстве, установке, обслуживании, а также ремонтных работах пластиковых окон, а также дверей. Компания находится на рынке с 2010 года. За это время сформировала внушительную клиентскую базу. Сюда обращаются и повторно, рекомендуют компанию своим друзьям, знакомым. Здесь же получится заказать и качественные москитные сетки. В компании трудятся компетентные, лучшие сотрудники с большим стажем.
Компания «Полиметалл» занимается производством прессов и оборудования. Качеству продукции уделяем пристальное внимание. Цены при этом оптимальными остаются. С радостью необходимую модель поможем подобрать. Наши основные ценности – надежность, инновации и забота о каждом клиенте. Ищете валковый пресс для вырубки? Tecamet.ru/pressy/pressy-valkovye – тут есть возможность прессы валковые купить. Покупая нашу продукцию, можете быть уверены в ее работоспособности и долгом сроке эксплуатации. Позвоните по нашему номеру, и мы вас профессионально проконсультируем.
На сайте https://mirtash.ru/ изучите каталог натурального камня, который подходит для декорирования приусадебной территории. Но им украшают и дом внутри. Важным преимуществом покупки камня в этой компании является то, что его добывают напрямую из проверенных месторождений России. Работы мастеров этой компании вызывают неподдельный восторг, восхищение. На ваше усмотрение можно выбрать самую разную цветовую палитру, а также фактуру. Все природные камни отличаются высокой прочностью, надежностью, экологичностью.
На сайте https://ait-ural.ru/ уточните телефон компании для того, чтобы воспользоваться такой ценной и нужной услугой, как продвижение сайтов. При этом работы можно заказать не только в Екатеринбурге, но и остальных городах. Также есть возможность воспользоваться и такими важными услугами, как: создание интернет-магазинов, а также разработка сайтов-визиток. Каждый клиент сможет рассчитывать на индивидуальный подход, быстрое и профессиональное решение проблемы. В обязательном порядке проводится аудит сайта, а также поисковая оптимизация.
Посетите сайт https://gametop.ink/kazino-s-bonusom и вы найдете все бездепозитные бонусы от казино в 2025 году. Изучите самые свежие предложения. Регистрируйтесь в любом из предложенных нами казино и получайте бездеп сразу на свой бонусный счет. Мы собрали только лучшие предложения и самые надежные площадки.
Сайт rseriali.net оснащен удобным плеером, с помощью которого есть возможность совершенно бесплатно смотреть русские сериалы онлайн. Видео по рейтингу, дате выхода, стране-производителе, продолжительности и жанрам поделены. Если вы хотите свое мнение высказать, либо отзывы зрителей узнать, тогда в комментарии заходите. Ищете катина любовь смотреть все серии? Rseriali.net – здесь есть возможность в лучшем качестве смотреть российские фильмы. Мы постоянно базу пополняем, добавляем премьеры и новые серии. Давайте вместе окунемся в захватывающий мир кино!
Сайт рекомендует изучить содержательные, свежие новости о Кривом Роге, которые позволят узнать собственный город с другой стороны. А если что-то произошло, вы стали свидетелем происшествия, то сразу пишите администрации, чтобы новость попала в СМИ. На портале исключительно проверенные, содержательные материалы, которые важны всем, кто живет в этом городе. https://100.kr.ua/ – на портале вы найдете всю важную и ценную информацию, последние события, которые произошли недавно. Регулярно здесь публикуются свежие новости, которые помогут разобраться в настоящем.
На сайте https://dzen.ru/id/67f248b3c702a272997f30c7 вы найдете полезные, содержательные статьи на тему того, какие сервисы VPN считаются наиболее популярными, надежными и функциональными. Все статьи созданы экспертом в этом направлении, потому на них можно положиться, если выбираете VPN высокого качества. Также имеется информация, которая касается нелегкого выбора относительно бесплатного, платного VPN. Здесь регулярно публикуются свежие, содержательные статьи, которые будут полезны каждому.
АвтоМастера.нет – портал, на котором актуальная информация представлена. Вы узнаете, что такое чип-тюнинг. Расскажем, какая трансмиссия лучше. Собрали советы, которые будут полезны при эксплуатации и вождении машины. Разберемся и в том, как датчик кислорода работает. Ищете frm2? Avtomastera.net – тут автомобильные мастера разъясняют о тонкостях работы с клиентами, машинами, также механизмами. На портале есть удобный поиск, воспользуйтесь им. Руководствуясь нашими рекомендациями, вы сможете оптимальное время замены масла определить.
Looking for fast payouts and fair play? Head to https://giantwins-gb.uk/ today . With over 1,000 games, 24/7 customer support, and seamless GBP transactions, it’s the ultimate destination for UK players.
Ищете рейтинг лучших онлайн казино? Посетите https://topcasino.wiki/ и вы найдете ТОП онлайн казино 2025 года, отличающиеся честностью, надежностью и другими параметрами. Ознакомьтесь с полным списком игровых площадок, а также параметрами, по которым мы составили рейтинг, а также бонусными предложениями от каждого казино. Если вы новичок – для вас полноценная информация о том, как зарегистрироваться и играть.
BZDOSTUP будет вашим надежным помощником, если вам нужно купить бетон в Краснодаре или крае. Продукция подтверждается сертификатами. Мы готовы гибкие условия сотрудничества предоставить. Всегда соблюдаем сроки, и точность поставок гарантируем. https://bzdostup.ru – тут можете с нашими ценами и услугами ознакомиться. Предлагаем бетоны и растворы разных марок. Работаем как с частными клиентами, юридическими лицами, так и с бюджетными учреждениями. Вы можете в любое время товар получить. Вы точно не пожалеете, если к нам обратитесь!
Ищете интерактивное оборудование для учебных заведений или бизнеса? Посмотрите наш каталог на сайте https://interaktivnoe-oborudovanie.ru/ – существенный ассортимент удовлетворит каждого заказчика. Мы являемся официальным дилером ведущих мировых брендов в области сенсорного и проекционного оборудования. Ознакомьтесь с брендами на сайте с гарантией производителя, а мы готовы предложить лучшие цены.
Great post! I love how you’ve compiled all the necessary info on setting up retro games in Kodi. The list of emulators and ROMs is super helpful. I can’t wait to dive back into some of my favorite classics. Thanks for sharing!
Типография Печатных дел мастер https://pd-master.ru/ – это возможность воспользоваться калькулятором офсетной печати на сайте, а также заказать полиграфическую продукцию по доступным ценам. Мы специализируемся на печати цветных многостраничных изданий, коротких и средних тиражей. Онлайн утверждение макета и гарантия точного попадания в цвет. Ознакомьтесь на сайте со всеми нашими услугами, портфолио и то что мы выпускаем от буклетов и календарей, до журналов и книг.
На сайте https://iz-medi.ru/ изучите весь каталог продукции, в котором находятся: рукава высокого давления, металлорукава, подводки, шаровые краны и многое другое. Есть категории товаров, выполненных из нержавейки. Вся продукция выполнена из высокотехнологичных материалов, которым не страшны перепады температур, воздействие агрессивных веществ. Каталог регулярно пополняется любопытными новинками, которые используются в самых разных сферах промышленности. А если вы ищете что-то определенное, то воспользуйтесь специальным поиском.
Ищете лазерную гравировку? Посетите сайт https://newlt.ru/ и вы найдете услуги гравировки всех возможных изделий и материалов недорого и любой сложности. Посмотрите на сайте все наши услуги и с какими материалами мы работаем, ознакомьтесь с ценами, а наша скорость и идеальное качество понравятся каждому. Сделать срочную лазерную гравировку в Москве легко от NewLT! Скидки для оптовых клиентов!
Hackerlive.biz – форум, где мы актуальной информацией с вами делимся. Обсудим, сколько в интернете можно заработать. Вы узнаете, надежны ли бесплатные впн сервисы. Ищете взлом помощь хакера? Hackerlive.biz/topic/282/page-12 – здесь можно отыскать специалиста и прочитать отзывы о его работе. Задача будет в кратчайшие сроки осуществлена. Можете обратиться к хакеру в любое удобное время. Напишите ему на электронную почту, и он вам обязательно поможет. Для специалиста в получении для вас данных из соцсетей, банков и иных закрытых источников нет проблем.
Компания «Элек» комплексными поставками кабельной и электротехнической продукции занимается. Мы всегда компромисса со своими клиентами добиваемся. Строго договорных условий придерживаемся. С удовольствием предлагаем вам обширный выбор продукции высшего качества. Ищете кмпв 2х0 5 цена? Elekspb.ru – тут более подробная о нашей компании информация предоставлена. Гарантируем покупателям самую выгодную цену на продукцию. Не срываем поставки. Если вам нужен надежный судовой кабель, свяжитесь с нами по телефону, указанному на сайте. Ждем вашего звонка с нетерпением!
Посетите сайт https://interaktivnoe-oborudovanie.ru/ и вы сможете купить интерактивное оборудование. Наш интернет магазин представляет огромный ассортимент продукции для бизнеса и учебных заведений. Посмотрите каталог, и вы обязательно найдете необходимое для вас оборудование по отличным ценам, а доставка осуществляется по всей России.
EXEED ЦЕНТР АВТОРУСЬ https://avtoruss-exeed.ru/ – это официальный дилер EXEED. Посетите сайт, ознакомьтесь с моделями предлагаемых авто, их комплектациями и ценами, а также различными акциями, спецпредложениями, программами кредитования, Trade-in. Запишитесь на тест-драйв. Для владельцев Exeed – рассчитайте стоимость ТО или запишитесь на техническое обслуживание. Подробнее на сайте.
На сайте https://iq-kredit.ru/ воспользуйтесь поиском по кредитной программе банка. Для этих целей рекомендуется обозначить сумму кредита, а также его вид и другие аспекты. Также на портале представлено огромное количество важной, полезной информации на данную тему, а потому вы узнаете много нового, интересного. Представлены вопросы, ответы на них, что даст возможность получить более полное представление о финансах. Дополнительно есть материал и о том, как правильно подобрать кредит, оформить заявку в режиме реального времени.
Ищите кухню на заказ в спб? Gloriakuhni.ru портфолио мебельной фабрики GLORIA, мы работаем в ЛО и СПб. У нас огромный выбор фурнитуры, 800+вариантов отделки, гарантия – 3 года. Каждому в подарок – 3D-проект. Простой онлайн-калькулятор. 5 звёзд на Яндексе и Авито. Дарим столешницу и стеновую панель каждому клиенту. Создадим качественно кухню под любой бюджет и в срок.
This post is an absolute gem! I’ve always been passionate about retro gaming, and your guide on setting up Kodi with ROMs and emulators makes it so easy to relive those classic moments. The step-by-step instructions were really helpful, especially for a beginner like me. Thanks for sharing this awesome resource!
На сайте https://mxart.ru/ ознакомьтесь со справочником тех компаний, которые занимаются не только разработкой, но и продвижением сайтов при помощи уникальных и новаторских методик. Здесь же вы сможете ознакомиться и с подготовкой к разработке ресурса. Это крайне важно для того, чтобы получить больше клиентов. Для начала рекомендуется произвести анализ конкурентов, а также ЦА с той целью, чтобы выделиться на фоне других. Также необходимо будет обозначить и бизнес-стратегии, поставить цели, к которым вы будете идти.
Teleflora Belarus https://en.teleflora.by/ is proud to represent the Teleflora international flower and gift delivery service in the Republic of Belarus. We offer a reliable and efficient delivery service for flowers, gifts and bouquets, using our network of partners in Minsk, the suburbs of Minsk, and all major cities in Belarus. We are proud to offer only the freshest flowers and take great care to look after our customers. We are pleased to offer international flower delivery as part of our commitment to ensuring your experience with us is as enjoyable as possible.
На сайте https://y6.tartugi.site в большом количестве представлены самые интересные, увлекательные фильмы различных жанров: триллеры, драмы, комедии, приключения, боевики, исторические, детективы и многое другое. Также представлены и сериалы, которые вызовут у вас восторг и положительные впечатления. Есть как новинки, так и бестселлеры прошлых лет, которые не перестают пересматривать раз за разом. Имеются и мультфильмы тех лет, новинки, выхода которых ждали дети самых разных возрастов. Заходите сюда регулярно, чтобы получить порцию приятных эмоций.
С t.me/mvavada вам никогда не будет скучно. Официальный канал проекта Вавада в мир выигрышей предлагает вам погрузиться. В VAVADA вас невероятные слоты ожидают. Не упустите шанс на удачу, присоединяйтесь к нам уже сейчас и начинайте выигрывать прямо сегодня. Меняйте к лучшему свою жизнь! Ищете скачать vavada? T.me/mvavada – тут всегда что-то интересное найдется. Следите за нашими обновлениями. Мы каждого игрока ценим. Стараемся радовать вас новыми предложениями и акциями ежедневно. Готовы в любое время суток вам помощь оказать. Откройте для себя яркие эмоции с Вавада!
J-center Studio – школа парикмахерского искусства. Преподаватели грамотные и общительные. Они любят свою работу и с удовольствием делятся секретами со студентами. Вы научитесь мастерски создавать стильные прически и окрашивать волосы. Ищете как стать парикмахером? J-center.ru – тут цена курсов парикмахера указана. Учим исключительно тому, что действительно мастеру в салоне потребуется. Наша задача – предоставить вам новую профессию, благодаря которой сможете изменить жизнь. Свяжитесь с нами. Мы ответим на вопросы, уточним цены и сделаем персональный расчет для вас.
На сайте https://vsebonuskarti.ru/ в большом количестве представлены дисконтные карты. Также есть скидки в самых разных магазинах. О них вы сможете узнать первым. Здесь также представлены и дисконтные карты, а также программы лояльности. Теперь вы сможете приобрести все, что нужно по привлекательной стоимости, включая медикаменты, товары для животных, дома, одежду и многое другое. Вы получаете возможность значительно сэкономить, но не во вред качеству. Регулярно добавляются новые дисконтные карты, чтобы вы ощутили свою выгоду.
Teleflora Belarus Unit https://flower-shop.by/ is pleased to offer flower delivery services. The company is an online florist, delivering flowers across Minsk, Belarus. We would be delighted to assist you in sending flowers to Minsk, Belarus, and other regional Belarus towns including Mogilev, Vitebsk, Brest, Grodno, and Gomel, as well as worldwide destinations. We’re more than happy to take care of all your Belarus flower delivery orders. We’ve got a whole network of florists and flower shops who can deliver flowers for our customers whenever they need.
Компания «ПРОЖалюзи» предлагает заказать жалюзи. Более 70% клиентов обращаются к нам повторно либо по рекомендации. Наши мастера вас проконсультируют и необходимые замеры сделают. Вы получите с максимальным сроком службы солнцезащитные системы. https://projal.spb.ru – здесь указаны цены на жалюзи и шторы. Мы не стоим на месте, а регулярно развиваемся. Создаем то, в чем вы нуждаетесь. Для нас важно девизу соответствовать – комфорт, стиль, качество. Готовы вам по доступной стоимости предложить наиболее востребованные модели.
Отправляйте красивые цветы и подарки с доставкой по Минску, Беларуси вместе с https://sendflowers.by/ ! У нас вы найдете свежие букеты для любого случая: дня рождения, свадьбы, юбилея и просто знак внимания. Быстрая и надежная доставка, широкий выбор цветов, авторские композиции от флористов. Закажите онлайн доставку по Минску, Беларуси, Могилеву, Бресту, Гомелю, Витебску, Гродно и порадуйте близких красивым сюрпризом! Мы гарантируем качество и свежесть каждого букета.
На сайте https://santex-uslugi.ru/montazh-vodjanogo-teplogo-pola/ уточните телефон компании, которая выполняет установку водяного теплого пола. Компетентные и проверенные специалисты помогут сделать ваш дом максимально комфортным, уютным. При необходимости вы сможете воспользоваться расчетом сметы. Причем она будет готова в тот же день, когда вы обратились за услугой. Лучшие, знающие специалисты уложат пол в соответствии с требованиями, ГОСТом в ванной комнате, гостиной, кухне.
На сайте https://elek-opt.ru осуществляется оптовая реализация кабеля. Каждый клиент получает возможность воспользоваться бесплатной доставкой, которая осуществляется до транспортной компании. Изучите весь ассортимент, который представлен в разделе. Вся продукция от лучших, проверенных, надежных марок, которые отвечают за качество и работают на результат. Для того чтобы подобрать оптимальный вариант, а также подходящий бренд, необходимо воспользоваться специальным фильтром. Если появились вопросы, задайте их в специальной форме.
Для бизнеса крайне важно наладить сотрудничество с надежным и проверенным партнером, который точно никогда не подведет. Именно таким является предприятие «LowCostCargo», которое длительное время специализируется на выкупе, доставке товаров из Китая. https://lowcostcargo.ru/ – на портале изучите все важные подробности, которые помогут в построении бизнеса. Сотрудничество происходит без переплат, оно максимально прозрачное, по доступной стоимости. Подписывается договор, имеются гарантии на то, что груз приедет в целости.
Обратившись в «LEMON CAR», вы останетесь довольны качеством обслуживания. В автосервисе профессионалы своего дела трудятся. Мы весь спектр услуг СТО оказываем. С нашей помощью ваше авто будет ухоженно выглядеть и работать надежно в течение всего срока эксплуатации. Ищете сто анапа адреса? Lemon-car.ru – тут основная информация об автосервисе представлена. Также на сайте найдете отзывы. Предлагаем по выявлению неполадок вашей машины услуги. Можем предложить наилучшие условия по цене и покупке запчастей. Убедитесь лично в преимуществах работы с нами!
На сайте https://elekspb.ru вы получаете возможность приобрести кабель барабанами. Надежное и проверенное предприятие осуществляет продажу судовой электротехники. «ЭЛЕК» считается такой компанией, которая стремительно и активно развивается на рынке, а потому предлагает исключительно качественную и практичную продукцию, наделенную долгим сроком службы. На сайте находится весь перечень товаров, которые вы сможете приобрести прямо сейчас. Если остались вопросы, задайте их через специальную форму.
?Hola entusiastas del entretenimiento
Descubre pastГіn bono 20 euros y vive la mejor experiencia de casino desde casa.
RegГstrate en los mejores casinos de EspaГ±a y obtГ©n 20 euros gratis para jugar. – https://www.casino20eurosgratissindeposito.guru
?Que tengas excelentes ganancias destacadas !
Сайт fullinvest.ru будет интересен всем. Мы подготовили обучающие статьи для новичков. Кратко описали правила трейдеров для успешной торговли, каждое из них проверено практикой. Скорее к нам присоединяйтесь! https://fullinvest.ru – тут узнаете, брокеры-мошенники, кто такие и распознать их как. Постарались полезный материал создать. Собрали для успешного трейдинга стратегии. Развенчиваем мифы о криптовалютах. Разъясним, как страхи, побороть, которые прибыль мешают получить. Улучшите о финансах и трейдинге с помощью наших руководств свои знания!
Посетите сайт https://gametop.ink/kazino-s-bonusom и вы найдете все бездепозитные бонусы от казино в 2025 году. Изучите самые свежие предложения. Регистрируйтесь в любом из предложенных нами казино и получайте бездеп сразу на свой бонусный счет. Мы собрали только лучшие предложения и самые надежные площадки.
На сайте https://korobok-spb.ru/index.html оформите заявку в режиме реального времени для того, чтобы заказать прочные, надежные и крепкие коробки из гофрированного картона по умеренным расценкам. “Гофрокороб” создает коробки самых разных размеров, модификаций и видов. Есть возможность приобрести в розницу либо оптом, как вам выгодней. Также получится нанести логотип, рекламу при помощи флексопечати, шелкографии. Доставка продукции как по Санкт-Петербургу, так и области. Заказать коробки можно по обозначенному телефону.
На сайте https://penza-evakuator.ru/ закажите звонок для того, чтобы воспользоваться эвакуатором, который грузит как легковой, так и грузовой транспорт. Важным моментом является то, что принимается любая форма оплаты. Техника подается в течение 20-25 минут. Работа происходит в круглосуточном режиме. Очень часто компания устраивает акции для того, чтобы вы существенно сэкономили. В компании вы воспользуетесь и междугородним эвакуатором, а также транспортировкой техники. Компания гарантирует быструю подачу эвакуатора.
Не возникнут сложности в том, чтобы научиться зарабатывать на вложениях – нужно только изучить ценную, полезную информацию, которая окажет помощь в том, чтобы выбрать верную методику. На этом портале вы сможете начать развиваться, зарабатывать вместе с экспертами в данной сфере. https://fullinvest.ru/ – сайт, который ознакомит вас с важной информацией, терминами и тем, что такое трейдинг, почему он поможет вам. Вам ответят на все вопросы о том, как начать торговать, имеется много советов для тех, кто только начинает изучать данную сферу.
На сайте https://nabor-curierov.ru/y-food/ вы сможете ознакомиться с условиями работы в Яндекс Еде. Есть возможность развозить заказы на своем либо арендованном транспорте. Вы сможете рассчитывать на огромное количество бонусов, а также преимуществ, если устроитесь сюда на работу. Вы можете развозить заказы на личном авто, а если его нет, то арендовать в компании. Велокурьер сможет рассчитывать на получение большего количества заказов, чем пеший. Вы сами определяете для себя график работы.
Прогнозы на футбол от xGbet https://xgbet.ru/ , ставки на футбол от xGbet, аналитика проекта xGbet построена на мнении экспертов и работе собственного каперского ПО (программного обеспечения) на основе ИИ (искусственного интеллекта), которое учитывает более 100 показателей перед футбольными матчами. Вы узнаете ставки и прогнозы на матчи чемпионатов по футболу Бундеслига (Германия), Серия А (Италия) и Лига 1 (Франция), АПЛ (Англия), Ла Лига (Испания). Статистика правильности ставок на событий исход в матче дает возможность нам сказать, что на футбол прогнозы от xGbet поистине умные, а для посетителей и подписчиков официального сайта совершенно бесплатные.
Kaminru.ru – ваш достойный партнер в мире домашнего тепла и невероятного комфорта. Мы знаем о каминах, дымоходах и печах все. Поможем подобрать оборудование, прекрасно соответствующее вашим задачам, бюджету и особенностям дома. Вызвать на замер мастера либо вопрос задать по монтажу, есть возможность по номеру телефона на портале. Ищете камины на газу? Kaminru.ru – тут можете с условиями оплаты ознакомиться. Дарим покупателям скидки до 70% и подарки. Бережно доставляем товары по РФ за 24 часа. Предоставляем официальную гарантию от изготовителей на оборудование. Всегда вам рады!
VAVADA – казино, которое точно стоит вашего внимания. Тут много современных слотов, с красивой графикой. Сайт удобный, мобильная версия стабильно работает и предоставляет нужные функции. Самое главное то, что деньги реально приходят. https://kasyno-vavada.pl – тут вы можете подробнее с основными особенностями онлайн казино Вавада ознакомиться. Что касается службы поддержки, то специалисты круглосуточно работают. Они всегда стараются изучить вопрос досконально, чтобы оказать пользователям грамотную консультацию. Удачных игр мы вам желаем!
Ищете рейтинг лучших онлайн казино? Посетите https://topcasino.wiki/ и вы найдете ТОП онлайн казино 2025 года, отличающиеся честностью, надежностью и другими параметрами. Ознакомьтесь с полным списком игровых площадок, а также параметрами, по которым мы составили рейтинг, а также бонусными предложениями от каждого казино. Если вы новичок – для вас полноценная информация о том, как зарегистрироваться и играть.
Обратитесь в Alpa China https://alpa-china.ru/ и вы сможете заказать доставку грузов из Китая в любой город России под ключ. У нас собственные склады и точный расчет стоимости. Посетите сайт – ознакомьтесь со всеми нашими услугами. Работаем с физическими и юр лицами, страхуем, полный комплект документов, доставка до двери и многое другое. Услуги по доставке из Китая от профессионалов – это выгодно и надежно!
На сайте https://v-electronic.ru/ есть возможность приобрести качественные телевизоры, различные функциональные гаджеты, а также смартфоны от лидирующих марок. Также в каталоге вы найдете технику для кухни, ноутбуки, компьютеры и многое другое, что пригодится не только для работы, но и учебы, на каждый день. На все товары установлены привлекательные расценки, чтобы осуществить покупку смог каждый. Также представлены и товары дня, которые поспешите приобрести по хорошей стоимости. Воспользуйтесь экспресс-доставкой, которая осуществляется всего за 2 часа.
На сайте https://ruzskiy-rayon.santex-uslugi.ru/ оставьте заявку для того, чтобы воспользоваться установкой систем отопления, а также водоснабжения. Если система правильно спроектирована, а монтаж выполнен грамотно и в соответствии с требованиями, нормативами, то такая система прослужит очень долго, дополнительно обеспечит комфорт, необходимый микроклимат. В помещении будет создан комфорт и уют, что особенно важно в межсезонье и холодные зимние месяцы. В компании применяются только материалы эталонного качества.
На сайте https://pr-n.ru/advance/yandex-direct/ закажите звонок для того, чтобы узнать все об услуге Яндекс.Директ. В компании работают лучшие, перспективные и талантливые специалисты, которые трудятся на результат, помогают вашему бизнесу быстрее развиться. Для этих целей создается имиджевая реклама, а также реклама мобильных приложений. В обязательном порядке проводится аудит, разрабатывается особая стратегия, которая поможет продвинуть ваш бизнес. Каждый клиент будет регулярно получать отчеты о проделанной работе.
На сайте https://xn--24-glcdft7acibtl4f0c.xn--p1ai/ вы сможете получить деньги в режиме реального времени. Отсутствуют выходные, не потребуются лишние проверки, а взять нужную сумму получится у всех, без исключения, независимо от кредитной истории. Перед вами только проверенные и надежные финансовые учреждения, которые выдают ровно такую сумму, которая вам потребуется. При этом получить деньги вы сможете в любое время, даже сейчас. Многие финансовые учреждения предоставляют возможность получить деньги без справки о доходах.
На сайте https://seoalex.ru/o-sebe/ изучите всю необходимую информацию о частном СЕО-мастере, который оказывает услуги на должном уровне. Специалист берется за выполнение самых сложных задач. У Алексея большой опыт работы в области контекстной рекламы и СЕО. Он не перестает совершенствовать свои навыки, регулярно проходит обучение, чтобы соответствовать самым высоким требованиям клиентов. Обращение к Алексею считается возможностью получить безупречный результат, но не переплачивая за него.
На сайте https://mxart.ru/ ознакомьтесь со справочником тех компаний, которые занимаются не только разработкой, но и продвижением сайтов при помощи уникальных и новаторских методик. Здесь же вы сможете ознакомиться и с подготовкой к разработке ресурса. Это крайне важно для того, чтобы получить больше клиентов. Для начала рекомендуется произвести анализ конкурентов, а также ЦА с той целью, чтобы выделиться на фоне других. Также необходимо будет обозначить и бизнес-стратегии, поставить цели, к которым вы будете идти.
На сайте https://t.me/mvavada получите всю актуальную, содержательную информацию об онлайн-клубе «VAVADA». Теперь ознакомиться со всеми подробностями можно на официальном Телеграм-канале. Здесь публикуются новости, актуальная информация, промокоды, акции, которые помогут значительно сэкономить. Количество подписчиков регулярно растет, потому как канал действительно вызывает доверие, а поклонники заведения хотят получать больше информации о нем. На страницах только актуальные, содержательные данные из мира казино.
На сайте https://aprelevka.santex-uslugi.ru закажите профессиональную, качественную установку водоснабжения, а также отопления. Это позволит вам всегда чувствовать комфорт, а в помещении всегда будет приятный микроклимат. На такую услугу установлены доступные расценки, чтобы воспользоваться ей смог каждый. Обеспечивается надежность, эталонное качество услуг. Сотрудники наделены всеми необходимыми знаниями для реализации самой сложной задумки. Они могут работать с самыми разными типами систем.
На сайте https://vsebonuskarti.ru/ в большом количестве представлены дисконтные карты. Также есть скидки в самых разных магазинах. О них вы сможете узнать первым. Здесь также представлены и дисконтные карты, а также программы лояльности. Теперь вы сможете приобрести все, что нужно по привлекательной стоимости, включая медикаменты, товары для животных, дома, одежду и многое другое. Вы получаете возможность значительно сэкономить, но не во вред качеству. Регулярно добавляются новые дисконтные карты, чтобы вы ощутили свою выгоду.
На сайте https://krasnogorsk.santex-uslugi.ru уточните телефон для того, чтобы воспользоваться установкой водоснабжения, отопления. Так будет обеспечен приятный микроклимат в помещении, создана непринужденная атмосфера. Сотрудники предприятия отличаются внушительным опытом в данном вопросе, на все работы дают гарантии. Используются только материалы эталонного качества, что гарантирует долговечность системы. Все расценки на услуги указаны на сайте. Сотрудники разработают специально для вас индивидуальный проект.
?Hola usuarios de apuestas
Marca casino 20 euros gratis es la promociГіn perfecta para quienes buscan diversiГіn sin invertir. RegГstrate y accede a juegos de alta calidad con la posibilidad de retirar tus ganancias de manera sencilla. ВЎLa emociГіn te espera!
Casino Barcelona: Disfruta de 20 tiradas gratis hoy mismo – casino20eurosgratissindeposito.guru
?Que tengas excelentes partidas!
На сайте https://naro-fominsk.santex-uslugi.ru/ оставьте заявку с той целью, чтобы воспользоваться услугой, связанной с установкой систем отопления. Монтаж является обязательным условием для того, чтобы с комфортом проживать в частном доме, коттедже. Так получится создать в помещении непринужденную, приятную атмосферу, уют и безопасность. Предприятие дает на свои работы, материалы гарантии, обеспечивается профессиональный подход к выполнению задачи любого уровня сложности. Сотрудники отличаются глубокими знаниями в данной сфере.
На сайте https://ufk-techno.ru/ уточните всю необходимую информацию, которая связана с поставками промышленного оборудования от предприятия ООО ТК «Регион Новые Технологии». Компания находится на рынке, начиная с 2011 года. Основная специализация – это поставки электродвигателей, насосного оборудования как зарубежного, так и отечественного производства. Перед тем, как совершить приобретение, изучите весь каталог продукции. Регулярно появляются новые тематические статьи, чтобы вы с ними ознакомились.
На сайте https://elek-opt.ru осуществляется оптовая реализация кабеля. Каждый клиент получает возможность воспользоваться бесплатной доставкой, которая осуществляется до транспортной компании. Изучите весь ассортимент, который представлен в разделе. Вся продукция от лучших, проверенных, надежных марок, которые отвечают за качество и работают на результат. Для того чтобы подобрать оптимальный вариант, а также подходящий бренд, необходимо воспользоваться специальным фильтром. Если появились вопросы, задайте их в специальной форме.
Serialexpress приобрести увлекательные сериалы на dvd предлагает. Здесь можно найти уникальные диски. Вы будете в восторге от покупки, потому что качество сериалов безупречное. Товары доступны по приемлемой стоимости и отлично упакованы. Ищете купить дорамы? Serialexpress.ru – ресурс, где представлена информация об оплате, рекомендуем вам с ней ознакомиться. Предлагаем накопительную систему скидок. Постоянным клиентом выгодно быть. Гарантируем оперативную доставку. При появлении каких-либо вопросов, пишите нам на электронную почту. Мы всегда рады вам!
На сайте https://teletype.in/@sonicsquad/kargo-ili-belaya-dostavka-iz-kitaya-chto-vybrat уточните всю нужную информацию, которая касается сложности выбора между белой доставкой из Китая и Карго. Прочитав статью, вы определитесь с тем, что лучше выбрать, опираясь на подготовку документов, сроки, риски, а также стоимость. Кроме того, имеется информация относительно того, почему способ доставки играет важную роль. Есть информация и о том, что представляет собой карго-доставка. Обязательно почитайте информацию о том, что такое официальный импорт.
На сайте https://ruzskiy-rayon.santex-uslugi.ru/ оставьте заявку для того, чтобы воспользоваться установкой систем отопления, а также водоснабжения. Если система правильно спроектирована, а монтаж выполнен грамотно и в соответствии с требованиями, нормативами, то такая система прослужит очень долго, дополнительно обеспечит комфорт, необходимый микроклимат. В помещении будет создан комфорт и уют, что особенно важно в межсезонье и холодные зимние месяцы. В компании применяются только материалы эталонного качества.
Главным достоинством Апостолиди является предоставление возможности для актуальной информации посетителям. Мы понятным языком сложные финансовые вопросы разъясняем. Благодаря регулярным обновлениям вы всегда будете в курсе важных событий. https://apostolidi.ru – сайт, который сейчас пользуются невероятной популярностью. Здесь есть поиск, можете им в любое время воспользоваться. Апостолиди дает возможность находить полезные советы, исследовать уникальные материалы и получать знания от экспертов. Рады видеть вас на своем ресурсе!
На сайте https://elekspb.ru вы получаете возможность приобрести кабель барабанами. Надежное и проверенное предприятие осуществляет продажу судовой электротехники. «ЭЛЕК» считается такой компанией, которая стремительно и активно развивается на рынке, а потому предлагает исключительно качественную и практичную продукцию, наделенную долгим сроком службы. На сайте находится весь перечень товаров, которые вы сможете приобрести прямо сейчас. Если остались вопросы, задайте их через специальную форму.
На сайте https://iq-kredit.ru/ вы получите всю исчерпывающую, содержательную информацию, которая касается получения кредитов. Прямо сейчас вы сможете воспользоваться поиском по всем кредитным программам финансовых учреждений. Сделайте расчет платежа по кредитам. Вы сможете взять, в том числе, кредит наличными либо на карту. Если вы хотите получить более точную и исчерпывающую информацию на данную тему, то изучите вопросы и ответы. Представлены полезные материалы на тему того, как правильно подобрать кредит.
VAVADA – казино, вашего внимания заслуживает. Здесь с красивой графикой множество современных слотов. Сайт удобный, мобильная версия стабильно работает и предоставляет нужные функции. Главное то, что денежные средства приходят реально. https://kasyno-vavada.pl – здесь можете детальнее ознакомиться с главными особенностями онлайн казино Вавада. Касаемо саппорта, стоит отметить, что специалисты работают 24/7. Они всегда стараются изучить вопрос досконально, чтобы оказать пользователям грамотную консультацию. Желаем вам удачных игр!
На сайте https://ivi.moe посмотрите бесплатно и в хорошем качестве фильмы, сериалы, мультфильмы на Иви. Здесь представлено как популярное кино, которое уже многие пересматривали по несколько раз, так и новинки, которые вы обязательно оцените по достоинству. Также представлены и мультики, которые понравятся деткам самых разных возрастов. Все это вы сможете просматривать на любом устройстве, в том числе, компьютере, смартфоне. На портале регулярно появляются новинки, с которыми нужно ознакомиться и вам.
На сайте https://seoalex.ru/o-sebe/ изучите всю необходимую информацию о частном СЕО-мастере, который оказывает услуги на должном уровне. Специалист берется за выполнение самых сложных задач. У Алексея большой опыт работы в области контекстной рекламы и СЕО. Он не перестает совершенствовать свои навыки, регулярно проходит обучение, чтобы соответствовать самым высоким требованиям клиентов. Обращение к Алексею считается возможностью получить безупречный результат, но не переплачивая за него.
На сайте https://xn—-8sbaaajsa0adcpbfha1bdjf8bh5bh7f.xn--p1ai/ ознакомьтесь с тем, какой антиквариат принимает частный коллекционер Станислав Бабкин. Он скупает вещи по высокой цене. Но она зависит от разных нюансов. Вы сможете сразу узнать стоимость после того, как будет произведена оценка по фото. Частный коллекционер готов выехать в любую точку России. Клиент получает деньги сразу на карту либо наличными. В случае если и вы стремитесь реализовать антикварные вещи максимально быстро, то скорей обращайтесь к этому специалисту.
На сайте https://korobok-spb.ru/index.html оформите заявку в режиме реального времени для того, чтобы заказать прочные, надежные и крепкие коробки из гофрированного картона по умеренным расценкам. “Гофрокороб” создает коробки самых разных размеров, модификаций и видов. Есть возможность приобрести в розницу либо оптом, как вам выгодней. Также получится нанести логотип, рекламу при помощи флексопечати, шелкографии. Доставка продукции как по Санкт-Петербургу, так и области. Заказать коробки можно по обозначенному телефону.
На сайте https://xn—-7sbjhqn0bhjc0lk.xn--p1ai/ получите юридическую консультацию по различным вопросам. Компания Стратегия работает как с физическими, так и частными лицами. На все услуги установлены привлекательные расценки, чтобы воспользоваться ими смог каждый. Предприятие работает в этой сфере более 11 лет. В команде трудятся 11 специалистов, которые справятся с задачей независимо от сложности. К вашим услугам досудебный юрист, досудебное урегулирование, кредитный, семейный юрист, решение страховых споров.
На сайте https://xn--24-glcdft7acibtl4f0c.xn--p1ai/ вы сможете получить деньги в режиме реального времени. Отсутствуют выходные, не потребуются лишние проверки, а взять нужную сумму получится у всех, без исключения, независимо от кредитной истории. Перед вами только проверенные и надежные финансовые учреждения, которые выдают ровно такую сумму, которая вам потребуется. При этом получить деньги вы сможете в любое время, даже сейчас. Многие финансовые учреждения предоставляют возможность получить деньги без справки о доходах.
На сайте https://nabor-curierov.ru/y-food/ вы сможете ознакомиться с условиями работы в Яндекс Еде. Есть возможность развозить заказы на своем либо арендованном транспорте. Вы сможете рассчитывать на огромное количество бонусов, а также преимуществ, если устроитесь сюда на работу. Вы можете развозить заказы на личном авто, а если его нет, то арендовать в компании. Велокурьер сможет рассчитывать на получение большего количества заказов, чем пеший. Вы сами определяете для себя график работы.
На сайте https://aprelevka.santex-uslugi.ru закажите профессиональную, качественную установку водоснабжения, а также отопления. Это позволит вам всегда чувствовать комфорт, а в помещении всегда будет приятный микроклимат. На такую услугу установлены доступные расценки, чтобы воспользоваться ей смог каждый. Обеспечивается надежность, эталонное качество услуг. Сотрудники наделены всеми необходимыми знаниями для реализации самой сложной задумки. Они могут работать с самыми разными типами систем.
На сайте https://s1.torrent24.name находятся фильмы и сериалы в огромном количестве, а потому вы точно будете в курсе того, что посмотреть сегодня вечером или в выходной день. Имеются новинки этого года, те фильмы, которые выпущены несколько лет назад, старинные кинокартины, которые вновь хочется пересматривать и восхищаться игрой актеров, приятной музыкой. А для того чтобы воспользоваться всеми функциями сайта, пройдите регистрацию. Постоянно на портале публикуются новинки, которые можно посмотреть на любом устройстве.
На сайте https://rustv.today/ представлено огромное количество самых известных российских телеканалов. Этот портал предоставляет уникальную возможность оказаться в увлекательном, удивительном мире цифровых каналов. Контент является разнообразным, интересным, а потому вы обязательно найдете то, что произведет на вас эффект. Любой канал вы сможете просматривать в режиме реального времени. И самое главное, что все это абсолютно бесплатно. Здесь четкая картинка, а потому просмотр очень комфортный запоминающийся.
Ищете комфорт города в объятиях природы? Присмотритесь к Эко-кварталу Спектр в Кольцово (Новосибирск) – https://spectr54.ru/ – посмотрите планировки новостроек от 27 кв.м до 80 кв.м. Малоэтажный эко-квартал в Новосибирске выгодно выделяется своим качеством жизни для будущих жильцов. Купить квартиру в ЖК Спектр – подробнее на сайте.
На сайте https://v-electronic.ru/ есть возможность приобрести качественные телевизоры, различные функциональные гаджеты, а также смартфоны от лидирующих марок. Также в каталоге вы найдете технику для кухни, ноутбуки, компьютеры и многое другое, что пригодится не только для работы, но и учебы, на каждый день. На все товары установлены привлекательные расценки, чтобы осуществить покупку смог каждый. Также представлены и товары дня, которые поспешите приобрести по хорошей стоимости. Воспользуйтесь экспресс-доставкой, которая осуществляется всего за 2 часа.
На сайте https://t.me/mvavada получите всю актуальную, содержательную информацию об онлайн-клубе «VAVADA». Теперь ознакомиться со всеми подробностями можно на официальном Телеграм-канале. Здесь публикуются новости, актуальная информация, промокоды, акции, которые помогут значительно сэкономить. Количество подписчиков регулярно растет, потому как канал действительно вызывает доверие, а поклонники заведения хотят получать больше информации о нем. На страницах только актуальные, содержательные данные из мира казино.
На сайте https://krasnogorsk.santex-uslugi.ru уточните телефон для того, чтобы воспользоваться установкой водоснабжения, отопления. Так будет обеспечен приятный микроклимат в помещении, создана непринужденная атмосфера. Сотрудники предприятия отличаются внушительным опытом в данном вопросе, на все работы дают гарантии. Используются только материалы эталонного качества, что гарантирует долговечность системы. Все расценки на услуги указаны на сайте. Сотрудники разработают специально для вас индивидуальный проект.
На сайте https://oknaksa.ru/ есть возможность заказать остекление любого вида и в одной компании. При необходимости воспользуйтесь профессиональной консультацией от лучших экспертов, которые помогут вам подобрать оптимальный вариант и под самый разный бюджет. Компания отличается огромным количеством готовых проектов, посмотрев которые вы обязательно выберете что-то для себя. Ее рекомендуют друзьям, знакомым. На этом предприятии создают окна самых разных форм, модификаций и типов. Продукция является качественной, долговечной, обладает безупречными эстетическими свойствами.
На сайте https://neftegazmash.ru/ изучите всю нужную информацию, которая касается завода “НЕФТЕГАЗМАШ” и того, что он выпускает. Это – крупный производитель нефтегазового оборудования. Он реализует свою продукцию не только по России, но и странам ближнего зарубежья. Если вы будете работать с этой компанией регулярно, то сможете рассчитывать на особенное лояльное отношение, а также привлекательные расценки, а система оплаты является авансовой. Все заказы комплектуются быстро и своевременно.
На сайте https://pilmi.ru вы найдете огромное количество фильмов самых разных жанров, включая комедии, мелодрамы, драмы, романтические. Для того чтобы подыскать наиболее подходящий вариант, нужно воспользоваться специальным каталогом. Вашему вниманию представлены и ожидаемые любопытные новинки этого года, которые произведут эффект. Все это можно просматривать в любое время и на различных устройствах. Прямо сейчас воспользуйтесь возможностью посмотреть азиатское кино. Используйте поиск для облегчения выбора.
На сайте https://pr-n.ru/advance/yandex-direct/ закажите звонок для того, чтобы узнать все об услуге Яндекс.Директ. В компании работают лучшие, перспективные и талантливые специалисты, которые трудятся на результат, помогают вашему бизнесу быстрее развиться. Для этих целей создается имиджевая реклама, а также реклама мобильных приложений. В обязательном порядке проводится аудит, разрабатывается особая стратегия, которая поможет продвинуть ваш бизнес. Каждый клиент будет регулярно получать отчеты о проделанной работе.
На сайте https://naro-fominsk.santex-uslugi.ru/ оставьте заявку с той целью, чтобы воспользоваться услугой, связанной с установкой систем отопления. Монтаж является обязательным условием для того, чтобы с комфортом проживать в частном доме, коттедже. Так получится создать в помещении непринужденную, приятную атмосферу, уют и безопасность. Предприятие дает на свои работы, материалы гарантии, обеспечивается профессиональный подход к выполнению задачи любого уровня сложности. Сотрудники отличаются глубокими знаниями в данной сфере.
На сайте https://internetometer.net/ воспользуйтесь всеми возможностями интернетометра. При помощи такого сервиса у вас получится узнать собственный IP-адрес, настройки браузера, а также местоположение, другую важную и ценную информацию, которая обязательно вам пригодится. Этот сервис предоставляет уникальную возможность абсолютно бесплатно узнать то, какова скорость вашего Интернета. Вы сможете зайти на сайт в любое, наиболее комфортное время. Все представленные данные являются абсолютно точными, поэтому на них можно положиться.
На сайте https://ivi.moe посмотрите бесплатно и в хорошем качестве фильмы, сериалы, мультфильмы на Иви. Здесь представлено как популярное кино, которое уже многие пересматривали по несколько раз, так и новинки, которые вы обязательно оцените по достоинству. Также представлены и мультики, которые понравятся деткам самых разных возрастов. Все это вы сможете просматривать на любом устройстве, в том числе, компьютере, смартфоне. На портале регулярно появляются новинки, с которыми нужно ознакомиться и вам.
На сайте https://mxart.ru/ ознакомьтесь со справочником тех компаний, которые занимаются не только разработкой, но и продвижением сайтов при помощи уникальных и новаторских методик. Здесь же вы сможете ознакомиться и с подготовкой к разработке ресурса. Это крайне важно для того, чтобы получить больше клиентов. Для начала рекомендуется произвести анализ конкурентов, а также ЦА с той целью, чтобы выделиться на фоне других. Также необходимо будет обозначить и бизнес-стратегии, поставить цели, к которым вы будете идти.
На сайте https://y6.tartugi.site в большом количестве представлены самые интересные, увлекательные фильмы различных жанров: триллеры, драмы, комедии, приключения, боевики, исторические, детективы и многое другое. Также представлены и сериалы, которые вызовут у вас восторг и положительные впечатления. Есть как новинки, так и бестселлеры прошлых лет, которые не перестают пересматривать раз за разом. Имеются и мультфильмы тех лет, новинки, выхода которых ждали дети самых разных возрастов. Заходите сюда регулярно, чтобы получить порцию приятных эмоций.
Ищете профессиональные исследования рынков и отраслевой анализ? Посетите сайт MarketProGroup https://marketprogroup.ru/ – это инновационная исследовательская компания, предоставляющая детальный анализ рынка любого продукта или услуги. Более 1000 отчетов по всем ключевым отраслям экономики. Подробнее на сайте.
Ellcon.ru для вашего комфорта создан, чтобы вы время на поездки могли экономить, и найти нужное, из дома не выходя. У нас можете приобрести кабели, провода и аксессуары, электроустановочные изделия, высоковольтное оборудование, климатические системы по выгодным ценам. Ищете кабель канал цена? Ellcon.ru – портал, выбрав его для покупки, вы нервы, деньги и время прилично сэкономите. Доставка товаров исключительно при 100% предоплате заказа выполняется. Стремимся только к лучшему, чтобы каждый день клиентов радовать. Приятных вам приобретений!
На сайте https://smartporog.ru/ есть возможность посмотреть весь каталог выпадающих умных порогов. Они подходят для дверей любых типов и модификаций. Пороги автоматического типа идеально подходят для того, чтобы ими заменить стационарный порог, который в конкретном случае не получится установить. Их основное предназначение в том, чтобы замаскировать преграду в полу, избавиться от сквозняка, повысить качество звукоизоляции. Кроме того, такие пороги повышают звукоизоляцию. Выполнены из высокотехнологичных, инновационных материалов.
На сайте https://ruzskiy-rayon.santex-uslugi.ru/ оставьте заявку для того, чтобы воспользоваться установкой систем отопления, а также водоснабжения. Если система правильно спроектирована, а монтаж выполнен грамотно и в соответствии с требованиями, нормативами, то такая система прослужит очень долго, дополнительно обеспечит комфорт, необходимый микроклимат. В помещении будет создан комфорт и уют, что особенно важно в межсезонье и холодные зимние месяцы. В компании применяются только материалы эталонного качества.
На сайте https://penza.seoalex.ru/o-sebe/ ознакомьтесь с информацией, посвященной высококлассному, опытному SEO-специалисту Алексею. Он уже давно работает в этой сфере и предпринимает все возможное для того, чтобы каждый клиент получил именно тот результат, который хотел. Он работает директологом контекстной рекламы, а также СЕО-специалистом. Отличается огромным опытом в перечисленных сферах, использует только уникальные и работающие методы, которые дают гарантированный результат. Если не желаете переплачивать, то обращайтесь к Алексею.
На сайте https://ufk-techno.ru/ уточните всю необходимую информацию, которая связана с поставками промышленного оборудования от предприятия ООО ТК «Регион Новые Технологии». Компания находится на рынке, начиная с 2011 года. Основная специализация – это поставки электродвигателей, насосного оборудования как зарубежного, так и отечественного производства. Перед тем, как совершить приобретение, изучите весь каталог продукции. Регулярно появляются новые тематические статьи, чтобы вы с ними ознакомились.
Рива Групп https://hr.rivagroup.su/ это кадровое агентство с полным спектром услуг по подбору персонала. Поможем вашему предприятию быстро и эффективно решить сложности с подбором персонала. Узнайте на сайте подробнее о наших услугах и компетенциях в сфере рекрутинга. Занимаемся поиском кадров для предприятий, независимо от их масштаба, а стоимость наших услуг прозрачна.
Главным достоинством Апостолиди является предоставление возможности для актуальной информации посетителям. Мы понятным языком сложные финансовые вопросы разъясняем. Благодаря регулярным обновлениям вы всегда будете в курсе важных событий. https://apostolidi.ru – портал, который на сегодняшний день популярностью пользуется. Тут имеется поиск, воспользуйтесь им. Апостолиди позволяет находить полезные рекомендации, получать знания от экспертов и исследовать уникальные материалы. Рады видеть вас на своем ресурсе!
Serialexpress приобрести увлекательные сериалы на dvd предлагает. Здесь можно найти уникальные диски. Вы от покупки будете в восторге, потому как отменное качество сериалов. Товары прекрасно упакованы и доступны по приятной цене. Ищете магазин сериалов в Краснодаре? Serialexpress.ru – ресурс, где представлена информация об оплате, рекомендуем вам с ней ознакомиться. Предлагаем накопительную систему скидок. Постоянным клиентом выгодно быть. Гарантируем оперативную доставку. При появлении каких-либо вопросов, пишите нам на электронную почту. Рады вам всегда!
Хотите, чтобы ваш портал занимал лидирующие позиции в поисковых системах и привлекал тысячи пользователей? Вечные ссылки – ваш ключ к успеху! Наши достоинства: гибкие тарифы, оперативный результат, белые методы продвижения. Мы после оплаты сразу же приступаем к осуществлению заказа. Ищете купить вечные ссылки? SeoBomba.ru – тут опубликована более подробная о нас информация, посмотрите ее в любое время. Также тут представлены ответы на популярные вопросы. Выведите уже сейчас свой сайт на новый уровень, не упустите такую возможность. Созвонитесь с нами для консультации.
Посетите https://igormylnikovchannel.ru/poezdki-v-taksi-s-det-mi/ и вы найдете полезную информацию для начинающих таксистов и опытных водителей на тему поездок в такси с детьми, начиная от безопасности поездок и ответственности и правилах перевозки детей, до разбора вопросов почему таксисты отказываются от поездок с детьми и многое другое. Подробнее на странице.
На сайте https://pilmi.ru вы найдете огромное количество фильмов самых разных жанров, включая комедии, мелодрамы, драмы, романтические. Для того чтобы подыскать наиболее подходящий вариант, нужно воспользоваться специальным каталогом. Вашему вниманию представлены и ожидаемые любопытные новинки этого года, которые произведут эффект. Все это можно просматривать в любое время и на различных устройствах. Прямо сейчас воспользуйтесь возможностью посмотреть азиатское кино. Используйте поиск для облегчения выбора.
Сайт компании Аллегро – https://spb.tk-allegro.ru/ предлагает вам аренду в Санкт-Петербурге автобуса. У нас от 8 до 55 мест свой автопарк автобусов. Водители с большим опытом. У вас есть возможность заказать для любых мероприятий автобус: на экскурсию, выпускной, свадьбу и для школьников. Посетите сайт – узнайте больше о наших услугах и стоимости аренды или воспользуйтесь калькулятором на сайте, для расчёта стоимости.
Посетите страницу https://www.drive2.ru/o/b/691804470933197117/ и вы сможете ознакомиться с тем как происходит оклейка плёнкой Porsche 911 от профессионалов. Посмотрите как стал выглядеть Porsche 911 Carrera GTS после оклейки. Оклейка Porsche 911 выполнялась пленкой Vega 230 ST – узнайте почему и все ее преимущества в статье. Porsche 911 удивительный автомобиль – вам будет интересно читать!
Ellcon.ru создан для вашего комфорта, чтобы вы экономили время на поездки, и смогли, отыскать нужное не выходя, из собственного дома. у нас вы можете купить провода и аксессуары, электроустановочные изделия, климатические системы, кабели, высоковольтное оборудование по доступным ценам. Ищете заглушка для кабель канала 60х40? Ellcon.ru – ресурс, выбрав его для приобретения, вы время, нервы и денежные средства существенно сэкономите. Доставка товаров осуществляется только при 100% предоплате заказа. Стремимся к лучшему, чтобы ежедневно радовать клиентов. Приятных вам приобретений!
Посетите B2BOX https://b2box.ru/ – это уникальное комплексное решение для создания упаковки всех видов и направлений. Мы делаем упаковку, которая продает! Упаковочные решения для ритейла, создание индивидуальной и SRP упаковки, услуги дизайнерского бюро, производство транспортной упаковки, собственное плоттерное производство, все виды печати – это и многое другое вы найдете, посетив наш сайт.
Serialexpress предлагает купить захватывающие сериалы на dvd. Здесь можно найти уникальные диски. Вы от покупки будете в восторге, потому как отменное качество сериалов. Товары прекрасно упакованы и доступны по приятной цене. Ищете купить сериалы в Волгограде? Serialexpress.ru – портал, где информация об оплате предоставлена, советуем с ней ознакомиться вам. Мы накопительную систему скидок предлагаем. Постоянным клиентом выгодно быть. Быструю доставку гарантируем. При появлении каких-либо вопросов, пишите нам на электронную почту. Мы всегда рады вам!
Система менеджмента управления качеством содержит критерии менеджмента и стандарты, по которым проводится последующая сертификация предприятия. Чтобы получить сертификат СМК, нужно обратиться в аккредитованный сертификационный центр. Сертификация систем менеджмента качества является документальным подтверждением того, что система менеджмента сертифицированной компании соответствует требованиям того или иного стандарта. Подробнее: https://ok.ru/group/70000034956977
Arenda24.by – интернет-платформа для размещения объявлений по аренде оборудования и строительной техники. На нашем ресурсе вы сможете работать комфортно, ведь его создала истинная команда профессионалов. Ищете аренда строительная техника? Arenda24.by – портал, где вы найдете по аренде техники и любых инструментов объявления, и сможете организовать грузоперевозки. У нас есть объявления любых типов категорий. Опубликуйте объявление уже сегодня, и оно в кратчайшие сроки найдет своих клиентов. С нами вы доступ к качественной и популярной платформе получите.
Efizika.ru – ресурс, где у вас есть возможность по физике увидеть виртуальные лабораторные работы. Они ученикам освоить физические явления и законы помогают, также навыки проведения экспериментов и анализа данных вырабатывают. Вы можете эксперимент провести, усвоить от параметров цепи работу электрического тока и зависимость мощности. Ищете виртуальные лабораторные работы по физике 8 класс? Efizika.ru – тут имеется более детальная информация, посмотрите ее уже сегодня. При возникновении вопросов касаемо осуществления работы, либо интерпретации итогов, обратитесь к учебнику по физике. Желаем вам в эксперименте удачи!
Боль в суставах может серьезно ухудшить качество жизни. Артроз, подагра и воспаление суставов — частые причины дискомфорта. Эффективное лечение возможно! На сайте https://lechsustavy.ru/ вы найдете натуральные средства для лечения суставов в домашних условиях. Забудьте про боль без операции — попробуйте проверенные препараты, которые помогут восстановить хрящи, снять воспаление и вернуть подвижность. Начните лечить суставы сегодня!
На сайте https://rozatoday.ru/ представлено огромное количество ярких, запоминающихся композиций, которые созданы из свежих цветов: ослепительных роз, волнующих пионов, трепетных тюльпанов, строгих гвоздик. В компании работают только знающие, компетентные флористы, которые создают изысканные композиции в соответствии с предпочтениями клиента. В обязательном порядке учитываются и актуальные мировые тенденции. Можно приобрести как небольшой букетик, который подходит для романтического свидания, так и внушительных размеров для грандиозного праздника.
Детский туроператор Флагман организует школьные экскурсии и туры для детей по Санкт-Петербургу и Северо-Западу. Поездки с Флагманом всегда превращаются в увлекательные приключения. Собственный автопарк, профессиональные водители и контроль безопасности в пути гарантируют комфортные путешествия для детей. Профессиональные экскурсоводы адаптируют маршруты под детскую аудиторию, делая их познавательными и интересными. Подробнее на официальном сайте https://flagmanspb.ru/
Ищете Нестероидный противовоспалительный обезболивающий препарат с фенилбутазоном и лидокаином? Посетите сайт https://ambenium.ru/ и узнайте о препарате Амбениум – это единственный нестероидный противовоспалительный препарат, зарегистрированный в России с усиленным обезболивающим эффектом – раствор для внутримышечного введения фенилбутазон и лидокаин. Подробности на сайте.
Перевозка негабаритных грузов и доставка по всей территории России и СНГ на сайте https://negabarit-24.ru/ – это профессиональные услуги от нашей компании. Перевозка негабаритных грузов по России и странам СНГ, ЖД перевозки, перевозки манипулятором и международные перевозки. Гибкие варианты оплаты. Соблюдение сроков. Страхование грузов. Подробнее на сайте.
На сайте https://voronlaws.ru/ вы найдете Casino Dragon Money и его новое рабочее зеркало для того, чтобы открыть для себя удивительный мир огромного количества развлечений, щедрых бонусов, а также бесконечных выигрышей. На сайте вас ожидает увлекательный и эксклюзивный контент, который обязательно подарит много приятных и положительных эмоций. Клуб щедр на акции и бонусы, а потому здесь вы найдете все, что понравится и поможет заработать деньги. Рабочее зеркало ежедневно обновляется для вашей безопасности.
Ищете сельхозтехнику и оборудование по самым выгодным ценам от производителя? Посетите сайт Производителя ООО МИТЕХ https://mi-teh.ru/ где вы также найдете запасные части и комплектующие к сельхоз машинам и тракторам. Ознакомьтесь с нашим ассортиментом продукции на сайте.
Minivan.online предлагает услуги такси (8 мест) по доступным тарифам. У нас исключительно опытные водители работают. Машины оборудованы детскими креслами, люлькой, а также бустером. Мы стремимся обеспечить клиентам максимально комфортные и безопасные поездки. Ищете детское такси? Minivan.online – тут представлена о нашей компании подробная информация. Гарантируем своевременную подачу автомобиля. Готовы ответить на интересующие вас вопросы и помочь с оформлением заказа. Минивэн онлайн – надежность и безупречный сервис. Удостоверьтесь в этом лично!
На сайте https://arenda24.by/ каждый желающий получает возможность взять в прокат спецтехнику, садовый инвентарь для выполнения всех необходимых хозяйственных работ. Если нашли подходящее объявление, то свяжитесь и договоритесь с продавцом для того, чтобы он на выгодных условиях передал технику. Напротив каждого варианта имеются его характеристики, особенности, детальное описание, чтобы потенциальный клиент сразу же сориентировался. Постоянно появляются новые объявления, что позволит найти все, что нужно.
Центр «Доверие» предоставляет психологические услуги. Мы людям с трудностями, появляющихся у них в отношениях с окружающими и собой, помогаем справиться. Записаться к специалисту на личный прием вы можете по телефону на портале. Ищете психотерапия? Ack-group.ru/stati-po-psikhologii/psikhoterapiya – тут узнаете, что такое психотерапия, кому она показана и какие перед ней стоят цели. Также здесь на психологические консультации представлены расценки. Всегда готовы поддержать вас на пути к самопознанию и эмоциональному равновесию.
На сайте https://xn—-7sbjhqn0bhjc0lk.xn--p1ai/ получите юридическую консультацию по различным вопросам. Компания Стратегия работает как с физическими, так и частными лицами. На все услуги установлены привлекательные расценки, чтобы воспользоваться ими смог каждый. Предприятие работает в этой сфере более 11 лет. В команде трудятся 11 специалистов, которые справятся с задачей независимо от сложности. К вашим услугам досудебный юрист, досудебное урегулирование, кредитный, семейный юрист, решение страховых споров.
Ищете, где заказать надежную кухню на заказ по вашим размерам за адекватные деньги? Посмотрите портфолио кухонной фабрики GLORIA – https://gloriakuhni.ru/ . Все проекты выполнены в Санкт-Петербурге и области. На каждую кухню гарантия 36 месяцев, более 800 цветовых решений. Большое разнообразие фурнитуры. Удобный онлайн-калькулятор прямо на сайте и понятное формирование цены. Много отзывов клиентов, видео-обзоры кухни с подробностями и деталями. Для всех клиентов – столешница и стеновая панель в подарок.
На сайте https://pilmi.ru вы найдете огромное количество фильмов самых разных жанров, включая комедии, мелодрамы, драмы, романтические. Для того чтобы подыскать наиболее подходящий вариант, нужно воспользоваться специальным каталогом. Вашему вниманию представлены и ожидаемые любопытные новинки этого года, которые произведут эффект. Все это можно просматривать в любое время и на различных устройствах. Прямо сейчас воспользуйтесь возможностью посмотреть азиатское кино. Используйте поиск для облегчения выбора.
Посетите B2BOX https://b2box.ru/ – это уникальное комплексное решение для создания упаковки всех видов и направлений. Мы делаем упаковку, которая продает! Упаковочные решения для ритейла, создание индивидуальной и SRP упаковки, услуги дизайнерского бюро, производство транспортной упаковки, собственное плоттерное производство, все виды печати – это и многое другое вы найдете, посетив наш сайт.
Tent3302.ru необходимые автодетали предоставляет. Мы запчасти на Газель Некст продаем. Под заказ поставляем двигатель Газель Камминз 2.8. Стараемся цены на низком уровне поддерживать. Продажи выполняем со склада за безналичный и наличный расчет. Ищете палец поршневой камминз 28 5257057? Tent3302.ru – тут можете детальную о нас информацию отыскать. Мы качественную продукцию продаем. Особенным спросом у клиентов пользуются шины на Газель. Стараемся накладные расходы и транспортные максимально сократить. Вы можете быть уверены в вежливом и грамотном обслуживании.
Портал cryptopp.ru принимать обоснованные решения помогает. Мы динамику криптовалюты с помощью нейронных сетей на основе исторических данных прогонозируем. Вы можете ввести в специальные поля идентификатор монеты (к примеру, биткоин) или адрес контракта. Далее вам нужно выбрать сеть. После этого нажать на кнопку «Получение данных». Ищете узнайте прогноз криптовалют в пару кликов? Cryptopp.ru – тут опубликована детальная информация. Наша миссия – предоставить вам инструменты и аналитические данные для наилучшего понимания рынка криптовалют. Добро пожаловать в Cryptopp!
На сайте https://officepro54.ru представлено огромное количество мебели, которая идеально подходит для организации офисного пространства. Вся она выполнена из инновационных, уникальных материалов, а потому прослужит очень долго, не синтезирует в воздух опасных веществ. В разделе вы найдете кабинет руководителя, функциональные и вместительные столы для переговоров, шкафы-купе, сейфы, акустические системы, ученическую мебель и многое другое. Постоянно действуют акции. На продукцию установлены привлекательные цены.
Предприятие «Энерго Техстрой 2000» поставляет производственные материалы, технику российского производства. Ими смогут воспользоваться любые производственные предприятия страны. На сайте https://best-vendor.ru изучите полный ассортимент товаров, которые вы сможете приобрести в любое время, а доставка происходит наиболее комфортным для вас способом
Система менеджмента управления качеством содержит критерии менеджмента и стандарты, по которым проводится последующая сертификация предприятия. Чтобы получить сертификат СМК, нужно обратиться в аккредитованный сертификационный центр. Сертификация систем менеджмента качества является документальным подтверждением того, что система менеджмента сертифицированной компании соответствует требованиям того или иного стандарта. Подробнее: https://ok.ru/group/70000034956977
На сайте https://rozatoday.ru/ представлено огромное количество ярких, запоминающихся композиций, которые созданы из свежих цветов: ослепительных роз, волнующих пионов, трепетных тюльпанов, строгих гвоздик. В компании работают только знающие, компетентные флористы, которые создают изысканные композиции в соответствии с предпочтениями клиента. В обязательном порядке учитываются и актуальные мировые тенденции. Можно приобрести как небольшой букетик, который подходит для романтического свидания, так и внушительных размеров для грандиозного праздника.
Visita el sitio https://lucky-lady-charm.online/ donde podras leer una resena completa de la maquina tragamonedas Lucky Lady Charm Deluxe. Aprendera consejos y recomendaciones utiles sobre como jugar a la tragamonedas, lineas de pago y apuestas, aprendera todo sobre los bonos, asi como consejos sobre como ganar en Lucky Lady Charm.
Компания Аллегро https://spb.tk-allegro.ru/ – это аренда автобуса в Санкт-Петербурге. У нас от 8 до 55 мест свой автопарк автобусов. Водители с огромным опытом. Вы можете заказать автобус для различных мероприятий – для школьников, на свадьбу, выпускной, на экскурсию. Заходите на портал, узнайте больше о стоимости аренды, о наших услугах, или же воспользуйтесь для расчета стоимости калькулятором на портале.
Перевозка негабаритных грузов и доставка по всей территории России и СНГ на сайте https://negabarit-24.ru/ – это профессиональные услуги от нашей компании. Перевозка негабаритных грузов по России и странам СНГ, ЖД перевозки, перевозки манипулятором и международные перевозки. Гибкие варианты оплаты. Соблюдение сроков. Страхование грузов. Подробнее на сайте.
Looking for it AI Editing? Xnudes.app is the best NSFW artificial intelligence generator with pictures. Desire chat engine does not forget about you, it is realistic and incredibly fun, it is the most exciting chat experience you have ever seen in an AI service. Using deep learning models, these generators can create visual illustrations in various variations.
На сайте https://voronlaws.ru/ вы найдете Casino Dragon Money и его новое рабочее зеркало для того, чтобы открыть для себя удивительный мир огромного количества развлечений, щедрых бонусов, а также бесконечных выигрышей. На сайте вас ожидает увлекательный и эксклюзивный контент, который обязательно подарит много приятных и положительных эмоций. Клуб щедр на акции и бонусы, а потому здесь вы найдете все, что понравится и поможет заработать деньги. Рабочее зеркало ежедневно обновляется для вашей безопасности.
Работая с «НЕФТЕГАЗМАШ» у вас есть возможность рассчитывать на: полную и своевременную комплектацию ваших заказов и авансовую систему оплаты, поставку оборудования в сжатые сроки и различным видом транспорта. Наши специалисты обладают профильным высшим техническим образованием в сфере теплогазоснабжения. Ищете кран шаровый газовый под приварку 11лс60п? Neftegazmash.ru – здесь имеется каталог продукции. Также здесь можете ознакомиться с условиями доставки в любое время. С удовольствием сертификаты и действующие разрешения предоставим. Обращайтесь, вам все понравится, мы уверены!
Посетите сайт https://letrivelle.ru/ – это магазин мебели, в котором представлена дизайнерская мебель, свет и декор. Ознакомьтесь с каталогом или обратитесь к нашим квалифицированным менеджерам, которые помогут с выбором. Все в наличии на наших собственных складах в Москве и Санкт-Петербурге. Подробнее на сайте.
На сайте https://arenda24.by/ каждый желающий получает возможность взять в прокат спецтехнику, садовый инвентарь для выполнения всех необходимых хозяйственных работ. Если нашли подходящее объявление, то свяжитесь и договоритесь с продавцом для того, чтобы он на выгодных условиях передал технику. Напротив каждого варианта имеются его характеристики, особенности, детальное описание, чтобы потенциальный клиент сразу же сориентировался. Постоянно появляются новые объявления, что позволит найти все, что нужно.
Главным достоинством Апостолиди является предоставление возможности для актуальной информации посетителям. Мы простым языком объясняем сложные финансовые вопросы. Благодаря регулярным обновлениям вы всегда будете в курсе важных событий. https://apostolidi.ru – портал, который на сегодняшний день популярностью пользуется. Здесь есть поиск, можете им в любое время воспользоваться. Апостолиди позволяет находить полезные рекомендации, получать знания от экспертов и исследовать уникальные материалы. Добро пожаловать на наш портал!
Система менеджмента управления качеством содержит критерии менеджмента и стандарты, по которым проводится последующая сертификация предприятия. Чтобы получить сертификат СМК, нужно обратиться в аккредитованный сертификационный центр. Сертификация систем менеджмента качества является документальным подтверждением того, что система менеджмента сертифицированной компании соответствует требованиям того или иного стандарта. Подробнее: https://ok.ru/group/70000034956977
Go to the site https://betwave.ro/en where you will find a list of all the best online casinos, as well as useful and complete information about each of them – how to play, what bonuses there are, how to withdraw money, which casinos have a minimum deposit, registration steps and advantages of each of them, as well as what are the biggest bonuses in online casinos. More details on the site.
Посетите B2BOX https://b2box.ru/ – это уникальное комплексное решение для создания упаковки всех видов и направлений. Мы делаем упаковку, которая продает! Упаковочные решения для ритейла, создание индивидуальной и SRP упаковки, услуги дизайнерского бюро, производство транспортной упаковки, собственное плоттерное производство, все виды печати – это и многое другое вы найдете, посетив наш сайт.
Перевозка негабаритных грузов и доставка по всей территории России и СНГ на сайте https://negabarit-24.ru/ – это профессиональные услуги от нашей компании. Перевозка негабаритных грузов по России и странам СНГ, ЖД перевозки, перевозки манипулятором и международные перевозки. Гибкие варианты оплаты. Соблюдение сроков. Страхование грузов. Подробнее на сайте.
На сайте https://xn—-7sbjhqn0bhjc0lk.xn--p1ai/ получите юридическую консультацию по различным вопросам. Компания Стратегия работает как с физическими, так и частными лицами. На все услуги установлены привлекательные расценки, чтобы воспользоваться ими смог каждый. Предприятие работает в этой сфере более 11 лет. В команде трудятся 11 специалистов, которые справятся с задачей независимо от сложности. К вашим услугам досудебный юрист, досудебное урегулирование, кредитный, семейный юрист, решение страховых споров.
Доверие – центр, который психологические услуги предоставляет. Мы помогаем людям справляться с трудностями, которые у них возникают в отношениях с собой и окружающими. Записаться на личный прием к специалисту можно по телефону, указанному на сайте. Ищете психотерапия? Ack-group.ru/stati-po-psikhologii/psikhoterapiya – здесь узнаете, что такое психотерапия, какие цели перед ней стоят и кому она показана. Также тут представлены расценки на психологические консультации. Готовы вас на пути к эмоциональному равновесию и самопознанию поддержать.
Посетите сайт https://schetki.spb.ru/ и вы сможете подобрать и купить машинку для чистки обуви. Ознакомьтесь с нашим ассортиментом машинок для чистки обуви – для дома или офиса, для чистки подошвы обуви, бахилонадевателями, комплектующими и другим ассортиментом. Также обслуживаем и предоставляем в аренду машины для чистки обуви и аппараты для надевания бахил. Доставляем по всем регионам России.
Time1c.ru предлагает купить 1С. У нас работают проверенные профессионалы своего дела. Они готовы проконсультировать вас. У вас есть возможность 1С в облаке протестировать решение. Заполните уже сейчас на нашем портале форму. Укажите ваше имя, телефон для связи и e-mail адрес. Ищете 1с унф общепит? Time1c.ru – можете с ценами ознакомиться. Также тут есть удобный поиск и блог. Расскажем, как 1С ERP помогает управлять проектами и ресурсами. Вы узнаете о преимуществах использования 1С Бухгалтерия для строительной отрасли. Время развивать бизнес!
Отказное письмо https://www.rospromtest.ru/sertifikati/otkaznoe-pismo/ — документ, который подтверждает, что товару не требуется сертификат или декларация о соответствии. Отказное письмо оформляется на основании данных от заявителя без подачи заявки на сертификацию, эксперт на основании области применения продукции и ее кода ТН ВЭД определяет необходимость обязательной сертификации, о чем предоставляется ответ в письменном виде. Отказное письмо называют информационным письмом.
Перевозка негабаритных грузов и доставка по всей территории России и СНГ на сайте https://negabarit-24.ru/ – это профессиональные услуги от нашей компании. Перевозка негабаритных грузов по России и странам СНГ, ЖД перевозки, перевозки манипулятором и международные перевозки. Гибкие варианты оплаты. Соблюдение сроков. Страхование грузов. Подробнее на сайте.
На сайте https://pilmi.ru вы найдете огромное количество фильмов самых разных жанров, включая комедии, мелодрамы, драмы, романтические. Для того чтобы подыскать наиболее подходящий вариант, нужно воспользоваться специальным каталогом. Вашему вниманию представлены и ожидаемые любопытные новинки этого года, которые произведут эффект. Все это можно просматривать в любое время и на различных устройствах. Прямо сейчас воспользуйтесь возможностью посмотреть азиатское кино. Используйте поиск для облегчения выбора.
Tent3302.ru необходимые автодетали предоставляет. Мы продаем запчасти на Газель Некст. Под заказ поставляем двигатель Газель Камминз 2.8. Стараемся цены на низком уровне поддерживать. Продажи выполняем со склада за безналичный и наличный расчет. Ищете задний редуктор валдай 38? Tent3302.ru – здесь можете найти подробную информацию о нас. Мы качественную продукцию продаем. Шины на Газель особенным спросом у клиентов пользуются. Стараемся накладные расходы и транспортные максимально сократить. Вы можете в грамотном и вежливом обслуживании быть уверены.
Посетите сайт Мир Часов https://mir-watch.ru/ – это скупка часов в Москве. Вы сможете сдать часы в ломбард по выгодной стоимости. Занимаемся выкупом (скупкой) швейцарских часов и других известных брендов. Выкупаем не только элитные часы, но и часовые аксессуары: виндеры, коробки, шкатулки, ремни, ювелирные украшения и аксессуары с бриллиантовыми камнями.
Посетите B2BOX https://b2box.ru/ – это уникальное комплексное решение для создания упаковки всех видов и направлений. Мы делаем упаковку, которая продает! Упаковочные решения для ритейла, создание индивидуальной и SRP упаковки, услуги дизайнерского бюро, производство транспортной упаковки, собственное плоттерное производство, все виды печати – это и многое другое вы найдете, посетив наш сайт.
Visit https://wpstore.pro/ where you will find premium WordPress themes and plugins. We have collected the best solutions for WordPress in one place. Official products from developers. We have the most affordable prices, original products, unlimited use, lifetime updates and much more. More details on the site.
Детский туроператор Флагман организует школьные экскурсии и туры для детей по Санкт-Петербургу и Северо-Западу. Поездки с Флагманом всегда превращаются в увлекательные приключения. Собственный автопарк, профессиональные водители и контроль безопасности в пути гарантируют комфортные путешествия для детей. Профессиональные экскурсоводы адаптируют маршруты под детскую аудиторию, делая их познавательными и интересными. Подробнее на официальном сайте https://flagmanspb.ru/
Система менеджмента управления качеством содержит критерии менеджмента и стандарты, по которым проводится последующая сертификация предприятия. Чтобы получить сертификат СМК, нужно обратиться в аккредитованный сертификационный центр. Сертификация систем менеджмента качества является документальным подтверждением того, что система менеджмента сертифицированной компании соответствует требованиям того или иного стандарта. Подробнее: https://ok.ru/group/70000034956977
Arenda24.by – интернет-платформа для размещения объявлений по аренде оборудования и строительной техники. На нашем ресурсе вы сможете работать комфортно, ведь его создала истинная команда профессионалов. Ищете аренда техники москва строительной? Arenda24.by – портал, где вы найдете по аренде техники и любых инструментов объявления, и сможете организовать грузоперевозки. У нас есть объявления любых типов категорий. Разместите объявление уже сейчас, и оно в сжатые сроки своих клиентов найдет. С нами вы доступ к качественной и популярной платформе получите.
На сайте https://rozatoday.ru/ представлено огромное количество ярких, запоминающихся композиций, которые созданы из свежих цветов: ослепительных роз, волнующих пионов, трепетных тюльпанов, строгих гвоздик. В компании работают только знающие, компетентные флористы, которые создают изысканные композиции в соответствии с предпочтениями клиента. В обязательном порядке учитываются и актуальные мировые тенденции. Можно приобрести как небольшой букетик, который подходит для романтического свидания, так и внушительных размеров для грандиозного праздника.
Go to the site https://betwave.ro/en where you will find a list of all the best online casinos, as well as useful and complete information about each of them – how to play, what bonuses there are, how to withdraw money, which casinos have a minimum deposit, registration steps and advantages of each of them, as well as what are the biggest bonuses in online casinos. More details on the site.
Вместе с t.me/azino777_a можете отправиться в захватывающее путешествие по миру азартных игр. Предлагаем персонализированные предложения и уникальные бонусы. Расскажем, как в Азино начать играть. Вас ждет возможность выиграть крупный приз и невероятные эмоции. Не упустите шанс испытать свою удачу! Ищете azino777 android? – здесь представлено много интересной информации. Собрали самые частые вопросы от игроков. Всегда готовы помочь вам. Приготовьтесь к увлекательным турнирам в Азино. Участвуйте и боритесь за призы с другими игроками!
Market-delivery-dubai.ru предлагает доставку алкоголя. Вы можете у нас приобрести абсцент, виски, коньяк, пиво, ликер, водку, бризер, вино, джин, текилу, ром. Мы гарантируем приемлемые цены. Доверие покупателей заслужили. Ищете dubai alcohol delivery? Market-delivery-dubai.ru – здесь есть то, что вам нужно. Регулярно работаем над ассортиментом. Потребности своих клиентов мы хорошо знаем. Заказы через Whatsapp принимаем. Осуществляем доставку любого вида алкогольной продукции высокого качества в короткие сроки. Необходима помощь? Свяжитесь с нами.
Блог о маркетплейсах «OOWA» предлагает ознакомиться с актуальной, интересной и познавательной информацией, которая касается удачных продаж на маркетплейсах, обзоров товаров и услуг. На портале регулярно публикуются ценные и содержательные рекомендации от экспертов, которые помогут начать лучше разбираться в тонкостях такого бизнеса. Ищете аналитика на ozon? На oowa.ru регулярно публикуются ценные и содержательные рекомендации от экспертов, которые помогут начать лучше разбираться в тонкостях такого бизнеса. Почитайте о самых востребованных товарах с маркетплейсов.
Академия «Арчибальд» занимается обучением грумингу. У вас есть возможность свои навыки совершенствовать до бесконечности на живых моделях. Преподаватели отвечают на все вопросы. Дарим методические материалы, учебники, а также видеолекции. Окунитесь в атмосферу, с которой расставаться не хочется. Ищете курсы груминга недорого в москве? Grooming-dream.ru – здесь представлены реальные отзывы клиентов. Мы лучших груминг-специалистов выпускаем. Предлагаем инструменты в период обучения. Если вам интересна новая профессия – Арчибальд, вот то место, которое вам подойдет.
Alkomarket-dubai.ru коллекцию алкогольных напитков на разный кошелек и вкус предлагает. Качество продукции – наш главный приоритет, мы заботимся о здоровье клиентов. Закажите алкоголь с доставкой на дом уже сейчас. Наслаждайтесь удобством! Ищете купить алкоголь в дубае c доставкой? Alkomarket-dubai.ru – здесь представлен широкий ассортимент пива, вина, водки, виски и скотча, а также других премиальных напитков от известных мировых брендов. Бережно относимся к покупателям, заботясь об их потребностях. Поможем подобрать достойные варианты для вас и на подарок близким.
Вместе с t.me/azino777_a у вас есть возможность в увлекательное путешествие по миру азартных игр отправиться. Предлагаем уникальные бонусы и персонализированные предложения. Расскажем, как начать играть в Азино. Вас ждут невероятные эмоции и возможность выиграть крупный приз. Не упустите шанс испытать свою удачу! Ищете azino777 новое зеркало? – здесь представлено много интересной информации. Собрали самые частые вопросы от игроков. Всегда готовы помочь вам. Приготовьтесь к увлекательным турнирам в Азино. Участвуйте и с другими игроками боритесь за призы!
На сайте https://pilmi.ru вы найдете огромное количество фильмов самых разных жанров, включая комедии, мелодрамы, драмы, романтические. Для того чтобы подыскать наиболее подходящий вариант, нужно воспользоваться специальным каталогом. Вашему вниманию представлены и ожидаемые любопытные новинки этого года, которые произведут эффект. Все это можно просматривать в любое время и на различных устройствах. Прямо сейчас воспользуйтесь возможностью посмотреть азиатское кино. Используйте поиск для облегчения выбора.
Специалисты компании «МосСтройАльянс» решат любую сложную задачу. Мы на осуществлении фасадных, уборочных и кровельных работ специализируемся. Предоставляем доступные цены. Вы будете довольны результатом. Ищете ремонт кровли гаража в москве? Mos-stroi-alians.ru – здесь можете ознакомиться с отзывами наших клиентов. Для работы применяем исключительно материалы высшего качества. Ваше время мы ценим. Несем ответственность за соблюдение сроков. Свяжитесь с нами по указанному на сайте телефону. Мы вас проконсультируем и на все вопросы ответим.
Блог о маркетплейсах «OOWA» предлагает ознакомиться с актуальной, интересной и познавательной информацией, которая касается удачных продаж на маркетплейсах, обзоров товаров и услуг. На портале регулярно публикуются ценные и содержательные рекомендации от экспертов, которые помогут начать лучше разбираться в тонкостях такого бизнеса. Ищете обзор инверторного кондиционера tuvio aci09w11? На oowa.ru регулярно публикуются ценные и содержательные рекомендации от экспертов, которые помогут начать лучше разбираться в тонкостях такого бизнеса. Почитайте о самых востребованных товарах с маркетплейсов.
На сайте https://officepro54.ru представлено огромное количество мебели, которая идеально подходит для организации офисного пространства. Вся она выполнена из инновационных, уникальных материалов, а потому прослужит очень долго, не синтезирует в воздух опасных веществ. В разделе вы найдете кабинет руководителя, функциональные и вместительные столы для переговоров, шкафы-купе, сейфы, акустические системы, ученическую мебель и многое другое. Постоянно действуют акции. На продукцию установлены привлекательные цены.
Компания «Отопление и водоснабжение» специализируется на предоставлении высокого качества услуг. У нас глубокие знания и опыт в сфере монтажа отопительных систем. Следим за современными технологиями, чтобы вам передовые решения предлагать. Подходим к каждому проекту индивидуально. Ищете монтаж систем отопления? Krasnogorsk.santex-uslugi.ru – сайт, где указаны цены и размещены отзывы о нас. Применяем оборудование от лучших производителей и надежные материалы. Удачно осуществили множество работ. Готовы комфортный дом для вашей семьи создать.
Пороги автоматического типа являются идеальным вариантом при условии, что осуществить монтажные работы стационарного не удастся либо нежелательно. В данный момент можно изучить каталог всех вариантов, которые предлагает предприятие «SMARTПОРОГ», что позволит подобрать решение, которое определенно подойдет. https://smartporog.ru/ – на портале ознакомьтесь с достоинствами, на которые вы сможете рассчитывать при установке порогов внутри помещения. Такие конструкции потребуются с той целью, чтобы в помещение не попадали солнечные лучи, посторонние запахи. Это оптимальное решение, в том числе, и для ванной.
Академия «Арчибальд» занимается обучением грумингу. Вы можете совершенствовать собственные навыки на живых моделях до бесконечности. Преподаватели отвечают на все вопросы. Дарим методические материалы, учебники, а также видеолекции. Окунитесь в атмосферу, с которой расставаться не хочется. Ищете курсы груминга москва и область? Grooming-dream.ru – тут реальные отзывы клиентов представлены. Мы лучших груминг-специалистов выпускаем. Предлагаем инструменты в период обучения. Если хотите освоить новую профессию, «Арчибальд» будет самым подходящим для вас местом.
Компания «Отопление и водоснабжение» предлагает квалифицированные услуги. Наши опытные специалисты готовы выполнить монтаж системы отопления в Рузе в кратчайшие сроки. Создайте тепло и комфорт в вашем доме с нами. Ищете монтаж систем отопления? Ruzskiy-rayon.santex-uslugi.ru – здесь можете прямо сейчас ознакомиться с отзывами о нас. Гарантируем использование качественных материалов. Ваши ожидания мы готовы превзойти. Стараемся сделать услуги доступными для клиентов. Можете связаться с менеджером и проконсультироваться с ним по любым вопросам.
Вместе с t.me/azino777_a у вас есть возможность в увлекательное путешествие по миру азартных игр отправиться. Предлагаем персонализированные предложения и уникальные бонусы. Расскажем, как в Азино начать играть. Вас ждут невероятные эмоции и возможность выиграть крупный приз. Испытайте свою удачу уже сейчас! Ищете песня azino777? – здесь представлено много интересной информации. Собрали самые частые вопросы от игроков. Всегда готовы помочь вам. Приготовьтесь к увлекательным турнирам в Азино. Участвуйте и с другими игроками боритесь за призы!
ООО «Короче, дилер» представляет собой официальную библиотеку знаний ассоциации «Российские автомобильные дилеры». На портале https://koroche-dealer.ru каждый, у кого есть вопросы по теме, сможет найти на них ответы. Представлены самые актуальные материалы, касающиеся работы дилерских центров по самым разным направлениям.
Ищете облучатели для лечения кожных заболеваний? Agsvv.ru/catalog/obluchateli_dlya_lecheniya вы сможете купить облучатели для лечения кожных заболеваний с завода с гарантией по цене производителя. ООО Хронос изготовлением облучателей для лечения кожных заболеваний с 2009-го года с доказанными методами лечения занимается. Медицинские приборы от производителя славятся высочайшим качеством! Посмотрите наш ассортимент и назначение приборов. Мы приборы своего производства частным и государственным медучреждениям по всей РФ поставляем.
Блог о маркетплейсах «OOWA» предлагает ознакомиться с актуальной, интересной и познавательной информацией, которая касается удачных продаж на маркетплейсах, обзоров товаров и услуг. На портале регулярно публикуются ценные и содержательные рекомендации от экспертов, которые помогут начать лучше разбираться в тонкостях такого бизнеса. Ищете обзор очистителя воздуха polaris? На oowa.ru регулярно публикуются ценные и содержательные рекомендации от экспертов, которые помогут начать лучше разбираться в тонкостях такого бизнеса. Почитайте о самых востребованных товарах с маркетплейсов.
Looking for midjourney ai prompts? Findprompt.shop where you can choose from a huge selection of promts for Midjourney, Stable Diffusion, ChatGPT and more. Study the best recommendations for AI. You can sell your promts on our platform at a great price. Pay close attention to the choice of promts on the portal – it is the largest on the market. Our offers are unique, and the cost is affordable for everyone.
Академия «Арчибальд» занимается обучением грумингу. У вас есть возможность свои навыки совершенствовать до бесконечности на живых моделях. Преподаватели отвечают на все вопросы. Дарим видеолекции, методические материалы и учебники. Окунитесь в атмосферу, с которой расставаться не хочется. Ищете курсы груминга москва и московская область? Grooming-dream.ru – тут реальные отзывы клиентов представлены. Мы выпускаем отменных груминг-специалистов. Предлагаем инструменты в период обучения. Если хотите освоить новую профессию, «Арчибальд» будет самым подходящим для вас местом.
Krause-ekb.ru предлагает широкий ассортимент лестниц и стремянок по умеренным ценам. Работаем с организациями и частными лицами. Бесплатную консультацию мы для вас можем предложить. Совершить покупки стало гораздо проще, теперь не надо из дома выходить. Для этого каталогом воспользуйтесь, который на ресурсе предоставлен. Ищете лестница краузе купить? Krause-ekb.ru – здесь размещена подробная информация о компании. Главная цель Krause – предложить высококачественные товары и доставить заказ покупателю как можно быстрее. При возникновении вопросов, смело звоните нам по телефону.
Вы находитесь на едином сайте аренды, где получится взять в прокат различную технику для выполнения самых разных работ. Вы сможете опубликовать объявление и предложить свою технику, чтобы ее заказал кто-то еще. https://arenda24.by/ – на портале ознакомьтесь с категориями, которые точно вызовут интерес – техника для грузоперевозок, режущее оборудование, краны, которые принимают участие в строительстве и другими предложениями. Получить доступ к опциям удастся, если пройдете регистрацию.
Форум социальной инженерии — Lolz.live предлагает уникальную возможность на выгодных условиях продать игровые аккаунты, а также учетные записи для социальных сетей, скилы и различную игровую атрибутику. Этот портал будет полезен как новичкам, которые только рассматривают продажу аккаунтов в качестве заработка, так и тем, для кого это уже стало бизнесом.
Probanki-online.ru – сайт, который предлагает вам исчерпывающую информацию о банковских услугах и финансовых продуктах в России. Расскажем, автокредит, что это такое. Объясним, как идеальную карту выбрать. Вы о плюсах вкладов узнаете. Стремимся в курсе последних финансовых событий быть. Ищете онлайн кредит без посещения банка? Probanki-online.ru – тут можете найти о различных банках и их предложениях информацию. На ресурсе есть поиск, воспользуйтесь им. Сделать процесс выбора финансовых продуктов удобным и простым – вот наша основная цель. Рады видеть вас на нашем сайте!
Вместе с t.me/azino777_a у вас есть возможность в увлекательное путешествие по миру азартных игр отправиться. Предлагаем уникальные бонусы и персонализированные предложения. Расскажем, как в Азино начать играть. Вас ждут невероятные эмоции и возможность выиграть крупный приз. Испытайте свою удачу уже сейчас! Ищете azino777 онлайн? – тут имеется множество актуальной информации. Собрали самые частые вопросы от игроков. Рады вам помочь. Приготовьтесь к увлекательным турнирам в Азино. Участвуйте и боритесь за призы с другими игроками!
Market-delivery-dubai.ru предлагает доставку алкоголя. У вас есть возможность купить виски, ром, вино, текилу, бризер, абсцент, коньяк, водку, пиво, джин, ликер. Мы гарантируем приемлемые цены. Доверие покупателей заслужили. Ищете delivery drinks dubai? Market-delivery-dubai.ru – тут то есть, что вам необходимо. Регулярно работаем над ассортиментом. Потребности своих клиентов мы хорошо знаем. Заказы через Whatsapp принимаем. Выполняем доставку различного вида алкогольной продукции отменного качества в сжатые сроки. Необходима помощь? Позвоните нам.
Блог о маркетплейсах «OOWA» предлагает ознакомиться с актуальной, интересной и познавательной информацией, которая касается удачных продаж на маркетплейсах, обзоров товаров и услуг. На портале регулярно публикуются ценные и содержательные рекомендации от экспертов, которые помогут начать лучше разбираться в тонкостях такого бизнеса. Ищете обзор очистителя воздуха polaris? На oowa.ru регулярно публикуются ценные и содержательные рекомендации от экспертов, которые помогут начать лучше разбираться в тонкостях такого бизнеса. Почитайте о самых востребованных товарах с маркетплейсов.
На сайте https://officepro54.ru представлено огромное количество мебели, которая идеально подходит для организации офисного пространства. Вся она выполнена из инновационных, уникальных материалов, а потому прослужит очень долго, не синтезирует в воздух опасных веществ. В разделе вы найдете кабинет руководителя, функциональные и вместительные столы для переговоров, шкафы-купе, сейфы, акустические системы, ученическую мебель и многое другое. Постоянно действуют акции. На продукцию установлены привлекательные цены.
Арчибальд – академия, которая обучением груминга занимается. У вас есть возможность свои навыки совершенствовать до бесконечности на живых моделях. Преподаватели отвечают на все вопросы. Дарим видеолекции, методические материалы и учебники. Погрузитесь в атмосферу, с которой не захочется расставаться. Ищете курсы груминга в москве с нуля? Grooming-dream.ru – здесь представлены реальные отзывы клиентов. Мы лучших груминг-специалистов выпускаем. Предлагаем инструменты в период обучения. Если вам интересна новая профессия – Арчибальд, вот то место, которое вам подойдет.
На сайте https://pilmi.ru вы найдете огромное количество фильмов самых разных жанров, включая комедии, мелодрамы, драмы, романтические. Для того чтобы подыскать наиболее подходящий вариант, нужно воспользоваться специальным каталогом. Вашему вниманию представлены и ожидаемые любопытные новинки этого года, которые произведут эффект. Все это можно просматривать в любое время и на различных устройствах. Прямо сейчас воспользуйтесь возможностью посмотреть азиатское кино. Используйте поиск для облегчения выбора.
На сайте https://rustreetwear.ru вы найдете огромное количество интересных, разнообразных и эксклюзивных брендов, которые создают роскошную уличную одежду на любые случаи жизни. Есть как совсем не известные марки, которые только начинают свой путь, так и гиганты мировой индустрии. Перед вами самый впечатляющий каталог, где вы найдете не только одежду, но и аксессуары. Каталог обновляется ежедневно, чтобы вы обязательно нашли для себя лучший вариант. Здесь установлены доступные расценки.
Компания «V8soft» предлагает облачный сервис для того, чтобы вы смогли вести бизнес удачно и максимально эффективно. На предприятии работают исключительно те профессионалы, у которых имеется весь необходимый опыт работы, полезные навыки. На сайте https://v8soft.ru/ изучите все возможности ПО, чтобы определить то, подходит ли вам решение.
Популярная компания «Herbs & Flowers» предлагает огромный выбор искусственных цветов, которые идеально подходят как для украшения интерьера дома, так и офиса. В каталоге сайта https://herbsandflowers.ru/ вы найдете вертикальное озеленение, ампульные растения, а также деревья, ветви и многое другое.
Alkomarket-dubai.ru коллекцию алкогольных напитков на разный кошелек и вкус предлагает. Наш основной приоритет – качество продукции, мы о здоровье своих клиентов заботимся. Закажите алкоголь с доставкой на дом уже сейчас. Наслаждайтесь удобством! Ищете алкоголь в дубае с доставкой? Alkomarket-dubai.ru – здесь представлен широкий ассортимент пива, вина, водки, виски и скотча, а также других премиальных напитков от известных мировых брендов. Бережно относимся к покупателям, заботясь об их потребностях. Поможем подобрать достойные варианты для вас и на подарок близким.
На сайте https://mvpol.ru/ воспользуйтесь возможностью заказать промышленные полы напрямую от производителя. Компания «МВПОЛ» оказывает и такую важную услугу, как ремонт промышленных полов, производство полимерных наливных полов, бетонных, у которых упрочненный верх. Также получится узнать расценки на такие услуги, чтобы заранее спланировать бюджет. Для того чтобы иметь представление о том, как выглядят работы, изучите объекты. На все услуги предоставляются гарантии. Вся информация дается максимально быстро.
Компания «Ковка Винтаж» в течение длительного времени оказывает свои услуги и предлагает создать изысканные, завораживающие кованые изделия, которые украсят придомовую территорию, беседку, террасу, а также частный дом. На сайте https://kovka-vintazh.ru/ ознакомьтесь с полным ассортиментом изделий и работами компетентных и выдающихся мастеров.
На сайте https://vezuviy.shop/ вы сможете приобрести чугунные, стальные банные печи, нержавеющие, а также в облицовке, печи-камины, отопительные, каминные топки, дымоходы, порталы и многое другое. Вся продукция от производителя, а потому наценки очень маленькие. Такая техника считается идеальной не только с целью обогрева помещения, но и оформления пространства. А самое главное, что она отличается долгим сроком службы, надежностью из-за того, что в работе использовались высокотехнологичные, проверенные материалы.
Сайт hm.mnemosyne.ru предлагает выбрать ремень в подарок любимым людям. Мастера, создающие изделия, отличаются творческим потенциалом. Каждая модель с учетом модных трендов разрабатывается. Мы к покупателям всегда прислушиваемся. При возможностях всегда идем на встречу. https://hm.mnemosyne.ru – тут сможете узнать, какой ремень в подарок руководителю, шефу или коллеге преподнести. Для изделий отбирается лучшая кожа. Оцените неповторимость ручной работы. Сделайте уже сейчас заказ на нашем портале. Пусть ваш стиль новыми красками засияет!
Пороги автоматического типа являются идеальным вариантом при условии, что осуществить монтажные работы стационарного не удастся либо нежелательно. Прямо сейчас изучите каталог продукции компании «SMARTПОРОГ», чтобы выбрать тот вариант, который полностью устроит. https://smartporog.ru/ – на портале ознакомьтесь с достоинствами, на которые вы сможете рассчитывать при установке порогов внутри помещения. Такие конструкции потребуются с той целью, чтобы в помещение не попадали солнечные лучи, посторонние запахи. Это оптимальное решение, в том числе, и для ванной.
Специалисты компании «МосСтройАльянс» решат любую сложную задачу. Мы на осуществлении фасадных, уборочных и кровельных работ специализируемся. Предлагаем самые выгодные цены. Вы будете довольны результатом. Ищете кровля цена за м2? Mos-stroi-alians.ru – здесь можете ознакомиться с отзывами наших клиентов. Для работы используем только самые качественные материалы. Ваше время мы ценим. Несем ответственность за соблюдение сроков. Свяжитесь с нами по указанному на сайте телефону. Мы вас проконсультируем и на все вопросы ответим.
Популярный сервис «Zoomy» предлагает воспользоваться такой популярной услугой, как аренда мотоциклов в Пхукете, Краби, Банг-Ламунг и других районах Таиланда. На сайте https://zoomy.travel уточните то, в каких районах Таиланда вы сможете взять мотоцикл в аренду.
На сайте https://prometall.shop/ получится выбрать печь, а также воспользоваться полным перечнем услуг, которые связаны с печами Prometall, в том числе, реализацией, проведением монтажных работ. Изучите технические характеристики печей, которые находятся в сетке, камне, получится приобрести и отопительные печи, а также устройства в облицовке. Прямо сейчас вы сможете изучить хиты продаж – те товары, которые пользуются особой популярностью. Каталог товаров регулярно обновляется, чтобы вы приобрели лучшее.
На сайте https://mvpol.ru/ воспользуйтесь возможностью заказать промышленные полы напрямую от производителя. Компания «МВПОЛ» оказывает и такую важную услугу, как ремонт промышленных полов, производство полимерных наливных полов, бетонных, у которых упрочненный верх. Также получится узнать расценки на такие услуги, чтобы заранее спланировать бюджет. Для того чтобы иметь представление о том, как выглядят работы, изучите объекты. На все услуги предоставляются гарантии. Вся информация дается максимально быстро.
На сайте https://prometall.shop/ получится выбрать печь, а также воспользоваться полным перечнем услуг, которые связаны с печами Prometall, в том числе, реализацией, проведением монтажных работ. Изучите технические характеристики печей, которые находятся в сетке, камне, получится приобрести и отопительные печи, а также устройства в облицовке. Прямо сейчас вы сможете изучить хиты продаж – те товары, которые пользуются особой популярностью. Каталог товаров регулярно обновляется, чтобы вы приобрели лучшее.
Отопление и водоснабжение – компания, которая на предоставлении качественных услуг специализируется. В области монтажа отопительных систем у нас опыт и глубокие знания. Следим за современными технологиями, чтобы вам передовые решения предлагать. Подходим к каждому проекту индивидуально. Ищете монтаж водоснабжения? Krasnogorsk.santex-uslugi.ru – сайт, где указаны цены и размещены отзывы о нас. Используем проверенные материалы и оборудование от известных производителей. Успешно выполнили множество работ. Готовы комфортный дом для вашей семьи создать.
«REDICO» представляет собой международный центр сертификации, а также лицензирования. Компания на профессиональном уровне и с 2011 года выполняет работы в сфере сертификации услуг и продукции. На сайте https://redico.ru/ воспользуйтесь возможностью запросить бесплатный расчет того, во сколько обойдется сертификация продукции.
Требуется продвижение сайтов вечными ссылками недорого? Cервис ProfLinks.ru ориентирован на размещение вечных ссылок с ИКС от 10; «вечных», в нашем случае, на постоянной основе и с разовой оплатой; «ИКС от 10», означает, что индекс качества сайтов, присваиваемый ресурсам поисковой системой Яндекс, будет минимум от 10 пунктов, в зависимости от выбранного Вами тарифного плана или доп. услуги.
ООО «Хронос» считается прогрессивным разработчиком медицинской техники, которая используется в клиниках, различных учреждениях, где важна точность, высокое качество обслуживания. Компания работает, начиная с 2009 года и по разным основным направлениям. На сайте https://agsvv.ru вы сможете с ними ознакомиться. Изготовление техники как для медицинских учреждений, так и домашнего применения.
На сайте https://xn—-7sbjhqn0bhjc0lk.xn--p1ai/ получите юридическую консультацию по различным вопросам. Компания работает как с физическими, так и частными лицами. На все услуги установлены привлекательные расценки, чтобы воспользоваться ими смог каждый. Предприятие работает в этой сфере более 11 лет. В команде трудятся 11 специалистов, которые справятся с задачей независимо от сложности. К вашим услугам досудебный юрист, досудебное урегулирование, кредитный, семейный юрист, решение страховых споров.
На сайте https://rustreetwear.ru вы найдете огромное количество интересных, разнообразных и эксклюзивных брендов, которые создают роскошную уличную одежду на любые случаи жизни. Есть как совсем не известные марки, которые только начинают свой путь, так и гиганты мировой индустрии. Перед вами самый впечатляющий каталог, где вы найдете не только одежду, но и аксессуары. Каталог обновляется ежедневно, чтобы вы обязательно нашли для себя лучший вариант. Здесь установлены доступные расценки.
Компания «V8soft» предлагает облачный сервис для того, чтобы вы смогли вести бизнес удачно и максимально эффективно. На предприятии работают исключительно те профессионалы, у которых имеется весь необходимый опыт работы, полезные навыки. На сайте https://v8soft.ru/ изучите все возможности ПО, чтобы определить то, подходит ли вам решение.
Компания «Отопление и водоснабжение» предлагает квалифицированные услуги. Компетентные специалисты готовы осуществить в Рузе в сжатые сроки монтаж системы отопления. Создайте комфорт и тепло с нами в вашем доме. Ищете монтаж систем отопления? Ruzskiy-rayon.santex-uslugi.ru – здесь можете прямо сейчас ознакомиться с отзывами о нас. Гарантируем применение материалов высокого качества. Ваши ожидания мы готовы превзойти. Стараемся сделать услуги доступными для клиентов. Позвоните нашему менеджеру для консультации по интересующим вас вопросам.
Компания «DELIVERY PLAY» предлагает выгодный прокат инвалидных колясок с быстрой доставкой и по привлекательным ценам. Каждый клиент получает возможность воспользоваться оперативной доставкой не только по Москве, но и области. На сайте https://deliveryplay.ru/arenda-invalidnyh-kolyasok изучите все модели, которые вы сможете заказать здесь.
На сайте https://vezuviy.shop/ вы сможете приобрести чугунные, стальные банные печи, нержавеющие, а также в облицовке, печи-камины, отопительные, каминные топки, дымоходы, порталы и многое другое. Вся продукция от производителя, а потому наценки очень маленькие. Такая техника считается идеальной не только с целью обогрева помещения, но и оформления пространства. А самое главное, что она отличается долгим сроком службы, надежностью из-за того, что в работе использовались высокотехнологичные, проверенные материалы.
Ищете облучатели для лечения кожных заболеваний? Agsvv.ru/catalog/obluchateli_dlya_lecheniya у вас появится возможность приобрести для лечения кожных болезней облучатели по цене производителя с гарантией. ООО Хронос изготовлением облучателей для лечения кожных заболеваний с 2009-го года с доказанными методами лечения занимается. Медицинские приборы от производителя славятся высочайшим качеством! Посмотрите наш ассортимент и назначение приборов. Мы приборы своего производства частным и государственным медучреждениям по всей РФ поставляем.
Популярная компания «Herbs & Flowers» предлагает огромный выбор искусственных цветов, которые идеально подходят как для украшения интерьера дома, так и офиса. В каталоге сайта https://herbsandflowers.ru/ вы найдете вертикальное озеленение, ампульные растения, а также деревья, ветви и многое другое.
Ресурс hm.mnemosyne.ru выбрать ремень в подарок любимым людям предлагает. Мастера, создающие изделия, отличаются творческим потенциалом. Каждая модель разрабатывается с учетом модных трендов. Мы прислушиваемся к покупателям. Идем при возможностях всегда на встречу. https://hm.mnemosyne.ru – тут сможете узнать, какой ремень в подарок руководителю, шефу или коллеге преподнести. Отбирается лучшая кожа для изделий. Оцените ручной работы неповторимость. Сделайте заказ на нашем сайте уже сейчас. Пусть ваш стиль засияет новыми красками!
Вы находитесь на едином сайте аренды, где получится взять в прокат различную технику для выполнения самых разных работ. Вы сможете опубликовать объявление и предложить свою технику, чтобы ее заказал кто-то еще. https://arenda24.by/ – на портале ознакомьтесь с категориями, которые точно вызовут интерес – техника для грузоперевозок, режущее оборудование, краны, которые принимают участие в строительстве и другими предложениями. Получить доступ к опциям удастся, если пройдете регистрацию.
На сайте https://xn—-7sbjhqn0bhjc0lk.xn--p1ai/ получите юридическую консультацию по различным вопросам. Компания работает как с физическими, так и частными лицами. На все услуги установлены привлекательные расценки, чтобы воспользоваться ими смог каждый. Предприятие работает в этой сфере более 11 лет. В команде трудятся 11 специалистов, которые справятся с задачей независимо от сложности. К вашим услугам досудебный юрист, досудебное урегулирование, кредитный, семейный юрист, решение страховых споров.
Looking for best prompts for chatgpt? Findprompt.shop, here you have the opportunity to make your choice from a large selection of promts for ChatGPT, Stable Diffusion, Midjourney and others. Study the best recommendations for AI. You can sell your promts on our platform at a great price. Pay close attention to the choice of promts on the portal – it is the largest on the market. Our offers are unique, and the cost is affordable for everyone.
Компания «Ковка Винтаж» в течение длительного времени оказывает свои услуги и предлагает создать изысканные, завораживающие кованые изделия, которые украсят придомовую территорию, беседку, террасу, а также частный дом. На сайте https://kovka-vintazh.ru/ ознакомьтесь с полным ассортиментом изделий и работами компетентных и выдающихся мастеров.
На сайте https://mvpol.ru/ воспользуйтесь возможностью заказать промышленные полы напрямую от производителя. Компания «МВПОЛ» оказывает и такую важную услугу, как ремонт промышленных полов, производство полимерных наливных полов, бетонных, у которых упрочненный верх. Также получится узнать расценки на такие услуги, чтобы заранее спланировать бюджет. Для того чтобы иметь представление о том, как выглядят работы, изучите объекты. На все услуги предоставляются гарантии. Вся информация дается максимально быстро.
На сайте https://prometall.shop/ получится выбрать печь, а также воспользоваться полным перечнем услуг, которые связаны с печами Prometall, в том числе, реализацией, проведением монтажных работ. Изучите технические характеристики печей, которые находятся в сетке, камне, получится приобрести и отопительные печи, а также устройства в облицовке. Прямо сейчас вы сможете изучить хиты продаж – те товары, которые пользуются особой популярностью. Каталог товаров регулярно обновляется, чтобы вы приобрели лучшее.
На сайте https://mvpol.ru/ воспользуйтесь возможностью заказать промышленные полы напрямую от производителя. Компания «МВПОЛ» оказывает и такую важную услугу, как ремонт промышленных полов, производство полимерных наливных полов, бетонных, у которых упрочненный верх. Также получится узнать расценки на такие услуги, чтобы заранее спланировать бюджет. Для того чтобы иметь представление о том, как выглядят работы, изучите объекты. На все услуги предоставляются гарантии. Вся информация дается максимально быстро.
На сайте https://kino-wsem.site/publ/doramy/ представлены дорамы в отличном качестве. Все они о любви, дружбе и вечном. Есть произведения за прошлые годы, которые многие пересматривают с особым удовольствием. Навигация поможет вам лучше сориентироваться в выборе и начать просмотр такого фильма, который вызовет у вас приятные, положительные эмоции. Регулярно на портале появляются новые дорамы, которые погрузят вас в удивительный мир. Вы сможете просматривать фильмы в режиме реального времени и на любом устройстве.
На сайте https://grillhouse-spb.ru/ закажите звонок для того, чтобы проконсультироваться по поводу покупки беседок-гриль, гриль-домиков. Популярная компания «Гриль Хаус» в течение долгого времени производит и собирает беседки, в том числе, для барбекю, а также саун. Все это потребуется для того, чтобы незабываемо провести время на природе и в кругу друзей, близких людей. Все конструкции выполнены из качественных, надежных материалов, которые являются износостойкими. Прямо сейчас изучите каталог доступных для заказа вариантов.
На сайте https://vezuviy.shop/ вы сможете приобрести чугунные, стальные банные печи, нержавеющие, а также в облицовке, печи-камины, отопительные, каминные топки, дымоходы, порталы и многое другое. Вся продукция от производителя, а потому наценки очень маленькие. Такая техника считается идеальной не только с целью обогрева помещения, но и оформления пространства. А самое главное, что она отличается долгим сроком службы, надежностью из-за того, что в работе использовались высокотехнологичные, проверенные материалы.
На сайте https://pohudetlegko.ru/ представлена исчерпывающая, актуальная и полезная информация о том, как похудеть правильно, без вреда для организма и максимально эффективно. На сайте вы найдете вдохновляющие истории, советы звезд, которые выглядят младше своего возраста. Есть рецепты блюд, которые созданы из полезных, вкусных ингредиентов. Но при этом они помогут скинуть вес и привести себя в форму к летнему сезону. Рецепты простые и быстрые, а потому справиться с приготовлением пищи сможет каждый. Описаны и упражнения, обертывания для похудения.
Проект Streetwear российским брендам уличной одежды посвящен. Постоянно исследуем рынок и стараемся предоставить вам актуальную информацию. Рассказываем, сколько опубликование в каталоге стоит. Любой бренд модерацию на сайте перед размещением проходит. Ищете русские спортивные бренды? Rustreetwear.ru – здесь можно узнать больше о проекте. Поддержать российских производителей и дизайнеров – это наша миссия. Если знаете бренд, которого нет в нашем каталоге, или желаете предложить сотрудничество, свяжитесь с нами через страницу контактов. Мы открыты для новых идей!
На сайте https://apostolidi.ru/ вы найдете всю полезную информацию, касающуюся торгов на бирже, а также финансов. Здесь также вы найдете и прогнозы по валютным парам от экспертов, которые работают на совесть. Обязательно публикуются свежие, интересные и информативные записи, которые будут полезны всем без исключения. Также представлен и курс доллара, о котором нужно знать инвесторам. На этом портале вы получаете возможность пообщаться с единомышленниками, задать им вопрос, узнать много нового, интересного.
На сайте https://t.me/rahvalskiy вы сможете ознакомиться с информацией о компании, которая занимается продвижением сайтов «под ключ». Вы сможете воспользоваться всеми комплексными рекламными услугами. В компании работают лучшие, компетентные сотрудники с огромным стажем, а потому они реализуют проект любой сложности и по лучшей стоимости. Для сотрудников нет неисполнимых задач. Они работают независимо от темы проекта и в строго указанные сроки. Можете не сомневаться в том, что получите результат, на который рассчитывали.
На сайте https://ptne.ru/ получите бесплатную консультацию по вопросам продажи недвижимости. Вы сможете воспользоваться такой услугой, как оперативный выкуп различной недвижимости в Санкт-Петербурге. При этом получить аванс вы сможете в день обращения. Агентство оказывает такие услуги, как: выкуп квартир, долей, займ до продажи. Выкуп происходит за свои средства, сделка является прозрачной. Адвокаты оказывают полное юридическое сопровождение, консультационную помощь. Если документов не хватает, то их соберут максимально быстро.
На сайте https://xn—-7sbjhqn0bhjc0lk.xn--p1ai/ получите юридическую консультацию по различным вопросам. Компания работает как с физическими, так и частными лицами. На все услуги установлены привлекательные расценки, чтобы воспользоваться ими смог каждый. Предприятие работает в этой сфере более 11 лет. В команде трудятся 11 специалистов, которые справятся с задачей независимо от сложности. К вашим услугам досудебный юрист, досудебное урегулирование, кредитный, семейный юрист, решение страховых споров.
На сайте https://grillhouse-spb.ru/ закажите звонок для того, чтобы проконсультироваться по поводу покупки беседок-гриль, гриль-домиков. Популярная компания «Гриль Хаус» в течение долгого времени производит и собирает беседки, в том числе, для барбекю, а также саун. Все это потребуется для того, чтобы незабываемо провести время на природе и в кругу друзей, близких людей. Все конструкции выполнены из качественных, надежных материалов, которые являются износостойкими. Прямо сейчас изучите каталог доступных для заказа вариантов.
Севертур предоставляет лучшие программы. Благодаря туроператору вы побываете в местах, где бережно хранится многовековая история России. Логистика сотрудниками компании выстроена безупречно. Гиды вежливые и приятные в общении. Экскурсии информативны и познавательны. Ищете каргопольская слобода? Xn–80ade0ahrahddrm9hxa.xn--p1ai – сайт, где можете узнать все самое интересное о наших турах. Приглашаем вас отправиться в невероятное путешествие. Вы в восторге от организации поездки останетесь. Сделайте памятные фотографии, не упустите такую возможность!
На сайте https://synccheat.ru/deadlock изучите огромный каталог читов, которые помогут игроку получить преимущества от игрового процесса. Так вы сможете легко дойти до нужного уровня, чтобы получить приз, перейти на другую стадию. Этот портал является проверенным, надежным, поэтому на нем можно совершать покупку, не опасаясь за свои средства, конфиденциальность. Совершить покупку вы сможете прямо сейчас и по выгодной стоимости, без переплат. Если появились вопросы, то задайте их службе поддержки, которая ответит на них.
На сайте https://pohudetlegko.ru/ представлена исчерпывающая, актуальная и полезная информация о том, как похудеть правильно, без вреда для организма и максимально эффективно. На сайте вы найдете вдохновляющие истории, советы звезд, которые выглядят младше своего возраста. Есть рецепты блюд, которые созданы из полезных, вкусных ингредиентов. Но при этом они помогут скинуть вес и привести себя в форму к летнему сезону. Рецепты простые и быстрые, а потому справиться с приготовлением пищи сможет каждый. Описаны и упражнения, обертывания для похудения.
На сайте https://mvpol.ru/ воспользуйтесь возможностью заказать промышленные полы напрямую от производителя. Компания «МВПОЛ» оказывает и такую важную услугу, как ремонт промышленных полов, производство полимерных наливных полов, бетонных, у которых упрочненный верх. Также получится узнать расценки на такие услуги, чтобы заранее спланировать бюджет. Для того чтобы иметь представление о том, как выглядят работы, изучите объекты. На все услуги предоставляются гарантии. Вся информация дается максимально быстро.
На сайте https://t.me/rahvalskiy вы сможете ознакомиться с информацией о компании, которая занимается продвижением сайтов «под ключ». Вы сможете воспользоваться всеми комплексными рекламными услугами. В компании работают лучшие, компетентные сотрудники с огромным стажем, а потому они реализуют проект любой сложности и по лучшей стоимости. Для сотрудников нет неисполнимых задач. Они работают независимо от темы проекта и в строго указанные сроки. Можете не сомневаться в том, что получите результат, на который рассчитывали.
На сайте https://kino-wsem.site/publ/doramy/ представлены дорамы в отличном качестве. Все они о любви, дружбе и вечном. Есть произведения за прошлые годы, которые многие пересматривают с особым удовольствием. Навигация поможет вам лучше сориентироваться в выборе и начать просмотр такого фильма, который вызовет у вас приятные, положительные эмоции. Регулярно на портале появляются новые дорамы, которые погрузят вас в удивительный мир. Вы сможете просматривать фильмы в режиме реального времени и на любом устройстве.
На сайте https://xn—-7sbjhqn0bhjc0lk.xn--p1ai/ получите юридическую консультацию по различным вопросам. Компания работает как с физическими, так и частными лицами. На все услуги установлены привлекательные расценки, чтобы воспользоваться ими смог каждый. Предприятие работает в этой сфере более 11 лет. В команде трудятся 11 специалистов, которые справятся с задачей независимо от сложности. К вашим услугам досудебный юрист, досудебное урегулирование, кредитный, семейный юрист, решение страховых споров.
На сайте https://grillhouse-spb.ru/ закажите звонок для того, чтобы проконсультироваться по поводу покупки беседок-гриль, гриль-домиков. Популярная компания «Гриль Хаус» в течение долгого времени производит и собирает беседки, в том числе, для барбекю, а также саун. Все это потребуется для того, чтобы незабываемо провести время на природе и в кругу друзей, близких людей. Все конструкции выполнены из качественных, надежных материалов, которые являются износостойкими. Прямо сейчас изучите каталог доступных для заказа вариантов.
На сайте https://dragon1gaming.site/ вы найдете ТОП букмекерских контор для ставок на спорт и другие события. Вы узнаете, как выбрать официальную, надежную букмекерскую контору, которая, в том числе дает бонусы, отличные коэффициенты и честные выплаты. Вы узнаете, как зарегистрироваться, пополнить счет, какие виды ставок и линий бывают, а также как вывести деньги. Подробнее на сайте.
На сайте https://apostolidi.ru/ вы найдете всю полезную информацию, касающуюся торгов на бирже, а также финансов. Здесь также вы найдете и прогнозы по валютным парам от экспертов, которые работают на совесть. Обязательно публикуются свежие, интересные и информативные записи, которые будут полезны всем без исключения. Также представлен и курс доллара, о котором нужно знать инвесторам. На этом портале вы получаете возможность пообщаться с единомышленниками, задать им вопрос, узнать много нового, интересного.
На сайте https://ptne.ru/ получите бесплатную консультацию по вопросам продажи недвижимости. Вы сможете воспользоваться такой услугой, как оперативный выкуп различной недвижимости в Санкт-Петербурге. При этом получить аванс вы сможете в день обращения. Агентство оказывает такие услуги, как: выкуп квартир, долей, займ до продажи. Выкуп происходит за свои средства, сделка является прозрачной. Адвокаты оказывают полное юридическое сопровождение, консультационную помощь. Если документов не хватает, то их соберут максимально быстро.
Mirtash купить природный камень предлагает. Вы можете по телефону оформить заявку. Мы много работаем и строим долгосрочные отношения с клиентами, основанные на доверии. Вы можете рассчитывать на выгодные условия сотрудничества и удобную систему расчетов. Ищете камни казань купить? Mirtash.ru – тут можно подробнее с информацией о доставке природного камня ознакомиться. Высокий уровень качества услуг мы гарантируем. Позвоните нам для получения консультации. С нами вы достойного партнера получите, который готов в реализации любых проектов помочь.
На сайте https://kabel-silovoj.ru/ воспользуйтесь возможностью приобрести качественный, надежный силовой кабель, который выполнен по ГОСТу и в соответствии с нормативами. Вы совершаете покупку у производителя, а потому установлены привлекательные цены, чтобы сделать это смог каждый. Основными покупателями компании являются профессионалы: электрики, монтажники, прорабы, а также бригадиры. Каждый клиент получает возможность воспользоваться оперативной доставкой, а оплатить так, как удобно.
На сайте https://pohudetlegko.ru/ представлена исчерпывающая, актуальная и полезная информация о том, как похудеть правильно, без вреда для организма и максимально эффективно. На сайте вы найдете вдохновляющие истории, советы звезд, которые выглядят младше своего возраста. Есть рецепты блюд, которые созданы из полезных, вкусных ингредиентов. Но при этом они помогут скинуть вес и привести себя в форму к летнему сезону. Рецепты простые и быстрые, а потому справиться с приготовлением пищи сможет каждый. Описаны и упражнения, обертывания для похудения.
На сайте https://t.me/rahvalskiy вы сможете ознакомиться с информацией о компании, которая занимается продвижением сайтов «под ключ». Вы сможете воспользоваться всеми комплексными рекламными услугами. В компании работают лучшие, компетентные сотрудники с огромным стажем, а потому они реализуют проект любой сложности и по лучшей стоимости. Для сотрудников нет неисполнимых задач. Они работают независимо от темы проекта и в строго указанные сроки. Можете не сомневаться в том, что получите результат, на который рассчитывали.
Visit the largest and most interesting travel blog https://www.atravel.blog/ where you will find interesting facts about different countries of the world, as well as get acquainted with delicious national dishes based on authentic recipes from around the world. Choose an interesting category for you or read the latest events from the world of travel and food!
На сайте https://ooo-rodnik.ru/ уточните телефон популярной компании «Родник», основной сферой деятельности которой является чистка, ремонт скважин по всей Московский области. Предприятие оказывает услуги в своей сфере уже более 5 лет. Работа происходит без выходных, пенсионеры смогут рассчитывать на приятные скидки, бонусы. На все работы дается гарантия в один год. Компания занимается обслуживанием дач, коттеджей, домов, производств, поселков городского типа. Со всеми направлениями деятельности ознакомьтесь на сайте.
На сайте https://market-delivery-dubai.ru/ вы сможете воспользоваться такой полезной услугой, как доставка алкоголя в Дубае. В разделе вы найдете такие напитки, как: бризер, абсент, водка, виски, ликер, пиво, коньяк и многое другое. Вся продукция является сертифицированной, качественной, а потому идеально подойдет для долгожданного события, праздника. Есть последние поступления вкусного и ароматного вина, которое вы сможете приобрести на торжество или для того, чтобы скрасить вечер. Доставка происходит в минимальные сроки.
На сайте https://xn—-8sbaaajsa0adcpbfha1bdjf8bh5bh7f.xn--p1ai/ ознакомьтесь со всеми вариантами антиквариата, который вы сможете продать по честной стоимости. Станислав Бабкин, являясь частным коллекционером, скупает предметы старины дорого. Оценка происходит в режиме реального времени, а средства выплачиваются на карту либо выдаются наличными. Вы сможете продать следующие вещи: серебро, картины, иконы, золотые, серебряные монеты, ордена, часы, самовары и многое другое. Вся сумма выплачивается полностью во время оформления сделки.
Судоходная компания Навигатор https://teplohod-restoran.ru/ это возможность организовать праздник на воде в Санкт-Петербурге. Свадьбы, дни рождения, корпоративы, выпускные, а также банкеты и фуршеты. Мы комплексно подходим к организации любого события. Посетите сайт, посмотрите наш флот и стоимость аренды судов, яхт, катеров, теплоходов.
На сайте https://vezuviy.shop/ вы сможете приобрести чугунные, стальные банные печи, нержавеющие, а также в облицовке, печи-камины, отопительные, каминные топки, дымоходы, порталы и многое другое. Вся продукция от производителя, а потому наценки очень маленькие. Такая техника считается идеальной не только с целью обогрева помещения, но и оформления пространства. А самое главное, что она отличается долгим сроком службы, надежностью из-за того, что в работе использовались высокотехнологичные, проверенные материалы.
На сайте https://vezuviy.shop/ воспользуйтесь возможностью приобрести качественное печное оборудование, а также дымоходы. На все распространяются гарантии. Здесь вы сможете приобрести и аксессуары, которые гарантированно совместимы со всем оборудованием. Доставка осуществляется абсолютно бесплатно. Клиент сможет получить в качестве презента банный камень. На все аксессуары действует скидка 10%. Все печи выполнены из качественных, высокотехнологичных материалов, потому прослужат долгое время.
На сайте https://face-me.ru/ вы сможете попробовать все возможности нейросетей и всего за несколько секунд превратить любое фото в видео. Инновационные и уникальные технологии дают возможность получить роскошную, яркую и любопытную фотосессию без профессионального оборудования, студии. Вы сможете создать фантастические образы и удивительные портреты в соответствии с предпочтениями. Эта программа дарит вам огромное количество возможностей и вдохновение. Вы каждый раз будете получать удивительные, красивые образы, которые всегда будут с вами.
Посетите сайт https://4px.ru/ – 4 Пикселя – это Digital агентство интернет-маркетинга полного цикла в Москве, с комплексным подходом к созданию рекламы в интернете. Ознакомьтесь с нашими выгодными услугами в SEO, Яндекс.Директ, SMM, Serm, разработкой и созданием сайтов и многими другими профессиональными услугами. Ознакомьтесь с нашими кейсами – мы будем рады видеть вас в числе наших клиентов!
Ищете оборудование из Китая по ценам производителя? Посетите сайт https://totem28.ru/ где вы найдете широкий ассортимент не только оборудования, но и спец техники. Наш каталог постоянно пополняется, мы тщательно отбираем новинки китайского машиностроения. Посмотрите наш каталог и узнайте подробнее на сайте.
На сайте https://xn--80aaaaaaxhx2a2ai2af3a8grd.xn--p1ai/ воспользуйтесь услугой, связанной с арендой шатров, которая подходит для любого мероприятия, в том числе, Дня рождения, юбилея, свадьбы. Аренда сделает любое мероприятие ярким, незабываемым. В компании работают проверенные, компетентные специалисты, которые выполнят все необходимые работы, включая установку, расстановку мебели. Имеется огромный выбор снаряжения, которое применяется для кемпинга. Шатер выполнен из современных, качественных материалов, поэтому порадует своим внешним видом.
Visit the site https://findprompt.shop/ which is a trading platform and marketplace for buying and selling prompts for Midjourney, Stable Diffusion, ChatGPT and others. Explore the best AI prompts. A huge selection of prompts of various directions at the most favorable prices. Visit the catalog and see for yourself our significant offer.
На сайте https://mvpol.ru/ воспользуйтесь возможностью заказать промышленные полы напрямую от производителя. Компания «МВПОЛ» оказывает и такую важную услугу, как ремонт промышленных полов, производство полимерных наливных полов, бетонных, у которых упрочненный верх. Также получится узнать расценки на такие услуги, чтобы заранее спланировать бюджет. Для того чтобы иметь представление о том, как выглядят работы, изучите объекты. На все услуги предоставляются гарантии. Вся информация дается максимально быстро.
Ищете изготовление наружной рекламы в Москве? Посетите сайт https://neon-mix.ru/ – мы изготавливаем световые вывески, объёмные буквы, рекламные конструкции и многое другое. Полный цикл — от производства до монтажа по самым выгодным ценам. Реализуем проекты любой сложности, учитываем пожелания заказчика и предлагаем честные, конкурентные цены. Ознакомьтесь со всеми услугами и ценами на сайте.
На сайте https://alkomarket-dubai.ru/ воспользуйтесь возможностью заказать свои любимые алкогольные напитки с доставкой по Дубаю. Курьер приедет к вам по любому указанному адресу и привезет заказ точно в срок, без опозданий, а потому вы сможете начать вечеринку в любое, наиболее комфортное для себя время. Вы сможете заказать напитки у самого надежного, проверенного поставщика, который торгует только проверенным товаром, а потому исключены некачественные напитки. Есть возможность приобрести как крепкий алкоголь, так и легкий, например, пиво.
поломки газового котла
Компания «КАРДЕКС» https://card-oil.ru/ — надежный партнер на рынке топливных решений, работающий более 12 лет. Специализируется на выпуске и обслуживании топливных карт для юридических лиц и индивидуальных предпринимателей. Преимущество КАРДЕКС — доступ к обширной сети из более чем 13000+ АЗС по всей России, включая федеральные и региональные заправочные станции. Это позволяет клиентам заправляться без привязки к конкретному бренду, оптимизируя расходы и логистику. Топливные карты КАРДЕКС обеспечивают удобный контроль затрат, предоставляют детальную аналитику и помогают экономить за счет персонализированных условий и скидок. Компания зарекомендовала себя как стабильный и технологичный игрок, предлагающий инновационные решения для бизнеса.
Услуга срочного выкупа автомобилей https://www.buying-car.ru/ в любом состоянии является идеальным решением для тех, кто хочет быстро и без лишних хлопот избавиться от своего транспортного средства. Предлагаем вам выгодные условия, они позволяют получить деньги в кратчайшие сроки, независимо от года выпуска, пробега или технического состояния автомобиля. Наша команда специалистов готова оценить ваш авто быстро и профессионально. Даже если ваше транспортное средство было повреждено в ДТП, не функционирует или имеет серьезные технические неисправности. Процесс выкупа прост и удобен. Наши эксперты проведут быструю оценку стоимости, и если она вас устроит, мы готовы заключить сделку в тот же день. Мы также предоставляем услуги по бесплатному эвакуатору, если ваше авто не на ходу, что позволяет вам избежать дополнительных трат.
На сайте https://fguard.ru/ почитайте статьи на самую разную тему. К примеру, кибермошенничество, для каких целей используется сеточка, которая на двери микроволновки. Здесь представлена вся нужная информация о смарт-часах и о том, чем они отличаются от бизнес-браслетов. Для того чтобы подыскать нужную информацию, воспользуйтесь специальным рубрикатором. На сайте вы найдете записи, которые касаются нейросетей, гаджетов. Представлены и интересные рекомендации, которые будут необходимы каждому. Имеются данные и про технологии.
Юнитал-М – учебный центр, который компетентные услуги предоставляет. Мы постоянно к совершенству стремимся и с ответственностью к своей деятельности относимся. Гарантируем добросовестность в выполнении своих обязательств, неравнодушие к разным вопросам и качественный сервис. https://www.unitalm.ru – ресурс, где мы рассказываем о том, как значимо на рабочем месте для компаний и специалистов повышение квалификации. Материал в удобной форме показан, педагогический состав располагает к обучению. Вместе мы высочайших результатов достигнем!
Ищете интернет магазин автозапчастей в Минске с выгодными ценами? Посетите https://belautoparts.by/ где вы найдете существенный выбор для все автомобилей с доставкой по всей Беларуси. Подберите запчасти по VIN, марке авто, номеру детали, артикулу, каталогу в иллюстрации. У нас также есть все для ТО – расходники, масла, фильтра и многое другое. В нашем интернет магазине более 30 млн запчастей как оригинальных, так и качественных заменителей. Ознакомьтесь на сайте подробнее!
На сайте https://autopiter.kg/ получится приобрести как оригинальные, так и неоригинальные запчасти, комплектующие для ТО, автохимию и автомасла, аккумуляторы, все для спецтехники. Представлен и каталог ГАЗ, ВАЗ, КАМАЗ. Есть возможность подобрать фильтр для автомобиля. Также представлены и автолампочки. Изучите раздел с рекомендуемыми товарами. Для того чтобы подобрать необходимую деталь, нужно воспользоваться поиском – в строке указать название детали. Все запчасти хранятся на складе и в нужном количестве.
На сайте https://prometall.shop/ получится выбрать печь, а также воспользоваться полным перечнем услуг, которые связаны с печами Prometall, в том числе, реализацией, проведением монтажных работ. Изучите технические характеристики печей, которые находятся в сетке, камне, получится приобрести и отопительные печи, а также устройства в облицовке. Прямо сейчас вы сможете изучить хиты продаж – те товары, которые пользуются особой популярностью. Каталог товаров регулярно обновляется, чтобы вы приобрели лучшее.
На сайте https://d600.ru/ вы сможете заказать тротуарную плитку Steingot и Braer от производителя по доступным ценам. Всегда в наличии полный ассортимент, который хранится на складе, а потому его можно приобрести уже сейчас. Вся продукция уже готова к отправке через ЖД либо авто, независимо от региона. Вы сможете воспользоваться услугами персонального менеджера. Есть возможность оплатить покупку по факту получения. Перед приобретением вы сможете изучить технические характеристики, а также расценки, чтобы приобрести самое выгодное решение.
Блок Маркет предлагает высококачественный строительный материал. Приобрести в нашей компании можно выгодно газобетонные блоки. Мы доверие клиентов заслужили. Получаем многочисленные положительные отзывы. Если нужно мы относительно выбора продукции вас проконсультируем. https://belarus-blok.ru – сайт, где можете ознакомиться с условиями доставки газобетона. Также здесь можно воспользоваться онлайн-калькулятором для расчета необходимого количества газоблоков. Стремимся с каждым покупателем к созданию долговечных отношений.
Visit https://itprof.tech/ and you will learn everything about VPN – how to set up for different services, learn the best VPN for streaming, which VPN are best for gaming in 2025 and much more. Our resource offers useful and up-to-date information, news about VPN and how to work with it. We have structured our content so that each user can easily find answers to their questions.
Etsitko hyodyllista tietoa lainoista? Vieraile osoitteessa https://esimerkkilinkki.fi/ – josta loydat kattavaa tietoa asuntolainasta, vinkkeja lainan hakemiseen, lainojen vertailuun ja paikkaan, kuinka saada laina heti ilman luottotietoja tai luottohistoriaa ja paljon muuta. Hyodyllista tietoa sinulle verkkosivuillamme.
На сайте https://rustreetwear.ru вы найдете огромное количество интересных, разнообразных и эксклюзивных брендов, которые создают роскошную уличную одежду на любые случаи жизни. Есть как совсем не известные марки, которые только начинают свой путь, так и гиганты мировой индустрии. Перед вами самый впечатляющий каталог, где вы найдете не только одежду, но и аксессуары. Каталог обновляется ежедневно, чтобы вы обязательно нашли для себя лучший вариант. Здесь установлены доступные расценки.
На сайте https://stakecasino.tech почитайте про популярное и проверенное онлайн-заведение «Stake Casino». Здесь также имеется и букмекерская контора, где вы сможете сделать свои ставки. Вам обязательно понравится интерфейс, а пользоваться им очень просто. Вас обрадуют бонусы, а также различные акции. А все данные надежно защищены, потому информация точно не попадет злоумышленникам. Каждую неделю организуются турниры, а также розыгрыши. Для каждого желающего доступна мобильная версия, а также зеркало.
На сайте https://belarus-blok.ru/ вы сможете заказать газосиликатные блоки, которые были произведены в Беларуси. Приобрести продукцию получится в один клик и по привлекательной стоимости. Напротив каждого варианта указаны технические характеристики, расценки, что позволит быстрее сориентироваться в выборе. Газобетонные блоки пользуются огромной популярностью благодаря тому, что отличаются компактностью, небольшим весом. К тому же, этот материал негорючий. Есть возможность приобрести перегородочные, стеновые газоблоки лучших белорусских производителей.
Посетите Интернет-магазин автозапчастей АВТО-ЕВРО – https://autoeuro.ru/ и вы сможете купить запчасти для иномарок оптом и в розницу. Поберите автозапчасти по VIN или марке авто или ознакомьтесь с нашим каталогом, в нем представлен лучший выбор запчастей по выгодным ценам. Работаем со всеми регионами России. Подробнее на сайте.
Посетите сайт https://addpets.ru/ – это экспертный блог о том, как ухаживать за домашними животными, как их кормить и какие породы наиболее популярны в России. Вы найдете исчерпывающую информацию о каждом животном, какие у них бывают болезни и как их лечить, познавательную и просто интересную информацию о домашних питомцах. Присоединитесь к обсуждению или присылайте свои интересные статьи!
На сайте https://profstroygroupp.ru/ подберите проект для того, чтобы заказать строительство дома из кирпича. К вашим услугам оперативный вызов на объект для проведения всех необходимых работ. Проект разрабатывается с участием заказчика. Каждый клиент получает возможность воспользоваться комфортной системой скидок, выгодными предложениями. Работы выполняются на основании договора, на них даются гарантии. Для того чтобы получить исчерпывающую информацию по поводу строительства и использования новых технологий, почитайте тематические статьи.
На сайте https://market-delivery-dubai.ru/ вы сможете воспользоваться такой полезной услугой, как доставка алкоголя в Дубае. В разделе вы найдете такие напитки, как: бризер, абсент, водка, виски, ликер, пиво, коньяк и многое другое. Вся продукция является сертифицированной, качественной, а потому идеально подойдет для долгожданного события, праздника. Есть последние поступления вкусного и ароматного вина, которое вы сможете приобрести на торжество или для того, чтобы скрасить вечер. Доставка происходит в минимальные сроки.
На сайте https://vezuviy.shop/ вы сможете приобрести чугунные, стальные банные печи, нержавеющие, а также в облицовке, печи-камины, отопительные, каминные топки, дымоходы, порталы и многое другое. Вся продукция от производителя, а потому наценки очень маленькие. Такая техника считается идеальной не только с целью обогрева помещения, но и оформления пространства. А самое главное, что она отличается долгим сроком службы, надежностью из-за того, что в работе использовались высокотехнологичные, проверенные материалы.
На сайте https://169.ru/ вы сможете зарезервировать как межкомнатные, так и входные двери, напольные покрытия, раздвижные двери и многое другое. Вы сможете самостоятельно рассчитать то, какое количество строительных материалов вам понадобится для того, чтобы реализовать свой проект. Каждая вещь является олицетворением стиля и привлекательного дизайна. Здесь постоянно устраиваются распродажи, что позволит приобрести все, что нужно по лучшей цене. Очень часто здесь проходят акции. Предлагается огромный выбор сервисов и услуг.
Интернет-магазин саженцев Мартин-Сад https://www.martin-sad.ru/ это интернет-магазин питомника растений. Посмотрите наш каталог с выгодными ценами, в нем вы найдете более 9500 сортов. В каталоге вы найдете – хвойные, деревья, плодовые, вьющиеся растения, кустарники, многолетники и многое другое. Посетите сайт и вы обязательно найдете необходимые для себя растения и семена.
Приветствую всех, наша команда создала не официальный канал Jozz Casino. Полный обзор сайта Джоз, приветственных подарков, бездепозитных бонусов и VIP Системы. Присоединяйся сейчас и получи 100 фриспинов за регистрацию. Jozz работает по лицензии Кюрасао. Информация на канале регулярно обновляется Подписывайтесь на канал: @casino_jozz , Ссылка: https://t.me/casino_jozz
На сайте https://vezuviy.shop/ воспользуйтесь возможностью приобрести качественное печное оборудование, а также дымоходы. На все распространяются гарантии. Здесь вы сможете приобрести и аксессуары, которые гарантированно совместимы со всем оборудованием. Доставка осуществляется абсолютно бесплатно. Клиент сможет получить в качестве презента банный камень. На все аксессуары действует скидка 10%. Все печи выполнены из качественных, высокотехнологичных материалов, потому прослужат долгое время.
Welcome to the official Joy Casino blog https://officialjoycasino.net/ — a place where you can explore the fascinating world of online gambling from different perspectives: game mechanics, psychology, responsible gaming and industry analytics. If you are looking for a deep dive into gaming strategies, casino technology or responsible gaming tips, you have come to the right place.
На сайте https://mvpol.ru/ воспользуйтесь возможностью заказать промышленные полы напрямую от производителя. Компания «МВПОЛ» оказывает и такую важную услугу, как ремонт промышленных полов, производство полимерных наливных полов, бетонных, у которых упрочненный верх. Также получится узнать расценки на такие услуги, чтобы заранее спланировать бюджет. Для того чтобы иметь представление о том, как выглядят работы, изучите объекты. На все услуги предоставляются гарантии. Вся информация дается максимально быстро.
Visit the site https://findprompt.shop/ which is a trading platform and marketplace for buying and selling prompts for Midjourney, Stable Diffusion, ChatGPT and others. Explore the best AI prompts. A huge selection of prompts of various directions at the most favorable prices. Visit the catalog and see for yourself our significant offer.
Автозапчасти в Минске и всей Беларуси с доставкой или забрать в пункте выдачи, на сайте https://pyatnitsa.by/ – это возможность выгодно купить запчасти для любого автомобиля. Подбор запчастей по VIN или авто – огромный каталог, низкие цены. Все в наличие. Ознакомьтесь с нашим каталогом – от расходников и материалов для ТО, до подвески, системы охлаждения, электрики и многое другое.
На сайте https://smartporog.ru/ изучите каталог, чтобы приобрести умные выпадающие пороги. Они идеально подходят для дверей различного типа. Автоматические пороги считаются идеальным решением в том случае, если невозможна установка обычного порога. Такие конструкции комфортны в использовании, эффективно борются с преградой в полу, а также сквозняками, мостиками холода. Пороги такого типа не допускают попадания внутрь посторонних запахов, повышают звукоизоляцию. Также пороги защищают от проникновения внутрь насекомых.
На сайте https://1abakan.ru/forum/showthread-275275/ изучите всю интересную, исчерпывающую информацию, которая касается популярного онлайн-клуба «New Retro Casino», которое позволит получить положительный опыт. Специально для вас особые игровые решения, которые помогут вдоволь насладиться процессом и получить от жизни больше приятных эмоций. Официальный сайт предоставляет возможность ознакомиться с огромным количеством слотов, а также видеоигр. Здесь каждый найдет игру на свой вкус. Вас ожидает огромное количество акций, интересных предложений.
Visit the largest and most interesting travel blog https://www.atravel.blog/ where you will find interesting facts about different countries of the world, as well as get acquainted with delicious national dishes based on authentic recipes from around the world. Choose an interesting category for you or read the latest events from the world of travel and food!
Ищете изготовление наружной рекламы в Москве? Посетите сайт https://neon-mix.ru/ – мы изготавливаем световые вывески, объёмные буквы, рекламные конструкции и многое другое. Полный цикл — от производства до монтажа по самым выгодным ценам. Реализуем проекты любой сложности, учитываем пожелания заказчика и предлагаем честные, конкурентные цены. Ознакомьтесь со всеми услугами и ценами на сайте.
Ландшафтный дизайн под ключ https://greenartstudio.ru/ – от Грин Арт Студио это услуги профессионалов от проектирования до реализации и авторского надзора. Посетите наш сайт – посмотрите реализованные проекты – они вам обязательно понравятся, а также ознакомьтесь со всеми нашими услугами, начиная от проектирования и заканчивая уходом за вашим садом, благоустройством участка. Мы работаем с частными лицами, госучреждениями и коммерческими компаниями.
На сайте https://axonbusiness.ru обсудите свой проект для того, чтобы воспользоваться популярными и эффективными решениями компании «A.X.O.N.». Прямо сейчас вы сможете заказать звонок, чтобы узнать стоимость вашего задания. Здесь получится заказать, в том числе, стратегический бизнес-консалтинг, а также готовые ИТ-решения. Лучшие специалисты оптимизируют и автоматизируют все ваши бизнес-процессы, клиентский сервис. Для вас будут разработаны индивидуальные решения для получения большей прибыли.
Компания AVTO197 предлагает услуги аренды автомобилей в Москве, обеспечивая клиентов широким выбором транспортных средств для любых ситуаций. В автопарке https://avtocar5.ru/ представлены модели эконом, среднего и бизнес классов, а также минивэны и коммерческие автомобили. Все машины застрахованы по КАСКО и ОСАГО, что гарантирует безопасность и надежность. Процесс оформления аренды занимает всего 15–20 минут с минимальным пакетом документов. Для постоянных клиентов предусмотрены гибкие системы скидок. Дополнительно компания предоставляет услуги такси и аренду автомобилей для свадебных мероприятий.
На сайте https://boostclicks.ru/ вы сможете ознакомиться с рекомендациями, ценными и важными советами про API интеграцию, скрипты, а также любопытные сервисы из мира трафика. Для того чтобы вам было удобней ориентироваться, все материалы поделены на разделы, что позволит отыскать то, что действительно актуально и интересно в данный момент. Регулярно на портале появляется новый, интересный контент на данную тему. Имеется и список тех статей, которые пользуются особой популярностью. Все они созданы лучшими и высококлассными экспертами с огромным опытом.
Ищете интернет магазин автозапчастей в Минске с выгодными ценами? Посетите https://belautoparts.by/ где вы найдете существенный выбор для все автомобилей с доставкой по всей Беларуси. Подберите запчасти по VIN, марке авто, номеру детали, артикулу, каталогу в иллюстрации. У нас также есть все для ТО – расходники, масла, фильтра и многое другое. В нашем интернет магазине более 30 млн запчастей как оригинальных, так и качественных заменителей. Ознакомьтесь на сайте подробнее!
На сайте https://miners-store.ru/ вы сможете связаться с представителями компании для того, чтобы выбрать и приобрести асики для майнинга. Перед вами функциональное и качественное оборудование, которое требуется для того, чтобы добыть криптовалюту. Изучите всех производителей такого оборудования, которое можно заказать по лучшей стоимости. Есть и самые популярные модели, которые приобретают чаще остальных. Здесь также осуществляется продажа видеокарт. Специалисты соберут специальную ферму для майнинга с нуля.
Посетите сайт https://4px.ru/ – 4 Пикселя – это Digital агентство интернет-маркетинга полного цикла в Москве, с комплексным подходом к созданию рекламы в интернете. Ознакомьтесь с нашими выгодными услугами в SEO, Яндекс.Директ, SMM, Serm, разработкой и созданием сайтов и многими другими профессиональными услугами. Ознакомьтесь с нашими кейсами – мы будем рады видеть вас в числе наших клиентов!
Etsitko hyodyllista tietoa lainoista? Vieraile osoitteessa https://esimerkkilinkki.fi/ – josta loydat kattavaa tietoa asuntolainasta, vinkkeja lainan hakemiseen, lainojen vertailuun ja paikkaan, kuinka saada laina heti ilman luottotietoja tai luottohistoriaa ja paljon muuta. Hyodyllista tietoa sinulle verkkosivuillamme.
На сайте https://remont-okon-63.ru/ уточните номер телефона для того, чтобы воспользоваться такой нужной услугой, как ремонт, регулировка окон независимо от сложности. Прямо сейчас вы сможете воспользоваться возможностью вызвать мастера. Для этого следует указать номер телефона, а также имя. Среди основных услуг, которые оказываются в этой компании, выделяют: ремонт балконных дверей, производство москитных сеток, стеклопакетов. Кроме того, доступен и срочный ремонт конструкций. Все работы выполняются в соответствии с требованиями.
Доставка комплексных обедов в Алматы для ваших сотрудников или на дом на сайте https://bvd.kz/ – у нас широкий ассортимент и выбор блюд по отличным ценам! Ознакомьтесь на сайте с составами и ценами на комплексные обеды. Заключаем договоры на доставку обедов в офисы и административные учреждения, доставляем обеды в школы и детские сады, где нет собственной кухни, в магазины и прочие подобные учреждения, у сотрудников которых нет возможности пообедать в столовой. Подробнее на сайте.
Вместе с t.me/azino777_a у вас есть возможность в увлекательное путешествие по миру азартных игр отправиться. Предлагаем персонализированные предложения и уникальные бонусы. Расскажем, как в Азино начать играть. Вас ждет возможность выиграть крупный приз и невероятные эмоции. Испытайте свою удачу уже сейчас! Ищете azino777 промокод? – тут имеется множество актуальной информации. Собрали самые частые вопросы от игроков. Всегда готовы помочь вам. Приготовьтесь к завлекательным в Азино турнирам. Участвуйте и с другими игроками боритесь за призы!
На сайте https://ooo-rodnik.ru/ уточните телефон популярной компании «Родник», основной сферой деятельности которой является чистка, ремонт скважин по всей Московский области. Предприятие оказывает услуги в своей сфере уже более 5 лет. Работа происходит без выходных, пенсионеры смогут рассчитывать на приятные скидки, бонусы. На все работы дается гарантия в один год. Компания занимается обслуживанием дач, коттеджей, домов, производств, поселков городского типа. Со всеми направлениями деятельности ознакомьтесь на сайте.
Судоходная компания Навигатор https://teplohod-restoran.ru/ это возможность организовать праздник на воде в Санкт-Петербурге. Свадьбы, дни рождения, корпоративы, выпускные, а также банкеты и фуршеты. Мы комплексно подходим к организации любого события. Посетите сайт, посмотрите наш флот и стоимость аренды судов, яхт, катеров, теплоходов.
Ищете оборудование из Китая по ценам производителя? Посетите сайт https://totem28.ru/ где вы найдете широкий ассортимент не только оборудования, но и спец техники. Наш каталог постоянно пополняется, мы тщательно отбираем новинки китайского машиностроения. Посмотрите наш каталог и узнайте подробнее на сайте.
Компания «КАРДЕКС» https://card-oil.ru/ — надежный партнер на рынке топливных решений, работающий более 12 лет. Специализируется на выпуске и обслуживании топливных карт для юридических лиц и индивидуальных предпринимателей. Преимущество КАРДЕКС — доступ к обширной сети из более чем 13000+ АЗС по всей России, включая федеральные и региональные заправочные станции. Это позволяет клиентам заправляться без привязки к конкретному бренду, оптимизируя расходы и логистику. Топливные карты КАРДЕКС обеспечивают удобный контроль затрат, предоставляют детальную аналитику и помогают экономить за счет персонализированных условий и скидок. Компания зарекомендовала себя как стабильный и технологичный игрок, предлагающий инновационные решения для бизнеса.
Спецкор Дніпро: Новини міста Дніпра і Дніпропетровської області – https://spetskor.dp.ua/ . Актуальні новини Дніпра і Дніпропетровської області. Довідкова, та корисна інформація про місто.
Ищете топливные карты для юридических лиц и ИП? Обратите внимание на единую топливную карта ЛИОТЭК для бизнеса. Узнайте на сайте https://liotec.ru/ все преимущества выгодной карты Лиотек и какие огромные преимущества она дает, по сравнению с другими картами. Подробнее на сайте.
Создание QR кодов
This post is a fantastic guide for retro gaming enthusiasts! I love how you broke down the setup process for different emulators and provided ROM links. It brings back so many nostalgic memories, and I can’t wait to dive into some classic games. Thanks for the great resource!
Great post! I love the detailed setup guide for retro gaming on Kodi. It’s been a while since I played my favorite classics, and your recommendations for ROMs and emulators will definitely help me get started. Thanks for sharing the tips!
четырехскатная крыша
кухня інтер єр
стільниця з епоксидної смоли
I realize this may be off topic, but does Kodi download the emulators to? I need this information to configure Rom Collection Browser with the emulator and can’t find the emulators I’ve downloaded through Kodi. Thanks
Nice Guide…. Thank you